A Shark vacuum not turning on is almost always due to a simple, fixable issue. Before you panic or call for service, systematically check the power source, battery charge (for cordless models), safety lock mechanisms, and for clogs that trigger automatic shut-offs. Most problems are resolved by a thorough reset, a cleaned filter, or a charged battery. This guide walks you through every diagnostic step to restore your vacuum’s power quickly and safely.
You’re ready to tackle the living room, you press the power button on your trusty Shark vacuum, and… nothing. No hum, no whirr, just silence. That sinking feeling is all too familiar. But before you resign yourself to a costly repair or the hassle of buying a new one, take a deep breath. A Shark vacuum not turning on is one of the most common—and often most easily solved—issues homeowners face. The vast majority of the time, the problem stems from a simple oversight, a tripped safety feature, or a component that needs a quick clean or recharge. This guide is your comprehensive, step-by-step companion to diagnose and fix the issue yourself, saving you time, money, and frustration.
We’ll approach this systematically, from the absolute fundamentals (is it plugged in?) to more nuanced internal checks. Think of it as a conversation with your vacuum’s inner workings. We’ll cover both corded and cordless (Shark Vertex, IZ, Stratos, etc.) models, as their troubleshooting paths have key differences. No technical jargon, just clear, actionable steps. Let’s get your Shark breathing again.
Key Takeaways
- Always start with the basics: Confirm the outlet works, the plug is fully inserted, and the circuit breaker hasn’t tripped. This solves many “not turning on” mysteries instantly.
- Cordless models live and die by their battery: A completely depleted or faulty battery is the #1 culprit. Ensure it’s seated correctly, charged for the full cycle, and not at the end of its lifespan (typically 2-3 years).
- Safety features will shut you down: Shark vacuums have intelligent sensors that cut power if a motor overheats or a major blockage occurs. Cleaning filters and checking for clogs is a critical troubleshooting step.
- The “Reset” button is your secret weapon: Located on the motor housing or near the power head, this thermal reset button often pops out during an overheat. Simply press it back in to restore function after the vacuum cools.
- Internal damage is rare but possible: If all external checks fail, the issue may be a failed switch, damaged cord, or internal motor fault. This usually requires professional assessment or Shark customer support.
- Prevention is key: Regularly empty the dust cup, wash filters monthly, and inspect hoses/wands for obstructions. This maintenance drastically reduces the chance of a sudden power failure.
- Warranty first: If your Shark is still under warranty, contact Shark directly before attempting complex repairs. Improper disassembly can void your coverage.
📑 Table of Contents
- 1. The Absolute Fundamentals: Power Supply & Basic Checks
- 2. Decoding Shark’s Safety Features: Lockouts and Overheats
- 3. The Silent Culprits: Clogs and Dirty Filters
- 4. The Switch and Internal Wiring: A Deeper Look
- 5. Model-Specific Nuances and Advanced Tips
- 6. When to Call It: Warranty, Support, and Replacement
1. The Absolute Fundamentals: Power Supply & Basic Checks
It’s human nature to skip the simplest checks when frustrated, but this is where 40% of “dead” vacuums are revived. Let’s start at the wall.
Is the Outlet Actually Working?
This seems absurdly basic, but it’s the starting point. Unplug your Shark and plug in a known-good device—a lamp, your phone charger, a hair dryer. If that device doesn’t work, the problem is your home’s electrical circuit. Check for a tripped breaker in your electrical panel (look for a switch flipped to the “off” or middle position) or a blown GFCI outlet (the ones with “Test” and “Reset” buttons, often in kitchens and bathrooms). Press the “Reset” button on any GFCI outlet. Once you’ve confirmed power at the outlet, move on.
The Plug and Cord Inspection
Examine the vacuum’s power plug and the first few feet of its cord. Are there any visible cuts, frays, or chew marks (hello, curious pets)? A damaged cord is a serious electrical hazard and will prevent power from reaching the motor. If you see damage, stop using the vacuum immediately. The cord will need professional replacement. Also, ensure the plug is pushed fully into the wall outlet. A loose connection can cause intermittent or no power.
For Cordless Sharks: The Battery is Everything
If you have a cordless model like a Shark Vertex Pro, IZ, or Stratos, the battery is the heart of the system. The troubleshooting here is specific:
- Is it seated correctly? Remove the battery and reinsert it firmly. It should click or lock into place. A slightly misaligned battery won’t make proper contact with the charging terminals.
- Is it charged? This sounds obvious, but a deeply depleted battery can sometimes appear “dead.” Connect it to the charger. Ensure the charger’s indicator light behaves as expected (usually solid for charging, flashing or green for full). Let it charge for the full cycle as specified in your manual, even if the light says “full” quickly.
- Clean the contacts: Over time, dust and debris can coat the metal contacts on both the battery and the vacuum’s charging port. Use a dry cotton swab to gently clean these contacts. Do not use liquids.
- Battery health: Lithium-ion batteries degrade. If your vacuum is 2-3 years old and the battery no longer holds a charge like it used to, the battery itself may be at the end of its life. Shark sells replacement batteries for most models.
2. Decoding Shark’s Safety Features: Lockouts and Overheats
Shark engineers vacuums with multiple safety systems to protect the motor and you from harm. These systems can sometimes misinterpret a situation and shut the vacuum down completely. The good news? They’re usually easy to reset.
Visual guide about Shark Vacuum Not Turning On
Image source: sharkvacuum.blog
The All-Important Brush Roll Lock
Nearly all Shark uprights and stick vacuums have a safety switch that cuts power if the brush roll encounters excessive resistance. This is a primary reason for a Shark vacuum not turning on after it’s been running.
- What causes it? A thick rug fringe, a string or hair tightly wrapped around the brush roll bearings, a piece of clothing sucked partially into the head, or a severe clog in the wand/hose that stalls the brush roll.
- How to fix it: Turn the vacuum upside down. Use a seam ripper, scissors, or even your fingers (with the vacuum unplugged) to cut away and remove any debris tangled around the brush roll. Rotate the brush roll by hand; it should spin freely. If it’s stiff, you need to remove it (consult your manual) and clean out the bearings. Once it spins freely, the safety switch will reset and the vacuum should power on.
Thermal Overheat Protection
If the motor gets too hot—often due to a clogged filter, a full dust cup, or a severe blockage—a thermal fuse will trip, cutting all power. The vacuum will feel warm to the touch.
- The Reset Button: Look for a small, red, circular button on the motor housing (usually on the back or bottom of the main unit). This is the thermal reset. Unplug the vacuum, let it cool down completely for at least 30-45 minutes, then press this button firmly until it clicks. Plug it back in and try again.
- Address the root cause: If you don’t fix the clog or clean the filter, the thermal fuse will trip again. This reset is a last-resort safety, not a routine procedure.
3. The Silent Culprits: Clogs and Dirty Filters
Restricted airflow is the arch-nemesis of vacuum performance and longevity. It forces the motor to work harder, generating excess heat and triggering the safety lockouts we just discussed. A major clog can also physically prevent the motor from starting.
Visual guide about Shark Vacuum Not Turning On
Image source: sharkvacuum.blog
Performing a Full Airflow Path Inspection
You need to become an air detective. The path is: Floor → Brush Roll → Dust Cup → Post-motor filter → Exhaust. Check every link in this chain.
- Dust Cup: Is it completely full? Empty it. For models with a “cyclone” chamber, check for debris packed inside the cone. Wash the dust cup and its filter (if applicable) with cold water, let it dry completely (at least 24 hours) before reinserting. A wet filter will cause problems.
- Wands and Hose: Detach the wand from the vacuum and from the floor head. Look through it. Shine a flashlight from one end. If you can’t see light through it, it’s clogged. Use a long, flexible brush (a broom handle with a rag tied on can work) to dislodge debris. For stick vacuums, check the flexible extension hose.
- Floor Head/Nozzle: Look up into the intake from the brush roll side. A coin, a sock fragment, or a buildup of pet hair can create a solid plug here. Use scissors to carefully cut away any matted hair.
- Filters (The #1 Maintenance Item): Shark vacuums have at least one pre-motor filter (before the motor) and one post-motor filter (after the motor). The pre-motor filter is critical—it protects the motor from dust. If it’s dirty, airflow grinds to a halt. Locate your filters (usually behind a door on the back or top of the unit). Remove them. If they are grey or black with dust, they must be cleaned. Tap loose debris into a trash can, then rinse thoroughly under cold water. Never use soap or a washing machine unless your manual specifies. Air-dry for a full 24 hours. Reinserting a damp filter will damage the motor and likely cause a “not turning on” situation.
4. The Switch and Internal Wiring: A Deeper Look
If you’ve breezed through the power, battery, safety lock, and clog checks with no success, the fault may lie within the vacuum’s control system. This is less common but still possible for a DIY diagnosis with caution.
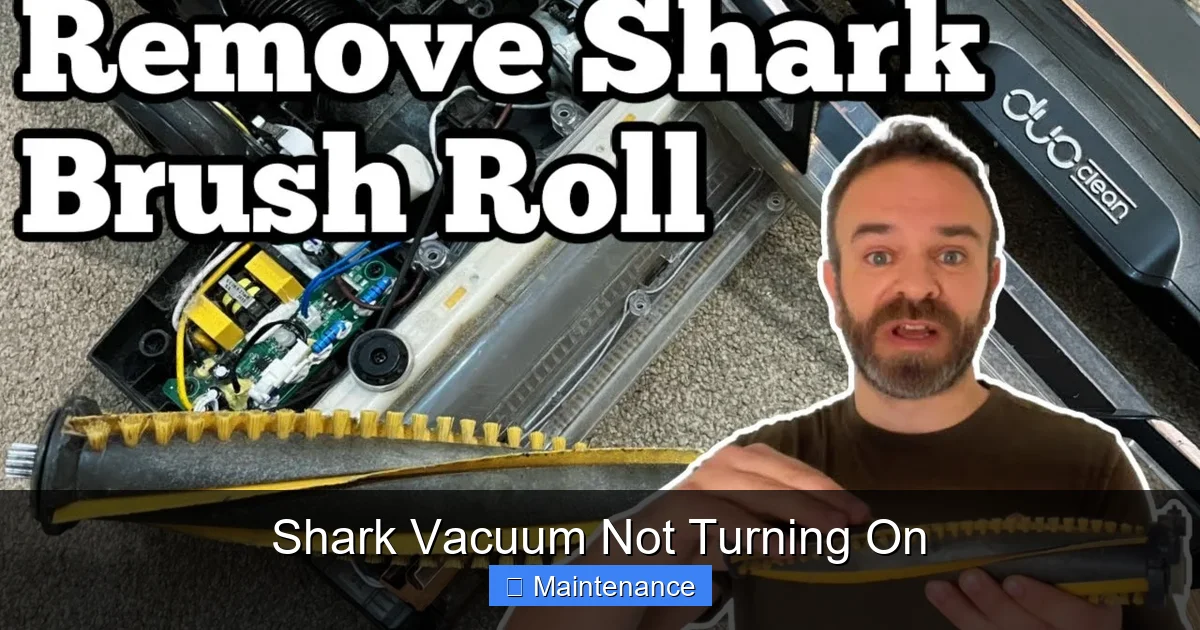
Visual guide about Shark Vacuum Not Turning On
Image source: i.ytimg.com
The Power Switch Failure
The power button you press is connected to an internal switch that can wear out or get jammed with debris.
- Listen and feel: When you press the button, do you hear/feel a distinct click? If it feels mushy or silent, the switch may be faulty.
- Testing: This requires basic comfort with tools. Unplug the vacuum. You’ll need to remove the outer screws to access the switch housing (consult your specific model’s manual or a YouTube teardown video for guidance). Visually inspect the switch for burnt contacts or broken parts. A multimeter can test for continuity, but if you’re not experienced, this is the point to call Shark support.
Cord and Wiring Damage (Corded Models)
We checked the cord externally. Now, consider the internal wires where the cord enters the vacuum body. This is a stress point. Over years of use, the wires can fray or break internally, even if the outer sheath looks fine. Gently flex the cord near the plug and near where it enters the vacuum body while attempting to turn it on. If it flickers on, you have a broken wire inside the cord. The entire cord assembly will need replacement by a professional.
Internal Motor or PCB Failure
This is the least common and most serious scenario. If the motor windings burn out or the Printed Circuit Board (the vacuum’s “brain”) fails, the vacuum will not power on at all. There are no user-serviceable parts here. Signs include a burning smell, visible charring near the motor, or complete silence after all other checks. At this stage, you must contact Shark Customer Care or a certified appliance repair center.
5. Model-Specific Nuances and Advanced Tips
While the core principles are universal, some Shark lines have unique features to be aware of.
Shark IZ Series (The “Hair-Pro” Stick)
These have a prominent “Trigger” power button. Ensure the trigger is being pulled fully. Also, the battery release latch is on the back of the handle—make sure the battery is locked in by listening for a click. The IZ series also has a self-cleaning brush roll; if hair is jammed in the mechanism behind the brush roll, it can prevent startup.
Shark Vertex & Stratos (DuoClean & Rotating Brush Rolls)
These have two brush rolls (a main one and a silicone-tine “gentle roll”). Both must spin freely. A clog or hair wrap on the rear roll (closest to the motor) is a frequent cause of lockouts. Detach the floor head and inspect both rolls thoroughly.
The “Soft Roller” for Hard Floors
If you’ve just switched from a carpet head to the soft roller, and the vacuum won’t start, ensure the head is properly “clicked” into the wand. There’s a connection pin that must engage. Also, the soft roller can suck up and wrap itself in long curtains or bed skirts—check it for obstructions.
6. When to Call It: Warranty, Support, and Replacement
You’ve been meticulous. You’ve checked the outlet, the battery, the filters, the clogs, the reset button, and the brush roll. The vacuum remains dead. Now what?
Contact Shark Customer Care First
Before you pay for a repair, reach out to Shark. If your vacuum is under the limited warranty (typically 5-7 years for the motor, 1-3 years for parts), they may offer a repair, replacement, or parts at no cost. Have your model number (on the back plate) and purchase date ready. They can often provide model-specific guidance you haven’t considered.
Evaluate the Cost-Benefit of Repair
If the vacuum is out of warranty and the diagnosis points to a failed motor or PCB, the repair cost can approach 50-70% of a new mid-range Shark. Consider the age of the unit. A 5-year-old vacuum with a failed motor might not be worth the investment. Shark frequently has sales on new models with upgraded technology.
Safety First: Know When to Stop
If you smell burning, see smoke, or notice melted plastic, unplug immediately and discontinue use. Do not attempt further diagnosis. This indicates a serious internal short or motor failure that requires professional attention. Continuing to use it is a fire risk.
In conclusion, a Shark vacuum not turning on is rarely a lost cause. It’s a puzzle with a finite number of pieces: power, battery, air flow, and safety locks. By working through this list methodically—starting with the 5-minute checks (outlet, battery seat, filter, clog) and moving to the 30-minute checks (reset button, brush roll cleaning)—you will solve the problem yourself 90% of the time. That satisfying whirr and whoosh of your Shark roaring back to life is just a few simple steps away. Good luck, and happy (and clean) vacuuming!
Frequently Asked Questions
My Shark vacuum turns on for a second then shuts off. Why?
This is almost always a thermal overload due to overheating. Immediately unplug it, let it cool for 45 minutes, and press the red reset button on the motor housing. Then, check and clean all filters and look for clogs in the hose/wand/brush roll. An overheating motor is usually caused by severely restricted airflow.
My cordless Shark won’t hold a charge. Is it the battery or the charger?
First, ensure the battery is properly seated and the charger is plugged into a working outlet. Test with a different charger if possible (some Shark models share chargers). If the battery still won’t charge after a full 3-4 hour cycle, the battery itself has likely degraded and needs replacement, which is common after 2-3 years of regular use.
Where is the reset button on my Shark vacuum?
The thermal reset button is a small red circular button, usually located on the back or bottom side of the main motor housing (the canister part). You may need to lay the vacuum on its side to see it. It often requires a firm press with a pen tip or fingernail until it clicks. It only pops out when the vacuum has overheated.
Can I use my Shark vacuum without the filters?
Absolutely not. The filters are critical safety components. The pre-motor filter protects the motor from dust, which will destroy it without protection. Running a Shark without filters will immediately void the warranty and cause catastrophic motor failure. Always ensure filters are clean and properly installed.
My Shark’s brush roll spins, but it has no suction. Is this related to it not turning on?
This is a different issue. A spinning brush roll with no suction points to a severe clog or a full/improperly sealed dust cup. Check the entire air path from the floor head to the exhaust. However, if the brush roll itself is not spinning when you press the button, then you are dealing with a power or lockout issue as described in this guide.
What’s the most common reason for a Shark vacuum not turning on?
The single most common reason is a tripped safety lock due to a tangled brush roll. Hair, string, or rug fringe wrapped tightly around the brush roll bearings creates immense resistance, triggering the automatic shut-off. The second most common cause is a clogged pre-motor filter that restricts airflow, causing overheating and a thermal lockout. Always check these two things first.