A broken or worn vacuum belt is a common Shark Navigator issue that renders your cleaner useless. Replacing it is a simple, cost-effective DIY fix most homeowners can do in under 30 minutes with basic tools. This guide provides everything you need: how to identify the correct belt, a detailed walkthrough for replacement, and essential maintenance tips to prevent future failures and keep your vacuum running powerfully for years.
Key Takeaways
- The belt is the critical link: It transfers power from the motor to the brush roll, which agitates carpet fibers. A broken belt means no brush roll spin and poor cleaning performance.
- Signs of failure are obvious: Listen for a high-pitched squeal, notice a loss of suction on carpets, or see a burnt rubber smell. The brush roll may not spin at all when the vacuum is on and tipped over.
- Correct belt identification is crucial: Shark Navigator models use specific belt sizes. Always check your model number (on the vacuum’s back or underside) and buy an OEM Shark belt or a verified compatible aftermarket part.
- Replacement is a simple 10-step process: It involves removing the bottom plate, taking out the old belt, stretching the new one over the motor pulley and brush roll, and reassembling. No special tools are needed beyond a screwdriver.
- Preventative maintenance extends life: Regularly clean the brush roll of hair and debris, check the belt for cracks or glazing, and ensure the vacuum isn’t forced over large objects that can jam the brush roll and snap the belt.
- Post-replacement issues are usually simple: If the brush roll doesn’t spin after a new belt is installed, it’s likely installed incorrectly, the belt is twisted, or the brush roll bearings are clogged with debris.
📑 Table of Contents
- Why Your Shark Navigator’s Belt Matters: The Heart of the Cleaning System
- Spotting the Signs: How to Know Your Belt Needs Replacement
- Choosing the Correct Replacement Belt: Avoiding Costly Mistakes
- Step-by-Step: Replacing Your Shark Navigator Vacuum Belt
- Preventative Maintenance: Making Your New Belt Last Longer
- Troubleshooting: What to Do If Things Go Wrong After Replacement
- The Bottom Line: Empowerment Through Simple Repair
Why Your Shark Navigator’s Belt Matters: The Heart of the Cleaning System
Your Shark Navigator vacuum is a marvel of engineering, designed to tackle both hard floors and deep-pile carpets with ease. At the core of its powerful carpet-cleaning ability is a simple, often overlooked component: the vacuum cleaner belt. This unassuming rubber loop is the vital mechanical link that transfers the rotational power from the vacuum’s motor all the way to the brush roll—that spinning cylinder bristled with nylon bristles. Without a functioning belt, your Shark Navigator becomes just a suction device, struggling to lift embedded dirt from carpet fibers. Understanding this part is the first step to becoming a confident DIY repair homeowner and ensuring your vacuum lasts for years.
Think of the belt like the serpentine belt in your car. It’s a wear item, meaning it’s designed to degrade over time and use. Factors like accumulated carpet fibers, hair, and general friction cause it to stretch, crack, or even snap. When it fails, the symptoms are unmistakable: a sudden silence where the brush roll’s vigorous scrubbing once was, a noticeable drop in cleaning performance on carpets, or that telltale burning rubber odor. Replacing this belt is one of the most frequent and straightforward repairs for the Shark Navigator line. It’s a perfect entry point into vacuum maintenance, saving you the cost and hassle of a service call or prematurely replacing a perfectly good machine.
Spotting the Signs: How to Know Your Belt Needs Replacement
Before you can fix the problem, you must correctly diagnose it. A failing belt doesn’t always announce itself with a dramatic snap. Often, it gives you subtle warnings. Learning to recognize these signs early can prevent a complete breakdown and save you from unnecessary part replacements. The key symptoms all point to one thing: the brush roll is not being driven by the motor.
Visual guide about Shark Navigator Vacuum Belt Replacement
Image source: homemadebklyn.com
The Auditory Clues: Squeals and Silences
The most common audio indicator is a high-pitched squealing or screeching noise. This sound happens because the belt is slipping on the motor pulley due to loss of tension, glazing (a shiny, hardened surface from heat), or partial breakage. You’ll hear it most prominently when the brush roll is engaged and in contact with carpet. Conversely, if you hear the motor running normally but the brush roll is completely silent and still when you tilt the vacuum to look at it, the belt has likely snapped entirely. A broken belt will sometimes get tangled inside the roller head cavity, which you might discover during inspection.
The Performance Drop: From Deep Clean to Surface Sweep
On hard floors, your Shark Navigator might seem fine because suction alone can pick up debris. But switch to a carpet, especially a medium or high-pile one, and you’ll immediately notice something is wrong. The vacuum will feel like it’s just gliding over the surface, failing to “grab” the carpet. That deep, embedded dirt and pet hair that used to be sucked up with ease now remains behind. This is the classic sign of a non-spinning brush roll. The brush roll’s agitation is what kicks debris up into the suction stream; without it, you’re only getting about 30-40% of the cleaning power on carpets.
The Physical Evidence: Smells and Visual Inspection
A distinct smell of burning rubber is a definitive red flag. This occurs when a slipping belt generates excessive heat through friction. If you catch this smell, turn off the vacuum immediately to prevent further damage to the belt or nearby components. The final and most reliable diagnosis is a hands-on inspection. Always unplug the vacuum first. Turn it over and locate the brush roll access plate on the underside—it’s usually a large rectangular or oval cover secured by 4-6 screws. Remove the screws and plate. Look at the belt. Is it cracked, frayed, stretched out (you shouldn’t be able to easily twist it a full turn), or glazed and shiny? Is there rubber dust or debris wrapped around the brush roll bearings? If the answer is yes to any of these, the belt needs to go.
Choosing the Correct Replacement Belt: Avoiding Costly Mistakes
This is the most critical step before you even pick up a screwdriver. Shark Navigator models span several series (Lift-Away, Pro, Pet, etc.) and generations. Using the wrong belt—one that is too long, too short, or the wrong width—will result in immediate failure, excessive wear on the motor bearings, or a brush roll that won’t spin at all. You have two primary paths to obtaining the correct part.
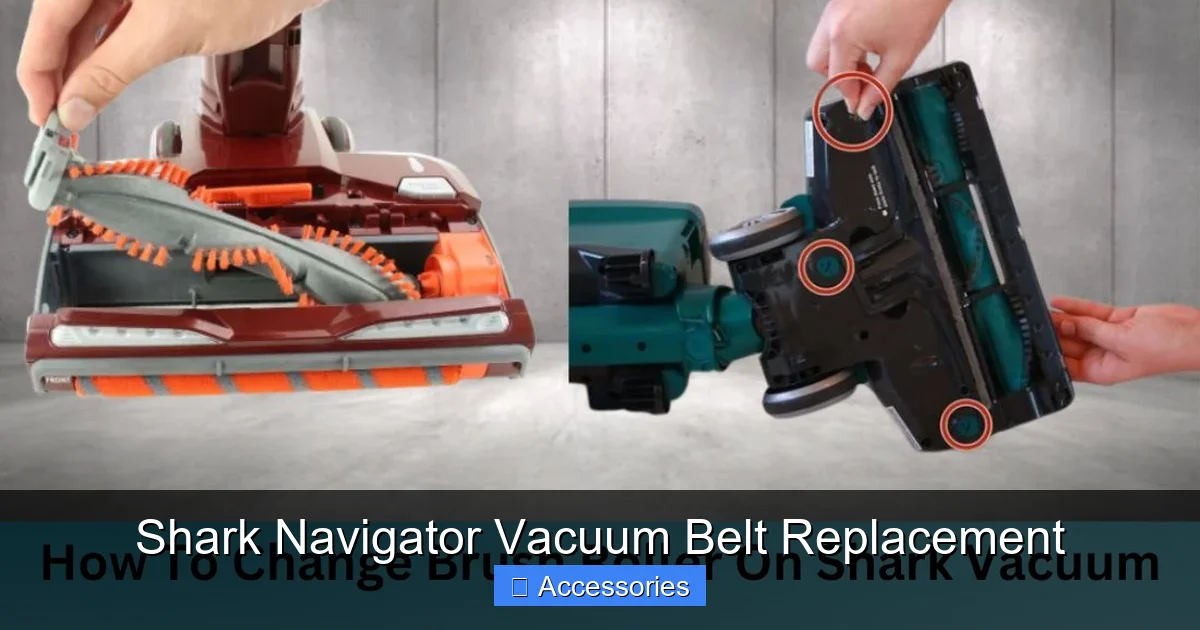
Visual guide about Shark Navigator Vacuum Belt Replacement
Image source: sharkvacuum.blog
Path 1: The OEM (Original Equipment Manufacturer) Route
The safest, most guaranteed method is to purchase a genuine Shark belt. These are designed explicitly for your model’s specifications. To find yours, you need the exact model number. It’s printed on a label on the back or bottom of the vacuum canister, often near the power cord. It will look something like “NV352, NV356, NV500, etc.” Once you have it, visit the official Shark website or an authorized retailer like Amazon’s Shark store. Search for “Shark [Your Model Number] belt.” The part number will typically be something like “XHF/01” or “B01N4G5H0C” (for older models). While often slightly more expensive than generic options, you have 100% certainty of fit and performance.
Path 2: The Aftermarket & Universal Belt Route
Many third-party manufacturers sell “compatible” or “universal” vacuum belts. These can be excellent value, but they require extreme diligence. You must cross-reference the OEM part number or the physical dimensions of your old belt. Key measurements are the belt’s length (in inches or millimeters) and its cross-section (width and thickness, often noted as something like “RB-2” or “flat belt 3/16″x1/4”). Reputable aftermarket brands like Enviro-Care, BestVacuumBelts, or Belts.com provide detailed compatibility charts. Read customer reviews specifically mentioning your Shark Navigator model. A poorly made aftermarket belt can stretch quickly, slip, or break prematurely, negating any initial savings.
A Pro-Tip for the Ambiguous Model Owner
If your model label is worn off or you’ve lost it, the best practice is to remove the old belt and take it with you to a local vacuum repair shop or measure it yourself with a flexible tape measure. Count the number of ribs on the inside of the belt (Shark belts typically have 3 or 4 ribs). Note the length by laying it flat. This physical evidence is more reliable than guessing based on a similar-looking model series. When in doubt, the small investment in a genuine Shark part is the stress-free choice.
Step-by-Step: Replacing Your Shark Navigator Vacuum Belt
With the correct new belt in hand and the vacuum unplugged, you’re ready for the repair. The process is remarkably similar across nearly all Shark Navigator uprights. Set aside 15-30 minutes. Have your screwdriver ready (usually a #1 or #2 Phillips). A flashlight can be helpful. Work on a clean, flat surface like a kitchen table or garage floor.
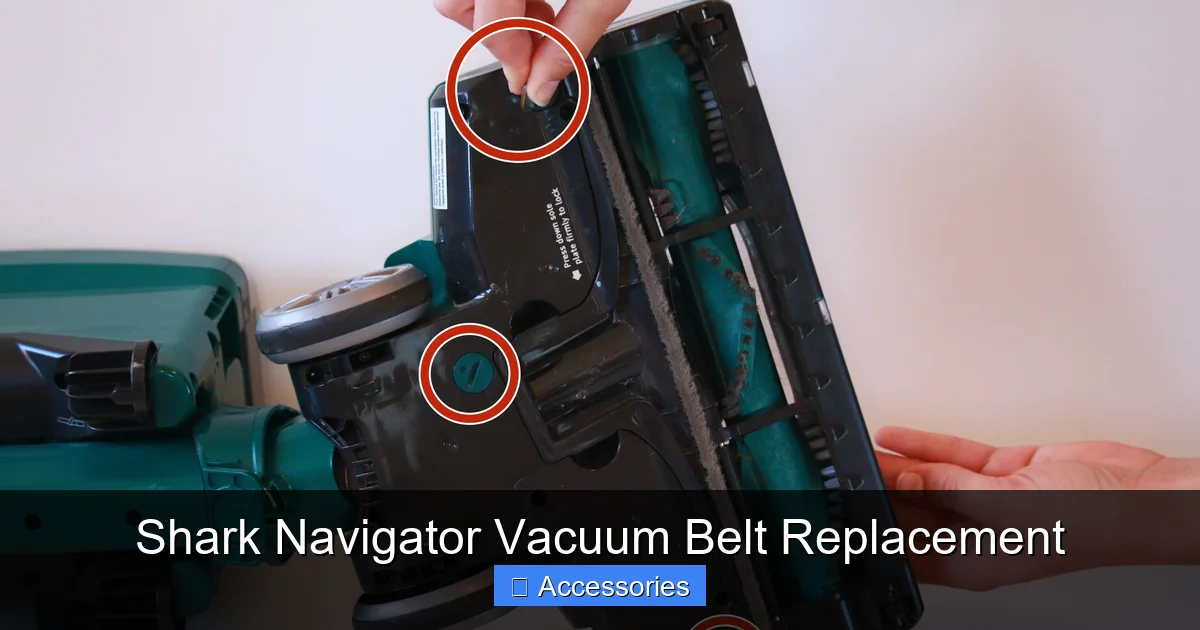
Visual guide about Shark Navigator Vacuum Belt Replacement
Image source: guide-images.cdn.ifixit.com
Step 1: Access the Brush Roll Chamber
Turn the entire vacuum cleaner upside down. You will see the large brush roll housing on the underside. It is covered by a plastic plate, typically black or dark gray, that runs the width of the vacuum head. This plate is held on by 4 to 6 screws. Use your screwdriver to remove all of them. Be careful not to drop them into the vacuum head. Place the screws in a small cup or bowl. Once all screws are out, gently pry the plate off. It may have a tight seal; a plastic pry tool can help, but your fingers often suffice.
Step 2: Remove the Old Belt
With the plate off, you’ll see the brush roll (a long cylinder with bristles) and the motor pulley (a small rubber wheel) at the other end of the housing. The belt will be looped around both. First, slide the brush roll out of its housing just far enough to release the tension on the belt. You don’t need to remove it completely yet. Now, simply pull the belt off the motor pulley. It will slip off easily. Then, slide the brush roll the rest of the way out of the housing. The belt should now be free. Carefully pull it off the brush roll’s groove. Take a moment to inspect the old belt—this confirms your diagnosis. Note any debris or hair wrapped around the brush roll’s bearings (the plastic caps on each end).
Step 3: Clean the Brush Roll and Housing (A Critical Step!)
This is the step that separates a good repair from a great one. Before installing the new belt, you must clean the brush roll thoroughly. Use a seam ripper, a dedicated brush cleaning tool, or even just your fingers to pull out every single hair, fiber, and string wound around the brush roll bristles and, most importantly, around the two metal axles and plastic bearing caps at each end. If debris is packed in there, it will create drag, causing the new belt to slip, overheat, and break prematurely. Also, wipe out the inside of the brush roll housing and the motor pulley with a dry cloth to remove any accumulated dust and rubber dust.
Step 4: Install the New Belt on the Brush Roll
Take your new belt. It will be a continuous loop. Stretch it slightly and place it onto the groove of the brush roll. It should fit snugly and sit flat in the groove without twisting. Give it a gentle spin to ensure it’s seated properly and isn’t pinched.
Step 5: Reinstall the Brush Roll and Loop the Belt
Slide the brush roll back into its housing, making sure the two ends (with the bearings) sit properly in their plastic slots. The belt will be hanging off one side. Now, the tricky part: stretch the belt and loop it over the motor pulley. The motor pulley is usually spring-loaded or has a little give. You’ll need to pull the belt taut and slide it onto the pulley. It requires firm pressure. Ensure the belt is sitting straight on both the brush roll and the motor pulley, not twisted. A twisted belt will cause violent vibration and immediate failure.
Step 6: Test Before Reassembling
Do not screw the bottom plate back on yet! Plug the vacuum in (keep it upside down on a safe surface). Turn it on. The brush roll should spin vigorously. Listen—there should be no squealing. Look—the belt should be tracking straight, not hopping off the pulleys. If it doesn’t spin, unplug immediately. Common reasons: the belt is not fully on the motor pulley, it’s twisted, or the brush roll bearings are still clogged. If it squeals, the belt may be too loose (stretch it more onto the pulley) or the pulley is worn (rare). Once you confirm smooth, quiet operation, unplug the vacuum.
Step 7: Final Reassembly
Align the bottom plate with its screw holes. Press it into place. It should fit flush. Insert all the screws you removed earlier and tighten them securely in a star pattern (tighten one a little, then the opposite one) to ensure even pressure and a good seal. Don’t overtighten and crack the plastic.
Step 8: Final Test and Enjoy
Plug the vacuum in and give it a full test on a carpet. You should immediately notice the return of the familiar deep-cleaning agitation. The vacuum should pull itself into the carpet slightly. There should be no unusual noises. Congratulations! You’ve successfully performed a Shark Navigator vacuum belt replacement and saved yourself a significant repair bill.
Preventative Maintenance: Making Your New Belt Last Longer
You’ve just installed a new belt. Now, protect your investment. The life of a vacuum belt is directly tied to how you use and maintain your Shark Navigator. Following these simple habits can easily double or triple the time between replacements.
Become a Brush Roll Cleaning Champion
This is the single most important maintenance task. Every 3-5 uses, especially if you have pets or long hair, turn the vacuum over and manually check the brush roll. Use your fingers or a cleaning tool to remove any hair and fibers wrapped around the bristles and, crucially, the axles. This debris acts as a brake, putting immense strain on the belt as the motor fights to turn the jammed brush roll. A clean brush roll spins freely and puts minimal stress on the belt.
Mind What You Vacuum
Your Shark Navigator is powerful, but it’s not indestructible. Avoid vacuuming large, hard objects like coins, paperclips, small toys, or hard plastic pieces. These can jam the brush roll instantly, causing the belt to burn out or snap. Be extra cautious with items like stray shoelaces, extension cords, or Christmas tree tinsel—these are notorious for wrapping tightly around the brush roll and bearings. If you suspect something has been sucked in, turn off the vacuum immediately and check.
Regular Inspection During Routine Tasks
Incorporate a quick belt check into your regular vacuum maintenance. Every few months, when you’re emptying the dust cup and cleaning the filters, take an extra 30 seconds to flip the vacuum over, remove the bottom plate, and glance at the belt. Look for the early signs: a shiny, glazed appearance, small cracks, or excessive stretching. Catching a belt that’s on its last legs allows you to replace it proactively, avoiding a sudden breakdown when you need the vacuum most.
Store It Properly
If you store your vacuum in a garage or basement where temperatures can fluctuate drastically, extreme cold can make rubber belts brittle and more prone to cracking. Store your vacuum in a moderate temperature environment when possible. Also, avoid storing it with heavy objects resting on the brush roll housing, which could compress the belt.
Troubleshooting: What to Do If Things Go Wrong After Replacement
You followed all the steps, but something’s not right. Don’t panic. Most post-replacement issues have simple, logical fixes. Here’s a diagnostic guide.
“My Brush Roll Isn’t Spinning With the New Belt”
This is the most common post-installation problem. First, unplug the vacuum. The most likely cause is an incorrectly installed belt. Double-check that the belt is looped around both the motor pulley and the brush roll groove. It’s easy to miss the motor pulley. Next, ensure the belt isn’t twisted. A twisted belt will prevent proper seating and grip. Third, remove the brush roll again and spin it by hand. Does it spin freely and smoothly? If it’s gritty, stiff, or doesn’t spin, the bearings are packed with debris from the old belt failure. You must thoroughly clean the brush roll axles and the inside of the bearing caps. A little WD-40 on the axles (wiped clean afterward) can help. Finally, confirm you have the correct length belt. A belt that is too short won’t reach the motor pulley; one that is too long will slip.
“It Squeals or Smells Like Burning Rubber Again”
If the new belt is squealing immediately, it’s slipping. First, ensure it’s properly seated on both pulleys. Second, check if the belt is the correct size. A belt that is too long will be loose and slip. Third, inspect the motor pulley. Is it worn smooth, glazed, or covered in old rubber residue? A worn pulley won’t grip a new belt. Clean the pulley surface with a dry cloth. If it’s severely worn, it may need replacement, though this is uncommon. A new belt on a dirty or worn pulley will fail quickly.
“The Vacuum Vibrates Badly or the Belt Keeps Jumping Off”
This points to misalignment. The belt must run straight between the two pulleys. If the brush roll isn’t seated correctly in its housing slots, it will be crooked, causing the belt to track off. Remove the bottom plate and brush roll. Re-seat the brush roll firmly, ensuring both ends are fully inserted into their plastic holders. The belt should then run parallel to the vacuum’s length. Also, check for any debris in the pulley grooves that would cause the belt to ride up.
The Bottom Line: Empowerment Through Simple Repair
Replacing the belt on your Shark Navigator vacuum is more than just a chore; it’s an act of ownership and a smart financial decision. For the cost of a fancy coffee, you can restore a $200-$300 appliance to its full cleaning power. The process demystifies a machine that often feels like a “black box.” By understanding this core component, you gain insight into your vacuum’s health. You learn to listen to its cues, spot early warnings, and perform basic upkeep that extends its lifespan. This knowledge translates to other appliances and builds valuable DIY confidence. So the next time your vacuum’s powerful scrubbing sound falters, don’t rush to replace the whole unit or call an expensive technician. Roll up your sleeves, grab your screwdriver, and remember: the solution is quite likely a simple, inexpensive loop of rubber waiting to be replaced.
Frequently Asked Questions
How often should I replace my Shark Navigator vacuum belt?
There’s no fixed schedule, as it depends on usage and what you vacuum. On average, a belt lasts 6-12 months with regular use. For pet owners or those with lots of carpet, inspect it every 3 months. Replace it at the first sign of cracks, stretching, glazing, or if the brush roll stops spinning.
What are the definitive signs my belt is broken?
The two clearest signs are: 1) The motor runs but the brush roll does not spin when you tilt the vacuum to look at it, and 2) a distinct smell of burning rubber. A high-pitched squeal is a sign of a slipping, failing belt before it breaks completely.
Can I use a generic or “fits all” vacuum belt instead of a Shark-specific one?
You can, but you must be extremely careful. You need to know the exact length and rib count (usually 3 or 4) of your specific model’s belt. A generic belt that is even slightly off in size will slip or break quickly. For guaranteed results and peace of mind, using a genuine Shark belt or a reputable aftermarket belt listed for your exact model number is strongly recommended.
What tools do I need to replace the belt?
You only need a Phillips-head screwdriver to remove the bottom plate screws. Having a flashlight, a small container for screws, and a tool like a seam ripper for cleaning the brush roll is helpful but not strictly necessary. No special vacuum tools are required.
I replaced the belt, but the brush roll still won’t spin. What now?
Unplug the vacuum immediately. The most common reasons are: 1) The belt is not properly seated on the motor pulley. 2) The belt is twisted. 3) The brush roll bearings are packed with debris from the old belt and are not spinning freely. Remove the brush roll, clean it meticulously, and reinstall. Ensure the belt is straight and taut on both pulleys.
Where is the best place to buy a replacement Shark Navigator belt?
For guaranteed compatibility, buy directly from Shark’s official website or authorized retailers like Amazon (sold by Shark). If using a third-party seller, always search by your specific model number (e.g., “NV352 belt”) and read reviews from users with the same model. Local vacuum repair shops are also an excellent, reliable source if you want to see the part before buying.