Replacing the belt in your Shark Duo Clean vacuum is a common and essential repair that restores its powerful deep-cleaning performance. A worn or broken belt causes the brush roll to stop spinning, leaving carpets dirty. This guide provides a detailed, step-by-step process to diagnose the issue, find the correct replacement belt, and install it safely, saving you significant money on service calls. Performing this simple maintenance yourself extends your vacuum’s life and ensures it operates at peak efficiency.
Key Takeaways
- The belt transfers motor power to the brush roll: It’s a critical component for agitating carpet fibers and lifting embedded dirt; without it, your vacuum is just a suction tool.
- Common signs of belt failure include: A burning smell, the brush roll not spinning, reduced cleaning power on carpets, or visible fraying/cracks in the belt itself.
- Always use the exact Shark Duo Clean vacuum belt: Using an incorrect size or type will cause poor performance, excessive wear, and can damage the vacuum’s internal components.
- Safety first: Always unplug the vacuum and check for residual suction in the hose before beginning any repair to prevent injury or damage.
- The replacement process is straightforward: It typically involves removing the brush roll housing, releasing the old belt, stretching the new one over the motor pulley and brush roll, and reassembling.
- Clean the brush roll and housing during replacement: Hair and debris wrap around the brush roll and in the housing, which is a primary cause of belt strain and premature failure.
- Regular belt checks are part of maintenance: Incorporating a quick belt inspection into your routine filter cleaning can catch wear early and prevent a sudden breakdown.
[FEATURED_IMAGE_PLACEHOLDER]
📑 Table of Contents
- Understanding Your Shark Duo Clean Vacuum Belt
- Diagnosing Belt Failure: Is It Really the Belt?
- Essential Tools and Preparation for the Job
- Step-by-Step: Removing the Old Belt and Brush Roll
- Installing the New Shark Duo Clean Vacuum Belt
- Post-Installation Testing and Verification
- Maintenance Tips to Maximize Belt Lifespan
- Conclusion: Empowerment Through Simple Repair
Understanding Your Shark Duo Clean Vacuum Belt
Your Shark Duo Clean vacuum is a powerhouse designed for whole-home cleaning, but its legendary performance on carpets hinges on a simple, often overlooked part: the vacuum belt. This isn’t just a random rubber band; it’s a precisely engineered component that acts as the crucial link between the vacuum’s powerful motor and the rotating brush roll. The brush roll, with its bristles and rubber fins, is what physically agitates carpet fibers, knocking loose dirt and pet hair that suction alone cannot remove. When the belt is in perfect condition, it transfers that raw motor power efficiently, creating the signature deep-clean feel of a Shark Duo Clean. However, like all parts subject to friction and tension, this belt wears out. Understanding its role helps you diagnose problems correctly and perform a confident replacement.
The Belt’s Critical Function
Think of the belt as the drive chain on a bicycle. The motor has a small pulley, and the brush roll has a larger pulley. The belt loops around both. When the motor spins, it turns the belt, which in turn spins the brush roll at high speed. In the Shark Duo Clean series, this mechanism is designed for durability, but it faces immense stress. It must stretch slightly over the pulleys, grip tightly to prevent slippage, and withstand the heat generated by friction. Over time, this constant tension and heat cause the rubber to harden, crack, and lose its elasticity. A slipping belt will make a high-pitched squealing noise and the brush roll will spin poorly or not at all. A broken belt is obvious—it snaps and falls off entirely. Both scenarios cripple the vacuum’s carpet-cleaning ability, reducing it to a bare-floor suction tool.
Why Shark Duo Clean Belts Are Specific
It’s vital to know that not all vacuum belts are created equal. Shark Duo Clean models, including popular ones like the Navigator Lift-Away, Rotator, and Vertex series, use specific belt part numbers. These belts are designed for the exact pulley sizes and required tension of your specific model. A belt that is too loose will slip and burn out quickly. A belt that is too tight will put excessive strain on the motor bearings and the brush roll itself, leading to premature failure of more expensive parts. Always consult your user manual or the official Shark website to find the precise replacement belt number for your exact model number, usually found on a sticker on the vacuum’s body or back. Common part numbers include the XTERA series belts, but verification is non-negotiable for a successful repair.
Diagnosing Belt Failure: Is It Really the Belt?
Before you disassemble your vacuum, it’s smart to confirm the belt is the culprit. Several symptoms point directly to belt issues, but a few can mimic other problems. A methodical diagnosis saves you time and ensures you’re fixing the right thing. Start with the most obvious signs and work your way to a physical inspection.
Visual guide about Shark Duo Clean Vacuum Belt Replacement
Image source: i.ytimg.com
Classic Symptoms of a Worn or Broken Belt
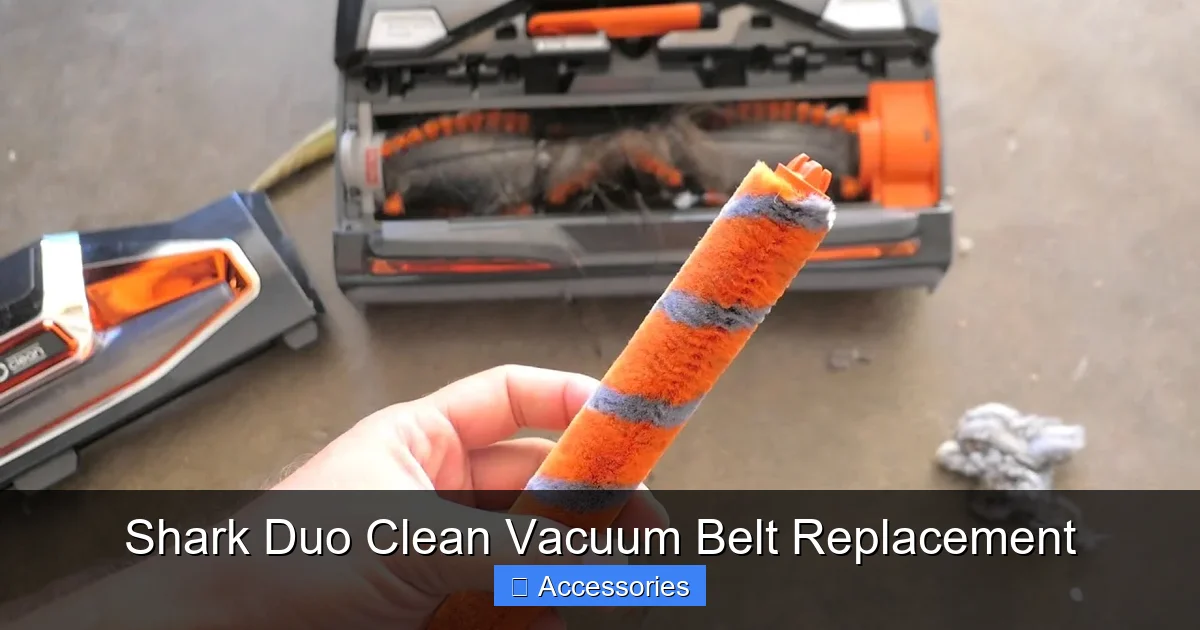
The most common indicator is a sudden or gradual loss of cleaning power on carpets while hard floor performance remains decent. If your vacuum seems to only suction dirt on flat surfaces but leaves carpet fibers looking untouched, the brush roll is likely not spinning. Turn the vacuum on and look at the brush roll through the headlight or by tilting the vacuum. If the bristles aren’t rotating, the belt is the prime suspect. You might also hear a distinct high-pitched squealing or burning rubber smell, which indicates a belt that is slipping severely due to wear or a jammed brush roll. Visually, if you can access the brush roll area, a belt that appears glazed, cracked, stretched, or has chunks missing is dead and needs immediate replacement.
Other Potential Issues to Rule Out
Sometimes, a non-spinning brush roll isn’t the belt’s fault. The brush roll itself can be jammed with hair, string, and carpet fibers. This jams the bearings, creating so much resistance that the belt can’t turn it, and it may slip or break. Always check for and remove this debris first. Also, the belt could have come off its track but is still intact. A quick visual check inside the brush roll housing will reveal this. In rare cases, the motor pulley itself can become clogged or the motor might be faulty, but these are less common than belt or debris issues. A simple test: with the vacuum unplugged, try to spin the brush roll by hand. It should rotate smoothly and freely. If it’s stiff or doesn’t move, you have a debris jam or a bearing problem that must be resolved before installing a new belt.
Essential Tools and Preparation for the Job
Replacing your Shark Duo Clean vacuum belt is a beginner-friendly DIY project, but having the right tools and a clean workspace makes it 10 times easier. This isn’t a complex repair, but rushing without preparation can lead to lost screws, frustration, or improper installation. Gather everything you need before you start.
Visual guide about Shark Duo Clean Vacuum Belt Replacement
Image source: guide-images.cdn.ifixit.com
Tools You’ll Need
The good news is you likely have most of these items around the house. You will need: a Phillips-head screwdriver (the #2 size is most common for Shark vacuums), a flat-head screwdriver (helpful for prying off stubborn brush roll caps or releasing belt tension), a pair of needle-nose pliers (to grip the belt and pull it over pulleys), and a clean, lint-free cloth. Some models use Torx screws; check your specific model. For the part itself, you must have the correct Shark Duo Clean vacuum belt replacement. Keep your old belt until you’ve confirmed the new one fits perfectly, as it’s a perfect reference for size and type.
Preparing Your Workspace and Vacuum
First, and most importantly, unplug the vacuum from the wall outlet. This is a non-negotiable safety step. Next, empty the dust cup and clean or replace the filters. This isn’t directly related to the belt, but it’s the perfect time for full maintenance. Then, turn the vacuum over and locate the brush roll housing—the rectangular or oblong head on the bottom. Use the flat-head screwdriver to gently pry off the plastic brush roll end caps (they usually clip on). You’ll see the brush roll and the belt. Have your screwdriver ready to remove the screws holding the housing to the vacuum body, typically 4-6 screws. As you remove each screw, place it in a small container or on your cloth to avoid losing them. Once all screws are out, carefully lift the housing off. You may need to disconnect a wiring harness for any headlights; note how it connects. Lay the housing on its side to expose the belt and brush roll.
Step-by-Step: Removing the Old Belt and Brush Roll
With the housing off, you have full access to the brush roll and the old belt. This is the core of the replacement process. Take your time here; forcing components can break plastic tabs. The goal is to free the brush roll and slip the old belt off the motor pulley without damaging anything.
Visual guide about Shark Duo Clean Vacuum Belt Replacement
Image source: m.media-amazon.com
Releasing the Brush Roll
The brush roll is usually held in place by two plastic caps, one on each end, that snap into the housing. With the housing off, you can often slide these caps off by hand. If they’re tight, use your flat-head screwdriver to gently pry them upward. Be careful not to break the plastic clips. Once both caps are off, the brush roll should lift out easily. If it doesn’t, check for any hidden screws or clips. As you lift the brush roll, the old belt will likely come with it, either still looped around the brush roll pulley or falling off. If it’s stuck on the brush roll, you can slide it off now. If it’s broken, just remove the pieces.
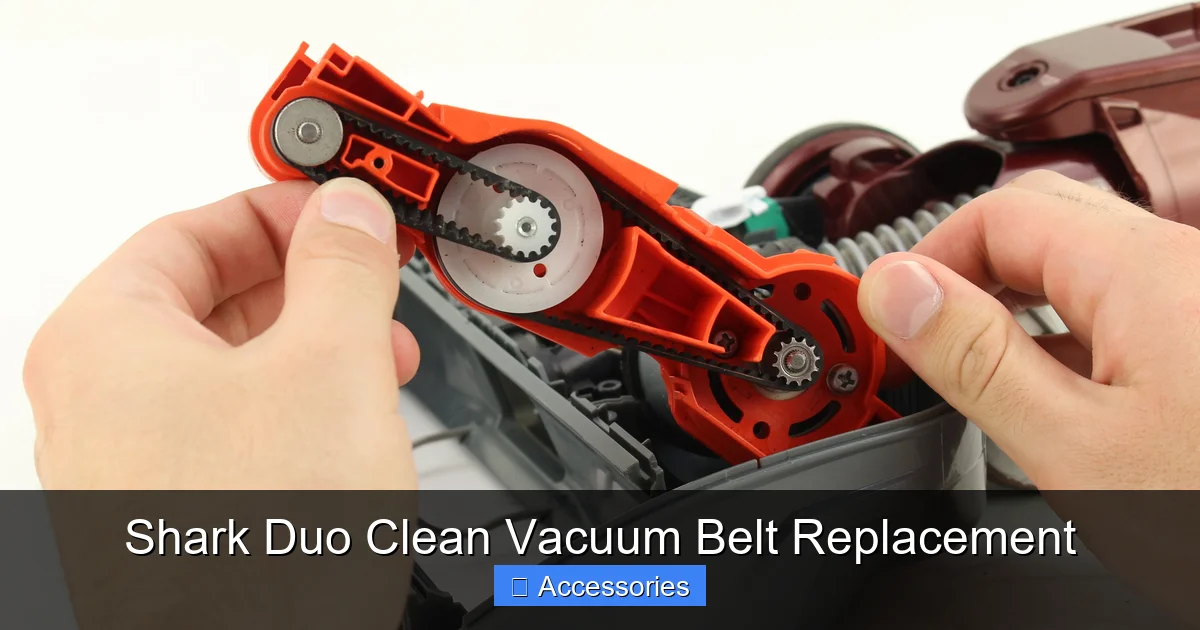
Removing the Belt from the Motor Pulley
Look inside the housing where the brush roll was. You’ll see a small metal or plastic pulley attached to the motor—this is the drive pulley. The old belt is either still looped around it or has fallen off into the housing. If it’s still on, use your needle-nose pliers to grip the belt firmly and stretch it slightly to slip it off the motor pulley. The pulley is small, so you need to create enough slack. If the belt is broken, simply remove the remnants from around the pulley and the housing cavity. At this stage, thoroughly inspect the motor pulley. It should be clean and smooth. Any melted rubber residue from a burned belt can be carefully scraped off with a flat tool, but be gentle to avoid damaging the pulley surface.
Installing the New Shark Duo Clean Vacuum Belt
Installation is essentially the reverse of removal, but it requires a bit of finesse to stretch the new belt over the pulleys. The key is to get the belt properly seated on both the motor pulley and the brush roll pulley before reinstalling the brush roll into the housing. A common mistake is putting the brush roll back in first and then trying to wrestle the belt on, which is much harder.
Looping the Belt Correctly
Take your new, correct Shark Duo Clean vacuum belt. Identify the motor pulley (small, driven by the motor) and the brush roll pulley (larger, on the brush roll itself). First, without the brush roll in the housing, stretch the new belt and loop it completely over the motor pulley. It should sit flat and centered. Now, with the brush roll sitting on your work surface, stretch the other end of the belt and loop it over the larger brush roll pulley. You should be able to do this by hand, but needle-nose pliers can provide the extra grip and leverage needed to stretch the rubber. Ensure the belt is seated properly in the groove of both pulleys and is not twisted. A twisted belt will cause immediate noise and failure. Give it a gentle rotation by hand; it should move smoothly over both pulleys.
Reassembling the Brush Roll and Housing
With the belt now installed on both pulleys (with the brush roll outside the housing), carefully lift the brush roll assembly and align it with the slots in the housing. The plastic end caps on the brush roll should slide back into their respective clips in the housing. You may need to gently press and twist to get them to snap in securely. Ensure the brush roll spins freely. If it’s stiff, double-check that the belt isn’t pinched or twisted and that the caps are fully seated. Once the brush roll is locked in place, reattach the brush roll end caps if they were separate pieces. Then, carefully lift the entire housing and align it with the screw holes on the vacuum body. Reinsert all the screws you removed earlier and tighten them securely, but do not overtighten and crack the plastic. If you disconnected a wire harness for a light, reconnect it firmly. Finally, snap any protective soleplates or covers back on over the brush roll area.
Post-Installation Testing and Verification
Don’t pack up your tools just yet. A quick test is crucial to verify your repair was successful and to avoid a frustrating “it’s still broken” moment. This step confirms the belt is correctly installed and the brush roll is spinning freely.
The Initial Power-On Check
First, ensure the vacuum is unplugged and the dust cup is empty. Place the vacuum on a clear floor area. Plug it in and turn it on to the highest carpet setting. Immediately tilt the vacuum so you can see the brush roll head. You should see the brush roll spinning vigorously. Listen for any unusual noises—a brief new-belt smell is normal, but loud squealing, grinding, or a high-pitched whine indicates a problem. Turn the vacuum off and unplug it. Manually rotate the brush roll by hand again. It should turn smoothly in both directions with only slight resistance from the belt. If it’s tight or binding, unplug it, remove the housing again, and check for a twisted belt or a misaligned brush roll.
Performance Test on Carpet
For the final test, run the vacuum over a medium-pile carpet. You should feel and hear the aggressive agitation. Look at the area you vacuumed; it should appear visibly disturbed and cleaner. A properly functioning belt and brush roll will lift the carpet fibers and pull debris into the suction path. If cleaning performance is still poor, double-check that the belt is on both pulleys and that the brush roll isn’t jammed with debris you might have missed during cleaning. This final verification step ensures your Shark Duo Clean vacuum belt replacement has restored your machine to its full, powerful cleaning potential.
Maintenance Tips to Maximize Belt Lifespan
Replacing a belt is a fix, but preventing frequent replacements saves you time and money. The belt’s lifespan is directly tied to how you use and maintain your vacuum. By incorporating a few simple habits, you can extend the life of your new belt—and your entire vacuum—significantly.
The #1 Cause of Premature Belt Death: Hair Wrap
The single biggest enemy of your vacuum belt is hair and fiber wrap around the brush roll bearings. As hair winds tightly around the metal axles of the brush roll, it creates immense drag. The belt has to work overtime to spin the brush roll, generating excess heat and wear. This heat accelerates the rubber’s deterioration. The solution is simple: every time you empty the dust cup, take 30 seconds to flip the vacuum over and use a seam ripper, scissors, or your fingers to cut and pull any hair wrapped around the brush roll and in the end caps. Doing this religiously can double or triple your belt’s lifespan.
Other Best Practices
Always use the correct height setting for your floor type. Running the vacuum on the highest setting on thin rugs or hard floors creates unnecessary strain on the belt and brush roll. Avoid vacuuming over hard objects, rug tassels, or string, as these can instantly jam the brush roll and snap the belt. Store your vacuum with the brush roll head off the ground to prevent debris from accumulating. Finally, make a visual belt inspection part of your quarterly maintenance. With the brush roll housing off, just look at the belt. If you see any cracks, glazing, or stretching, replace it proactively before it fails during a cleaning session.
Conclusion: Empowerment Through Simple Repair
Facing a malfunctioning Shark Duo Clean vacuum can be frustrating, but the solution is often a simple, inexpensive part: the belt. Armed with this guide, you now possess the knowledge to diagnose belt failure confidently, source the exact Shark Duo Clean vacuum belt replacement part, and execute the repair yourself with basic tools. This process demystifies a core piece of your vacuum’s mechanics. You’re not just replacing a rubber band; you’re restoring the vital connection that powers the brush roll’s deep-cleaning action. By performing this maintenance yourself, you save the cost of a service call, gain a deeper understanding of your appliance, and ensure your Shark Duo Clean continues to deliver the powerful, agitating clean it was built for. Remember, the secret to longevity is proactive maintenance—keep that brush roll clean, inspect the belt regularly, and your vacuum will serve you well for years to come.
Frequently Asked Questions
How often should I replace my Shark Duo Clean vacuum belt?
There’s no fixed schedule, as it depends on usage. Typically, a belt lasts 6-12 months with regular use. Inspect it quarterly for cracks, stretching, or glazing. Replace it immediately at the first sign of wear or if the brush roll stops spinning.
How do I find the correct belt for my specific Shark Duo Clean model?
Always locate your vacuum’s exact model number on its rating plate (usually on the back or bottom). Then, visit the official Shark website’s accessories page or a reputable authorized dealer. Enter your model number to get the guaranteed compatible belt part number. Do not use generic “one-size-fits-all” belts.
My new belt is installed, but the vacuum smells like burning rubber. Is that normal?
A slight “new rubber” smell for the first few uses can be normal as the belt seats itself. However, a strong, persistent burning smell indicates severe slippage. This usually means the belt is the wrong size, the brush roll is jammed with debris, or the belt is twisted. Unplug the vacuum and immediately recheck your installation.
What tools are absolutely necessary for this replacement?
You minimally need a Phillips-head screwdriver to remove the housing screws and a pair of needle-nose pliers to grip and stretch the new belt onto the pulleys. A flat-head screwdriver is helpful for prying off brush roll caps. A clean cloth is useful for wiping debris.
Should I clean the brush roll and housing while replacing the belt?
Absolutely. This is the perfect opportunity. Hair and debris wrapped around the brush roll bearings is the primary cause of belt strain and failure. Use scissors or a seam ripper to cut away all wrapped hair. Wipe out the housing to remove any dust and old belt residue for optimal performance.
Do all Shark Duo Clean models use the same belt?
No. While many models within the Duo Clean line share similar belt designs, they are not all universal. For example, belts for the Navigator Lift-Away series may differ from those for the Rotator or Vertex series. Using the wrong belt will cause slippage or damage. Always verify with your specific model number.