Maintaining your Shark Apex vacuum’s filters is non-negotiable for peak performance and air quality. This guide demystifies everything: from identifying the exact filter types your model needs (pre-motor, post-motor, foam) to precise replacement steps, cleaning routines, and where to buy genuine parts. Neglecting filters leads to suction loss, motor strain, and allergens recirculating. Proactive filter care ensures your investment lasts years and your home stays truly clean.
Have you ever pushed your Shark Apex across the floor and felt it just… not grabbing like it used to? That frustrating loss of suction is the vacuum’s way of crying for help, and more often than not, the culprit is hiding in plain sight: the filters. They’re not just a maintenance chore; they are the critical heart of your vacuum’s cleaning system. This isn’t just about keeping a part clean—it’s about protecting your investment, ensuring your family breathes easier, and guaranteeing that every pass of your Shark Apex truly lifts away dirt, dust, and allergens. Replacing and maintaining your Shark Apex vacuum filters isn’t optional; it’s the single most important routine you can perform. Let’s dive deep into everything you need to know, from the “why” to the exact “how,” so you can restore that powerful, deep-clean feeling every single time.
Key Takeaways
- Filters Are the Vacuum’s Lungs: Clogged filters directly cause suction loss, force the motor to work harder, and can shorten your Shark Apex’s lifespan significantly.
- Three Critical Filter Types: Your Shark Apex uses a combination of a pre-motor foam filter, a post-motor HEPA filter, and often a felt pre-filter. Each has a distinct role and replacement schedule.
- Cleaning vs. Replacing: The foam filter is washable and reusable. The HEPA and felt filters are not; they must be replaced entirely when dirty, typically every 3-6 months with regular use.
- Genuine Parts Matter: Always use Shark-certified filters (part numbers like HF40, HF41, HF51). Generic filters often fit poorly, compromise filtration, and can damage the vacuum.
- Maintenance is Preventative: A monthly foam filter wash and a quarterly visual check on all filters prevents 90% of performance issues and keeps your vacuum smelling fresh.
- Correct Model Identification is Crucial: “Shark Apex” covers several series (AZ, UZ, etc.). Your exact model number (on the back plate) dictates the precise filter kit you need.
- Performance Equals Clean Air: Proper filtration captures 99.97% of particles as small as 0.3 microns. This is vital for allergy sufferers and overall indoor air quality, not just floor cleanliness.
📑 Table of Contents
- Why Your Shark Apex’s Filters Are the Unsung Heroes of Clean
- Decoding Your Shark Apex: Identifying the Exact Filter Kit You Need
- Step-by-Step: How to Access, Remove, and Replace Your Shark Apex Filters
- Beyond Replacement: Essential Maintenance for Longevity and Performance
- Your Complete Buying Guide: Genuine vs. Generic, Where to Buy, and Cost
- Critical Mistakes to Avoid: Filter Care Gone Wrong
- Conclusion: A Simple Habit for a Powerful, Healthy Clean
Why Your Shark Apex’s Filters Are the Unsung Heroes of Clean
Think about what your vacuum does: it sucks in air loaded with carpet fibers, pet dander, dust mites, pollen, and microscopic debris. That dirty air has to go somewhere. The filters are the sophisticated barrier that captures all that filth, allowing only clean air to exit the back of the vacuum. When filters are pristine, air flows freely, the motor operates efficiently, and the exhaust air is harmless. When they’re clogged, it’s a cascade of problems.
The Domino Effect of a Dirty Filter
A clogged pre-motor filter, usually the foam one, is the first bottleneck. It restricts airflow to the motor, causing it to labor under strain. This strain generates extra heat and dramatically reduces suction power at the brush roll—the part that actually agitates carpet fibers. You might notice the vacuum feels lighter, it’s not picking up debris, and it might even overheat and shut off. Simultaneously, a saturated post-motor HEPA filter means allergens and fine dust are being blasted back into your room’s atmosphere, completely defeating the purpose of vacuuming. You’re not cleaning; you’re just redistributing pollution.
Protecting Your Investment and Your Health
The motor in your Shark Apex is a powerful, engineered component. It’s designed to move a specific volume of air. Forcing it to work against a clogged filter is like running a marathon while breathing through a straw. It causes premature wear, overheating, and ultimately, expensive motor failure. From a health perspective, a properly functioning HEPA filter is a frontline defense against airborne irritants. For homes with asthma, allergies, or young children, maintaining that 99.97% filtration efficiency for particles down to 0.3 microns is not a luxury—it’s a necessity for a healthy indoor environment.
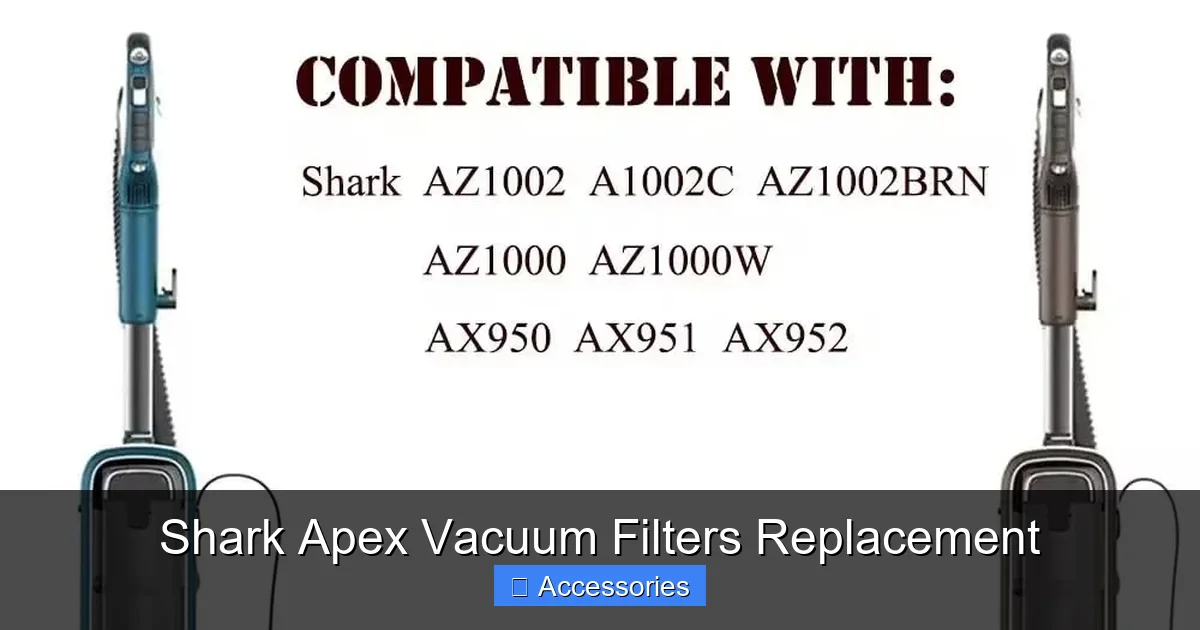
Decoding Your Shark Apex: Identifying the Exact Filter Kit You Need
The term “Shark Apex” encompasses several model series, including the popular AZ1000 series, the UZ series, and more. The first, most critical step is to identify your exact model number. This is a 6-8 digit code (e.g., AZ1002, UZ562) located on a silver sticker on the back or underside of the vacuum’s body. This number is your key to ordering the correct filters. Ordering the wrong ones is a common, frustrating mistake that leads to poor fits and zero performance improvement.
Visual guide about Shark Apex Vacuum Filters Replacement
Image source: sharkvacuum.blog
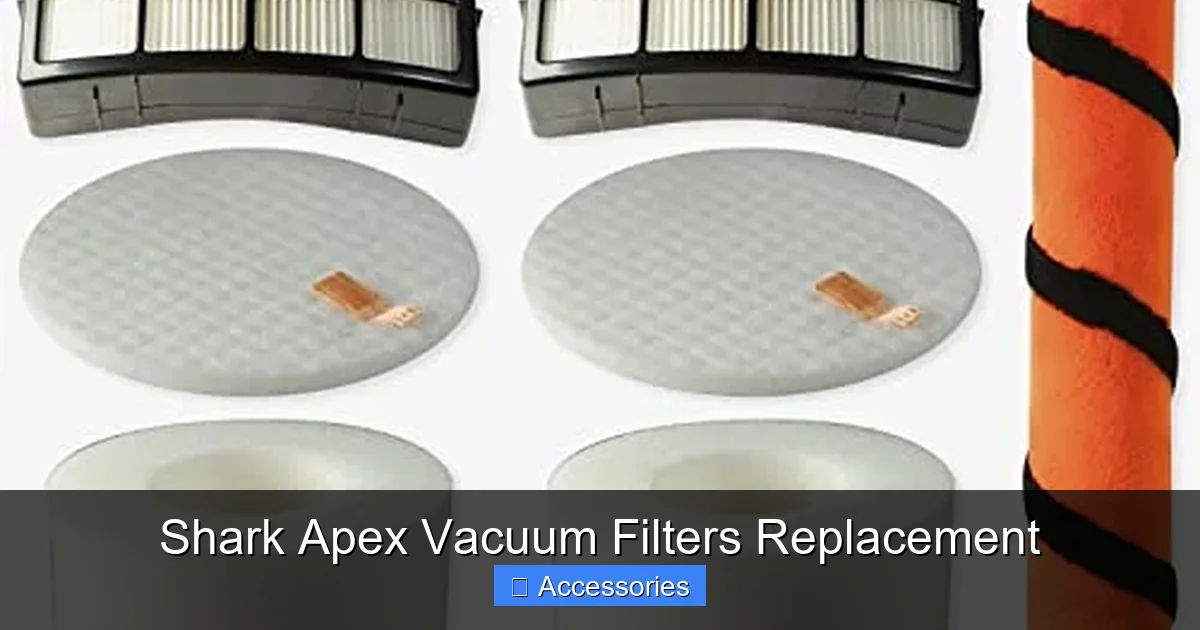
The Standard Filter Trio in Most Shark Apex Models
While layouts can vary slightly, the vast majority of Shark Apex uprights use this three-filter system:
- Pre-Motor Foam Filter (Washable): This is the first line of defense, catching larger particles like hair and carpet fibers before they reach the motor. It’s typically a rectangular or square piece of dense, blue or gray foam. It is designed to be removed, washed with water, and reused for the life of the vacuum.
- Pre-Motor Felt Filter (Replaceable): Located behind or around the foam filter in a plastic housing, this thin, tan or brown felt disc or rectangle catches fine dust that the foam misses. This is NOT washable. It must be replaced when visibly dirty or every 3-6 months.
- Post-Motor HEPA Filter (Replaceable): This is the final, critical filter. It’s usually a pleated, white rectangular cartridge (often part number HF40 or HF41 for many Apex models) that captures 99.97% of allergens and fine dust before the air is exhausted. It must be replaced, not cleaned, typically every 3-6 months with regular use.
Finding Your Model-Specific Filter Kit
Once you have your model number, visit the official Shark website’s “Accessories & Parts” section. Enter your model number, and it will display the exact filter kit compatible with your machine. These kits often bundle the felt and HEPA filters together (e.g., “Filter Kit for AZ1002”). You can also use authorized retailers like Amazon or Best Buy, but always verify the part numbers (HF40, HF41, HF51 are common for Apex) against your model’s requirements. Don’t rely on “fits Shark Apex” claims from third-party sellers without cross-checking.
Step-by-Step: How to Access, Remove, and Replace Your Shark Apex Filters
With the right filters in hand, the replacement process is straightforward but requires a specific sequence. Always ensure the vacuum is unplugged before beginning.
Visual guide about Shark Apex Vacuum Filters Replacement
Image source: m.media-amazon.com
Accessing the Filter Compartment
On most Shark Apex models, the main filter housing is located on the back of the vacuum canister (the dirt cup assembly). You’ll need to detach the dirt cup from the vacuum body. Typically, there are two release latches or buttons—one at the top and one at the bottom of the cup. Press them simultaneously and pull the cup straight down and off. The entire filter assembly is now exposed.
The Removal and Replacement Sequence
- Remove the Dirt Cup: As described above, detach it from the vacuum.
- Release the Filter Cover: On the back of the dirt cup, you’ll see a large, usually circular or rectangular, plastic cover securing the filters. It’s held by a locking tab or a couple of clips. Gently release the tab or squeeze the clips and lift the cover off.
- Extract the Foam Filter: The blue/gray foam filter sits on top. It’s usually just resting in place. Lift it out gently.
- Remove the Felt Filter: Underneath the foam, you’ll find the tan felt filter, often sitting in a plastic frame or basket. Lift it out. Note its orientation for reinstallation.
- Extract the HEPA Filter: The pleated HEPA cartridge is at the bottom. It may have a handle or a locking mechanism. Press any release tabs and pull it straight up and out.
- Install the New Filters: Place the new HEPA filter into the bottom slot first, ensuring it seats fully. Reinstall the felt filter into its frame/basket, then place that assembly back. Finally, set the clean (or new) foam filter on top.
- Reassemble: Snap the filter cover back on securely. Align the dirt cup with the vacuum body and push it up until you hear the latches click into place. You’re done!
Visual Tip: If you’re a visual learner, search for “Shark Apex [Your Model Number] filter replacement” on YouTube. Shark and numerous users have posted quick, 2-minute videos showing the exact process for your specific model.
Beyond Replacement: Essential Maintenance for Longevity and Performance
Replacing filters on schedule is vital, but maximizing their life and your vacuum’s efficiency requires a bit more TLC.
Visual guide about Shark Apex Vacuum Filters Replacement
Image source: images.vacuumfolk.com
The Monthly Foam Filter Wash Routine
Your washable foam filter is a workhorse. It should be removed and washed with plain water every month if you use your vacuum regularly. Use your sink or a tub. Gently squeeze and agitate it in warm water. Do not use soap, detergent, or brushes, as these can damage the foam’s porous structure. Rinse thoroughly under running water until all water runs clear. Squeeze out excess water—do not wring. The most crucial step: let it air-dry completely for at least 24 hours before reinstalling. A damp foam filter will block airflow and could damage the motor. Never, ever operate the vacuum with a wet foam filter.
Quarterly Visual Inspections
Every three months, take a moment to look at all your filters, even if it’s not yet “replacement time.” Check the foam for tears or hardening. Examine the felt filter—if it’s discolored, feels stiff, or is visibly clogged with dust, replace it. Look at the HEPA filter; if the pleats are gray or black instead of white, or if you see dust embedded in the media, it’s time for a new one. These quick checks prevent surprise performance drops.
Maintaining the Dirt Cup and Brush Roll
Filters work in concert with a clean system. After every few uses, tap out the dirt cup over a trash can and rinse it with water (ensure it’s completely dry before reattaching). Monthly, remove the brush roll (usually by flipping the vacuum over and releasing a bottom plate) to cut away any hair or fibers wrapped around it. A jammed brush roll strains the motor and reduces cleaning efficacy, making your filters work harder.
Your Complete Buying Guide: Genuine vs. Generic, Where to Buy, and Cost
When it’s time for new filters, you have choices. Making the right one saves money and protects your vacuum long-term.
The Case for Genuine Shark Filters (HF Series)
Genuine Shark filters, identified by part numbers like HF40, HF41, HF51, HF55, etc., are engineered to exact specifications for your Apex model. The pleat design in the HEPA filter, the density of the foam, and the fit of the felt are all optimized for maximum airflow and filtration. They are made from high-quality, tested materials. While they cost a bit more upfront ($15-$30 for a kit), they guarantee performance, fit, and safety for your vacuum’s motor. Using a subpar filter is a false economy that can lead to a $200+ motor repair.
Understanding Generic/Third-Party Filters
The market is flooded with cheaper filters on sites like Amazon and eBay. Some are decent quality, but many are problematic. Common issues include:
- Poor Fit: They may not seat correctly, allowing unfiltered air to bypass the system.
- Inferior Media: The HEPA paper may be thinner or less dense, trapping fewer particles.
- Off-Gassing: Cheap adhesives or materials can produce unpleasant smells when air passes through them.
- No Warranty: Shark will not cover damage caused by non-genuine parts.
If you choose to try a generic, buy from a seller with excellent reviews specifically mentioning your Shark Apex model, and be prepared to return them if the fit is off or you notice a smell.
Where to Buy and How to Save
Your primary sources should be:
- Shark Official Website: The gold standard for guaranteed compatibility.
- Major Retailers: Best Buy, Target, Walmart (in-store and online) carry genuine Shark parts.
- Amazon: Sell both genuine (sold by Shark or authorized dealers) and generics. Filter your search for “Ships from and Sold by Amazon.com” or “Shark” as the seller for genuine parts.
To save money, buy filter kits (felt + HEPA) instead of individual pieces. Also, consider multi-packs if you know you’ll be replacing them on schedule. Finally, sign up for price alerts on Amazon—genuine Shark filter kits often go on sale for 20-30% off.
Critical Mistakes to Avoid: Filter Care Gone Wrong
Even with the best intentions, it’s easy to make errors that undermine your maintenance routine. Here are the most common pitfalls.
Mistake 1: Washing the HEPA or Felt Filters
This is the #1 error. The HEPA filter’s microscopic paper structure is designed for air to pass through, not water. Washing it destroys its integrity, clogs the pleats, and renders it useless. The felt filter is similarly not water-resistant. Once wet, its structure collapses. Remember: Foam = Washable. HEPA & Felt = Replace Only.
Mistake 2: Reinstalling a Damp Foam Filter
Impatience can kill your motor. A damp foam filter restricts airflow massively and pulls moisture into the motor housing. This can cause short circuits, corrosion, and catastrophic failure. The 24-hour air-dry rule is not a suggestion; it is mandatory. Have a second foam filter on hand so you can swap and wash while the other dries.
Mistake 3: Ignoring the “Low Suction” Warning
Many modern Shark Apex models have a suction sensor that triggers a “Check Filter” or “Low Suction” light on the handle. This is not a vague suggestion; it’s a direct diagnostic alert. The moment it comes on, check and clean/replace your filters immediately. Ignoring it guarantees continued poor performance and stresses the motor.
Mistake 4 Using Harsh Chemicals or Tools on Filters
Never use soap, detergent, bleach, or scrubbing brushes on the foam filter. These can leave residues that get sucked into the motor or degrade the foam. Gentle water and hand-squeezing is all it needs. For the canister and brush roll, a soft cloth and mild cleaner are sufficient.
Conclusion: A Simple Habit for a Powerful, Healthy Clean
Caring for your Shark Apex’s filters transforms vacuuming from a chore with diminishing returns into a consistently powerful, healthy cleaning ritual. It connects directly to the core promise of your Shark Apex: unbeatable suction. By understanding the three-filter system, committing to a monthly foam wash and quarterly replacement of the felt and HEPA filters, and always using the correct genuine parts for your specific model number, you safeguard your vacuum’s motor, protect your home’s air quality, and ensure every cleaning session ends with that satisfying, deep-clean result. Make filter maintenance a non-negotiable part of your home care calendar. Your vacuum—and your lungs—will thank you for it. Set a reminder on your phone, stock up on the right filter kit, and experience the difference that clean filters make. It’s the easiest, most cost-effective way to keep your Shark Apex performing like new for years to come.
Frequently Asked Questions
How often should I replace the filters in my Shark Apex vacuum?
The washable foam filter should be cleaned monthly and replaced only if damaged. The non-washable felt pre-filter and HEPA post-motor filter should be replaced every 3-6 months with regular use, or immediately if visibly dirty or if your vacuum’s “Check Filter” light illuminates.
Where can I find my Shark Apex model number to buy the right filters?
The model number is a 6-8 digit code (e.g., AZ1002) on a silver sticker located on the back or underside of the vacuum’s body. You can also find it on the original box or in your user manual. Always use this number to search Shark’s official parts finder for guaranteed compatibility.
Can I wash the HEPA filter in my Shark Apex to save money?
No. The HEPA filter is made of delicate pleated paper that is destroyed by water. Washing it will ruin its filtration capability and can damage your vacuum. Only the blue foam pre-motor filter is designed to be washed with water and reused.
What happens if I use generic, non-Shark filters in my Apex?
Generic filters often have poor fit and inferior filtration media. They can allow unfiltered air to bypass the system, reduce suction, and may off-gas odors. Worse, they can restrict airflow unpredictably, causing motor strain and overheating. Using them risks voiding your warranty and damaging your vacuum.
My Shark Apex still has low suction after replacing the filters. What now?
If new, correct filters didn’t solve the issue, check for other clogs. Inspect the hose for blockages, ensure the dirt cup is not full and is properly seated, and clean the brush roll thoroughly of any wrapped hair or fibers. A severely clogged hose or a jammed brush roll will mimic filter symptoms.
Is it normal for my Shark Apex to smell musty after vacuuming?
A slight odor is common if you’re vacuuming up pet accidents or damp debris. However, a persistent musty smell usually indicates a dirty, damp filter (especially the foam if not dried completely) or a dirty dirt cup. Ensure your foam filter is 100% dry before reinstalling and wash the dirt cup with vinegar water to disinfect it.