Regularly replacing your Shark vacuum’s filters is non-negotiable for maintaining peak suction power and air quality. This guide demystifies the process, showing you exactly where filters are located in every major Shark series and how to swap them safely. We’ll clarify the difference between washable and replaceable filters, provide model-specific tutorials, and share pro-maintenance tips to extend your vacuum’s life. Forget guessing—get the definitive, step-by-step instructions to keep your Shark performing like new.
Key Takeaways
- Not All Filters Are Equal: Shark vacuums use multiple filter types (pre-motor, post-motor, foam, felt) with different lifespans and care instructions. Identifying yours is the first step.
- Washable vs. Replaceable: Foam and felt filters are typically washable and reusable, while paper and HEPA filters are almost always replaceable. Never wash a replaceable filter.
- Location Varies by Model: Filter access points differ significantly between Shark’s Navigator, Rotator, Vertex, and IZ series. Always consult your specific model’s manual for precise locations.
- Frequency is Key: Replace disposable filters every 3-6 months with regular use. Washable filters should be cleaned monthly and replaced annually or when visibly worn.
- Performance Depends on It: Clogged or damaged filters are the #1 cause of lost suction, motor strain, and poor air filtration. A new filter restores power and protects your vacuum’s engine.
- Use genuine Shark parts: Third-party filters often have poor fit and inferior materials, which can damage your vacuum and void the warranty. Always buy Shark-branded replacements.
- Maintenance is a System: Filter replacement is part of a holistic routine that includes emptying the dust cup, checking for clogs in hoses and brush rolls, and cleaning exterior vents.
📑 Table of Contents
- Why Your Shark Vacuum’s Filters Are Its Lifeline
- Decoding Shark Vacuum Filter Types and Their Roles
- Locating Filters in Major Shark Vacuum Series
- Step-by-Step: How to Replace Filter in Shark Vacuum (General Process)
- Essential Maintenance: Cleaning Washable Filters Properly
- Troubleshooting: What To Do If Suction Doesn’t Return After a Filter Change
- The Long Game: Building a Filter Replacement Habit
Why Your Shark Vacuum’s Filters Are Its Lifeline
Think of your Shark vacuum’s filters as its lungs. Just as you need clean air to breathe powerfully, your vacuum needs clear filters to generate the strong suction you rely on. When these filters get clogged with dust, hair, and debris, your vacuum’s performance nosedives. It has to work overtime, straining the motor and spewing unfiltered air back into your home. Understanding how to properly replace filter in Shark vacuum systems isn’t just a maintenance task—it’s the single most important thing you can do to preserve your investment, ensure efficient cleaning, and maintain a healthy indoor environment. Ignoring this simple step leads to weak suction, strange odors, and eventually, costly repairs. This guide will walk you through everything, turning a seemingly technical chore into a five-minute, confidence-boosting routine.
The Direct Link Between Filters and Suction Power
Your Shark vacuum creates suction by pulling air (and dirt) through the machine. That air must pass through a series of filters. The first filter, often a foam or felt pre-motor filter, catches large particles to protect the motor. Then, a more delicate post-motor or HEPA filter traps microscopic allergens and dust before the air exits. When any of these filters are saturated, airflow is restricted. It’s like trying to breathe through a thick cloth—it’s just not happening efficiently. You’ll notice your vacuum struggling on carpets it previously glided over, or you might see dust clouds trailing behind it. By learning to replace filter in Shark vacuum components at the first sign of wear, you ensure unrestricted airflow, maximum suction, and a motor that runs cool and quiet.
Decoding Shark Vacuum Filter Types and Their Roles
Before you can replace anything, you must know what you’re looking at. Shark doesn’t use a one-size-fits-all filter system. The type of filter you need depends entirely on your specific model series and its design. Using the wrong cleaning method or replacement part can cause damage. Here’s a breakdown of the common filter types you’ll encounter.
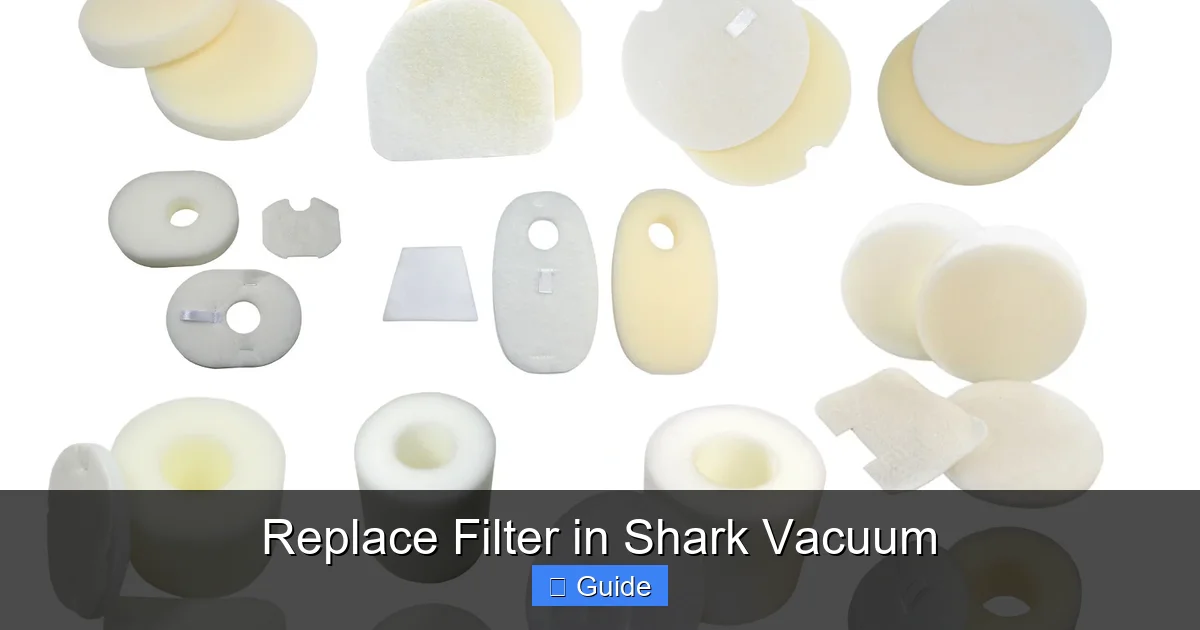
Visual guide about Replace Filter in Shark Vacuum
Image source: i.ebayimg.com
Pre-Motor Filters: The First Line of Defense
Located before the vacuum’s motor, these filters protect the engine from large debris like hair, carpet fibers, and larger dust bunnies. They are your vacuum’s bodyguards. In most Shark models, this is a foam filter. It’s usually rectangular or square, black or grey, and made of a porous, spongy material. This is the most common filter that is washable and reusable. You’ll find it behind a cover on the back or bottom of the vacuum body. A clogged pre-motor filter is the most frequent culprit behind a sudden drop in suction power.
Post-Motor Filters & HEPA Filters: The Air Purifiers
After the air passes through the motor (which needs cooling), it goes through a secondary filtration stage. This is the post-motor filter. Its job is to capture the finest particles, including allergens, pollen, and bacteria, ensuring the air expelled from your vacuum is cleaner than the air it sucked in. Many modern Sharks, especially those marketed for allergy sufferers (like the Shark Vertex or Shark Stratos), use a HEPA (High-Efficiency Particulate Air) filter at this stage. These are almost always disposable and not washable. They are typically pleated, paper-like, and white or off-white. They are crucial for indoor air quality and must be replaced according to the manufacturer’s schedule, usually every 3-6 months.
Felt Filters and Arm & Hammer Filters
Some older Shark models, like certain Navigator series, use a thin, tan or brown felt filter as a pre-motor filter. Like foam, it is washable but more delicate. Additionally, some Shark vacuums come with an Arm & Hammer carbon filter (often a small, circular, dark disc). This filter is designed to absorb odors. It is a replaceable filter with a lifespan of about 3 months and should never be washed.
Locating Filters in Major Shark Vacuum Series
This is where many people get stuck. Shark’s design philosophy changes across its popular lines. A filter on a Navigator is in a different spot than on an IZ. Let’s map it out for the most common series you likely own.
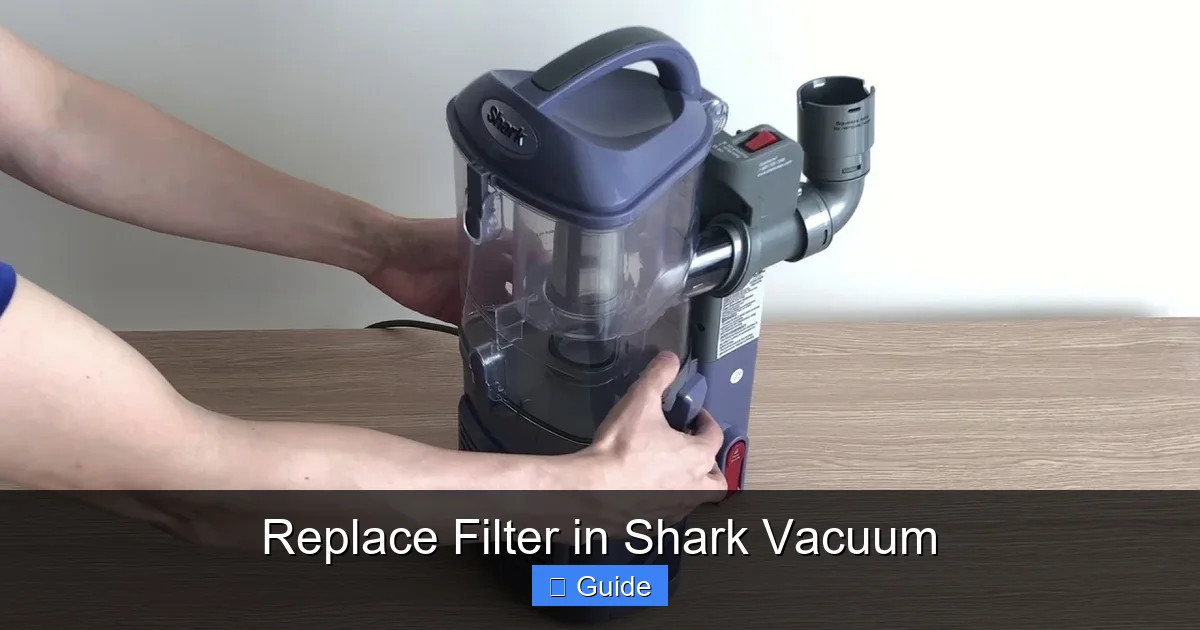
Visual guide about Replace Filter in Shark Vacuum
Image source: i.ytimg.com
Shark Navigator & Rotator Series (NV, NV350, NV356, NV500, etc.)
These are Shark’s classic uprights. They typically have two filters:
- Pre-Motor Foam Filter: Found on the back of the vacuum body, behind a small, circular or rectangular plastic cover. You usually press a tab to release it. The filter slips out from behind a grate.
- Post-Motor Filter/HEPA: Located on the top of the vacuum, underneath the clear dust cup assembly. You must first remove the dust cup by pressing the release button. Once the cup is off, you’ll see a rectangular cover on the motor housing; this houses the disposable HEPA filter.
Pro Tip: On many Rotator models (like the NV356), the pre-motor foam filter is actually located inside the dust cup assembly. You remove the cup, and the foam filter sits at the bottom of the cup’s cavity.
Shark Vertex & Stratos Series (AZ6002, AZ6003, etc.)
These premium models feature advanced filtration. They commonly have three filters:
- Pre-Motor Foam Filter: Located on the back of the unit, similar to the Navigator. A cover panel clips or twists off.
- Arm & Hammer Carbon Filter: A small, circular filter that slides into a dedicated slot, often found near the handle or on the front base. Consult your manual for the exact location.
- Post-Motor HEPA Filter: This is a large, rectangular, pleated filter. To access it, you must detach the entire dust cup assembly. The HEPA filter is housed in a rectangular compartment on the back of the motor unit, behind a cover that usually clicks off.
Shark IZ Series (IZ362, IZ420, etc.)
The stick vacuums have a different layout due to their compact size.
- Pre-Motor Filter: Often a combination foam and felt filter. You access it by removing the dust cup. The filter is usually attached to the inside of the cup or sits in a slot at the base of the motor unit.
- Post-Motor Filter: A small, circular HEPA filter. It is typically accessed by unscrewing a small cap on the back or side of the main body/handle assembly.
Critical: Always unplug your Shark vacuum before attempting to locate or remove any filter. Safety first.
Step-by-Step: How to Replace Filter in Shark Vacuum (General Process)
Now that you know where to look, the physical act of replacement is straightforward. Follow this universal protocol, adapting for your specific model.
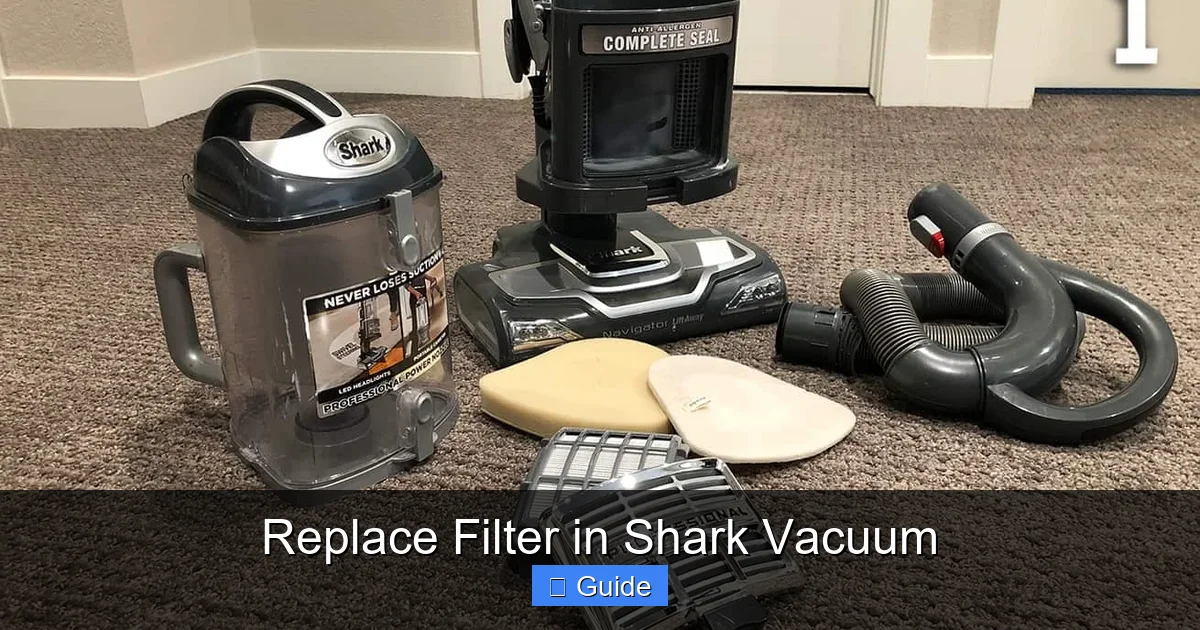
Visual guide about Replace Filter in Shark Vacuum
Image source: everydaycheapskate.com
Step 1: Identify and Access
Using the location guide above for your model series, locate the filter compartment. Most covers are held by plastic clips, a simple twist-lock, or a single screw. Gently pry or unscrew the cover. If it’s stuck, check for hidden clips—do not force it.
Step 2: Remove the Old Filter
Gently pull the filter straight out. For foam filters, they may be seated in a plastic frame. Note the orientation; most have a specific “up” side (often the mesh side faces the motor or the dirty air intake). Take a photo with your phone if you’re unsure how it fits back in. For disposable paper/HEPA filters, they simply slide out of their slot.
Step 3: Clean the Housing (The Most Important Skip!)
Before installing the new filter, use a soft brush or a dry cloth to wipe out the filter housing. You’ll be amazed at the dust and hair that accumulates in the corners and vents. A clean housing ensures maximum airflow for your new filter and prevents debris from immediately clogging it.
Step 4: Install the New Filter
For washable foam filters: Ensure it is completely cool and dry after washing. Slide it back into its frame or housing exactly as the old one came out. For disposable filters: Remove it from its sealed plastic packaging. Handle it by the edges to avoid getting oils from your fingers on the filter media. Slide it into the slot until it seats firmly. You should feel a slight click or resistance.
Step 5: Secure the Cover and Test
Snap or screw the access cover back into place securely. Reattach the dust cup if you removed it. Plug in the vacuum and turn it on. Listen for normal motor sounds and check for consistent suction at the hose. If you notice a whistling noise or weak suction, double-check that the filter is seated correctly and the cover is fully closed.
Essential Maintenance: Cleaning Washable Filters Properly
For your foam and felt filters, cleaning is as important as eventual replacement. Here’s how to do it right to extend their life and effectiveness.
The Correct Washing Method
Remove the filter. Take it to a sink and rinse it under lukewarm water. Gently squeeze and massage the filter to push out trapped dirt. Do not use soap, detergent, or any cleaning chemicals. These can break down the foam’s structure and leave residues that harm the motor. Continue rinsing until the water runs clear. For heavily soiled filters, you can let it soak in plain water for 10-15 minutes first.
Drying: Patience is Mandatory
This is the step where most people fail. A damp filter in your vacuum is a disaster waiting to happen—it can grow mold, mildew, and damage the motor. Air-dry your filter completely for at least 24-48 hours. Place it in a well-ventilated area, away from direct sunlight or heat sources (which can warp it). Prop it up if needed to allow air to circulate through all its pores. Never, ever use a hair dryer, oven, or radiator to speed up drying. It must be 100% bone-dry before reinstallation.
When to Toss a Washable Filter
Foam and felt filters degrade over time. After about a year of regular washing and use, inspect it closely. If it feels brittle, crumbly, has tears, or has permanently stained dark grey/black, it’s time to replace it. A deteriorating filter allows fine dust to bypass it and reach the motor, causing premature wear. A new foam filter costs $10-$15 and is cheap insurance for your $200-$500 vacuum.
Troubleshooting: What To Do If Suction Doesn’t Return After a Filter Change
You’ve replaced the filter, but the vacuum still feels weak. Don’t panic. The filter is just one part of the airflow path. Here’s your systematic checklist.
Check for Other Clogs
The most common post-filter-replacement issue is a clog elsewhere. First, detach the hose. Look through it from both ends. Use a long, flexible brush or even a bent coat hanger to dislodge any obstructions. Second, inspect the brush roll. Hair and string wrap tightly around the bearings and inside the housing, blocking airflow. Scrape it clean with scissors or a seam ripper. Third, check the air intake vents on the vacuum body and the exhaust port on the back. Clear any lint or debris blocking these critical openings.
Verify Filter Installation
Double-check that the new filter is the exact model for your Shark vacuum. An ill-fitting filter allows air to leak around it. Also, ensure it’s inserted in the correct orientation. The “dirty air” side usually faces the intake, and the “clean air” side faces the motor. Look for arrows on the filter frame or housing.
Assess the Dust Cup and Seals
A cracked or warped dust cup, or a compromised seal around the cup’s attachment point, will cause major air leaks. Inspect the cup for cracks. Ensure it clicks securely into place. Also, check the gasket or seal around the cup’s lid; if it’s torn or missing, air will escape before reaching the filters.
Motor Issues (Last Resort)
If you’ve cleared all clogs, verified the filter, and checked seals, the problem may be internal. A worn motor or a broken internal fan belt (on some models) will cause severe suction loss. At this point, it’s time to contact Shark customer support or a certified repair shop, especially if your vacuum is still under warranty.
The Long Game: Building a Filter Replacement Habit
Don’t wait for your vacuum to lose all its power. Proactive maintenance is effortless and saves money. Here’s how to build a simple, foolproof system.
Mark Your Calendar
Set a recurring reminder on your phone. For disposable filters, mark a date 3-6 months from today. For washable filters, mark a monthly “rinse” reminder and an annual “replace” reminder. Pair it with another task, like changing your HVAC filter, to create a seasonal maintenance routine.
Keep Spare Filters On Hand
The biggest barrier to replacing a filter is not having the right one. Once you identify your exact model number (usually on a sticker on the back or bottom of the vacuum), order a 2-pack of the correct disposable filter and a spare foam filter from Shark’s official website or a authorized retailer. Store them with your vacuum cleaning supplies. When one is dirty, you swap it immediately and wash the old one for future use.
Know Your Model Number
This is your golden ticket. The model number (e.g., NV356, AZ6002, IZ362) is the only way to guarantee you’re buying the correct filter. Write it down on a piece of masking tape and stick it to your vacuum’s handle or on the wall where you store it. When shopping online, search for “[Your Model Number] filter replacement” to avoid costly mistakes with incompatible parts.
Frequently Asked Questions
How often should I replace the filter in my Shark vacuum?
Disposable HEPA and paper filters should be replaced every 3-6 months with regular use. Washable foam and felt filters should be rinsed monthly with water and replaced entirely once a year or when they become brittle and discolored. For homes with pets or allergy sufferers, replace disposable filters closer to the 3-month mark.
Can I wash a HEPA filter or a paper filter?
No, you should never wash HEPA or paper filters. Water destroys the delicate pleated structure, rendering the filter useless and allowing unfiltered air to pass through. Washing will also promote mold growth. These filters are designed to be replaced, not cleaned. Only foam and felt filters are intended for washing.
Where can I find the exact filter part number for my Shark model?
The best source is your vacuum’s user manual, which lists all part numbers. Alternatively, locate your vacuum’s model number (on a sticker on the back/bottom) and enter it into the “Find Parts” section of Shark’s official website. You can also search for “[Your Model Number] filter” on major retailer sites, which will typically list the compatible Shark part number (e.g., SF35, HEPA-F02).
What happens if I don’t replace my Shark vacuum filter?
Failing to replace a dirty filter leads to a cascade of problems: severe loss of suction, making cleaning ineffective; the motor must work harder, overheating and wearing out faster; and unfiltered, allergen-filled air is blown back into your home, worsening indoor air quality. You’ll also likely develop a persistent burnt smell from the overworked motor.
My vacuum smells musty after I washed the foam filter. Is it ruined?
A musty smell indicates the filter was not dried completely before reinstallation. Mold or mildew has likely begun to grow inside the foam. You must discard that filter immediately. Using it will spread spores and odors. In the future, ensure the filter air-dries for a full 48 hours in a warm, dry, well-ventilated area before putting it back in the vacuum.
Are generic or third-party filters safe to use in my Shark?
We strongly recommend against using generic filters. They often have poor dimensional accuracy, leading to air leaks around the seal. The filter media is frequently inferior, offering subpar filtration that can damage your motor. Using non-genuine parts can also void your Shark warranty. For the health of your vacuum and your home’s air, always purchase Shark-branded filters or those explicitly certified by Shark.