Removing the HEPA filter from your Shark Lift Away is a simple, crucial maintenance task. This guide provides a detailed, safe process to ensure your vacuum’s longevity and your home’s air quality. Proper filter care prevents loss of suction and protects the motor. Follow these steps to master this essential skill for a healthier cleaning routine.
Key Takeaways
- Safety First: Always unplug the Shark Lift Away before attempting to remove any filter to prevent electrical hazards and accidental activation.
- Know Your Filter: The Shark Lift Away typically uses two filters: a pre-motor foam filter and a post-motor HEPA filter. The HEPA filter is usually rectangular and located near the exhaust.
- Cleaning vs. Replacement: The foam pre-motor filter is washable and reusable. The HEPA filter is often a pleated paper filter that is not washable and must be replaced every 3-6 months under normal use.
- Gentle Handling: Filters are delicate. Avoid bending, crushing, or using sharp objects when removing or handling the HEPA filter to maintain its structural integrity and filtration efficiency.
- Check the Manual: Your specific Shark Lift Away model number (found on the vacuum’s body) determines the exact filter type and part number for accurate replacement.
- Regular Schedule: Incorporate filter inspection into your monthly vacuum maintenance routine to catch clogs or damage early, ensuring consistent suction and air quality.
- Proper Reinstallation: Ensure the filter is seated correctly in its housing with all tabs or seals engaged. An improperly installed filter will cause air leaks and loss of suction.
📑 Table of Contents
- Introduction: Breathe Easier with Proper Filter Maintenance
- Understanding Your Shark Lift Away’s Filtration System
- Why and When You Must Remove the HEPA Filter for Service
- Step-by-Step Guide: How to Remove the HEPA Filter from Your Shark Lift Away
- Cleaning and Replacing Your HEPA Filter: Best Practices
- Maintenance Schedule and Pro Tips for Longevity
- Troubleshooting: What If My Vacuum Still Loses Suction After Filter Replacement?
- Conclusion: A Simple Act for a Powerful Clean
Introduction: Breathe Easier with Proper Filter Maintenance
Your Shark Lift Away vacuum is a powerful cleaning ally, designed to tackle carpets, hard floors, and above-floor surfaces with ease. But its true secret weapon for maintaining a truly clean home isn’t just its suction power—it’s the sophisticated filtration system that captures fine dust, allergens, and particles, preventing them from being blown back into your living space. At the heart of this system is the HEPA (High-Efficiency Particulate Air) filter. Understanding how to properly remove HEPA filter from Shark Lift Away models is not just a maintenance chore; it’s a fundamental practice for preserving your vacuum’s performance, extending its lifespan, and safeguarding your family’s indoor air quality.
Over time, this critical filter becomes clogged with the very debris it captures. A blocked filter acts like a choked airway, forcing your vacuum’s motor to work harder, leading to a noticeable drop in suction power, overheating, and potentially costly motor damage. Furthermore, a saturated filter can allow unfiltered air to bypass it, recirculating allergens and fine particulate matter back into your home—the exact opposite of what you want when cleaning. This comprehensive guide will walk you through every aspect of this process, from identification and safe removal to cleaning, replacement, and troubleshooting, empowering you to keep your Shark Lift Away operating at its peak.
Understanding Your Shark Lift Away’s Filtration System
Before you can successfully remove the HEPA filter, it’s essential to understand the entire filtration architecture of your Shark Lift Away. Most models in this line employ a multi-stage filtration system, each component serving a distinct purpose. Knowing which part is which prevents accidental damage and ensures you’re addressing the correct component during maintenance.
Visual guide about Remove Hepa Filter from Shark Lift Away
Image source: sharkvacuum.blog
The Two-Tier Defense: Pre-Motor and Post-Motor Filters
Shark Lift Away vacuums almost universally use a two-filter system. The first line of defense is the pre-motor filter, often made of foam. This filter sits immediately after the suction path and captures larger particles like hair, carpet fibers, and larger dust bunnies. Its primary job is to protect the vacuum’s motor from debris that could cause wear or clogging. This foam filter is typically reusable and requires regular washing with water.
The second and final stage is the post-motor filter, which is the true HEPA filter in most Shark Lift Away models. After the air has passed through the motor for cooling, it then goes through this filter before being exhausted back into your room. This HEPA filter is engineered to trap 99.97% of particles as small as 0.3 microns, including pollen, mold spores, bacteria, and fine household dust. It is usually a pleated, paper-like material encased in a plastic frame. This is the filter you need to know how to remove for inspection and eventual replacement, as it is not designed to be washed.
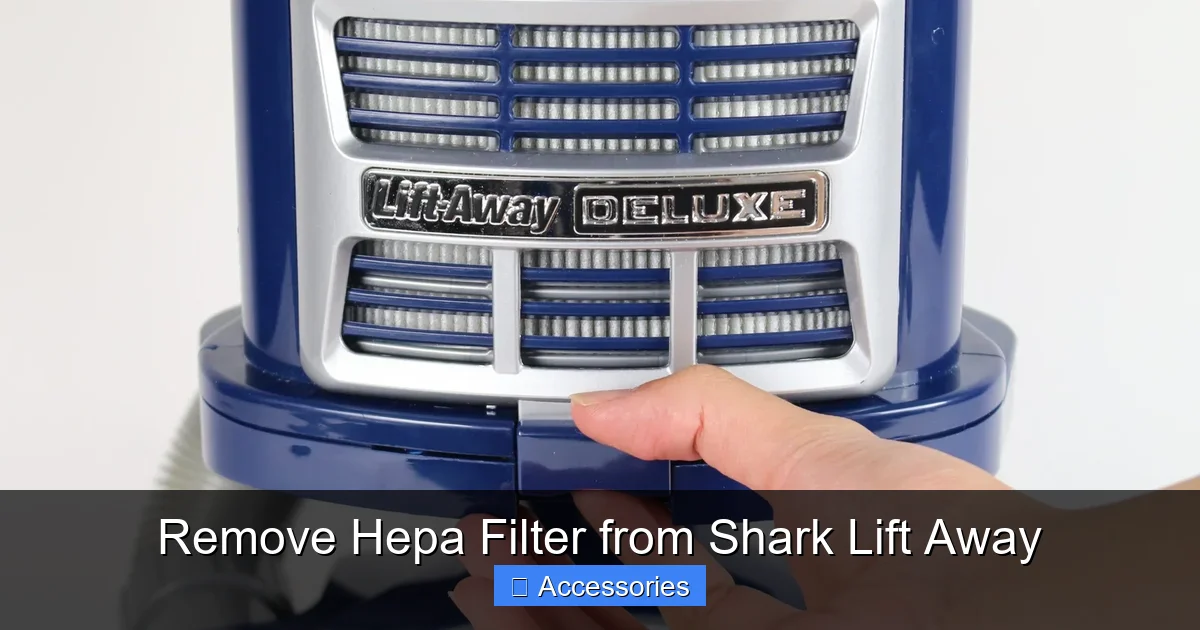
Locating the HEPA Filter on Your Specific Model
While the core design is consistent, the exact location of the post-motor HEPA filter can have minor variations. On the vast majority of Shark Lift Away uprights (models like the NV350, NV356, NV360, etc.), you will find it on the back or top-rear of the vacuum’s main body/canister. Look for a rectangular or square access panel, often secured by one or two clips or a simple twist-lock mechanism. It is positioned near the exhaust vents where the cleaned air is expelled. On some stick/handheld variants of the Lift Away system, the filter location might be on the side or bottom of the main handheld unit. The surest method is to consult your owner’s manual, which will have a labeled diagram of all parts. If the manual is unavailable, search for your exact model number (e.g., “Shark Navigator Lift Away NV352”) online to find a digital copy or an illustrated parts breakdown.
Why and When You Must Remove the HEPA Filter for Service
Knowing how to remove the filter is only half the battle; understanding why and when is equally important for proactive maintenance. Waiting until your vacuum’s performance visibly declines often means the problem has already progressed.
Visual guide about Remove Hepa Filter from Shark Lift Away
Image source: airpurifierissues.com
Signs Your HEPA Filter Needs Attention
Several clear indicators signal it’s time to remove and inspect your HEPA filter. The most obvious is a significant drop in suction power. If your vacuum no longer seems to be pulling debris as effectively, especially on carpets, a clogged filter is the prime suspect. You might also notice the vacuum’s motor sounding louder or higher-pitched, a sign it’s straining. A musty or unpleasant odor emanating from the exhaust is another red flag, indicating the filter is saturated with trapped organic material. Visually, if you can see the filter through its housing and it appears dark gray or black instead of its original white or light color, it is heavily loaded and needs service. Finally, if you’ve had the vacuum for 6-12 months with regular use and haven’t touched the filter, it’s time for a check-up.
The Consequences of Neglect: Performance and Health Impacts
Ignoring filter maintenance has a cascade of negative effects. A clogged HEPA filter drastically reduces airflow, which is the lifeblood of any vacuum cleaner. This reduction in airflow leads to poor cleaning performance—debris isn’t lifted from floors as effectively. It also causes the motor to overheat, accelerating wear and potentially leading to premature motor failure, one of the most expensive repairs. From a health perspective, a saturated HEPA filter can lose its ability to trap fine particles, allowing allergens and irritants to escape back into your home’s air. For allergy sufferers, this can be particularly problematic. Furthermore, a dirty filter can become a breeding ground for mold and bacteria, which are then expelled into your environment. Regular removal and replacement of the HEPA filter are non-negotiable for a hygienic, efficient cleaning system.
Step-by-Step Guide: How to Remove the HEPA Filter from Your Shark Lift Away
Now, let’s get to the core of the process. Removing the HEPA filter is designed to be a tool-free, user-friendly operation. Follow these steps carefully for your specific model. We will focus on the most common upright Shark Lift Away design.
Visual guide about Remove Hepa Filter from Shark Lift Away
Image source: johnnyvac.com
Step 1: Preparation and Safety
Begin by unplugging your vacuum cleaner from the wall outlet. This is the single most important safety step. Never attempt to service any part of an electrical appliance while it is connected to power. Next, position your Shark Lift Away on a stable, flat surface, preferably a towel or mat to protect your floors from any loose debris that might fall out. Have your new replacement HEPA filter ready if you know the old one is due for change. If you’re just inspecting, you’ll need a well-lit area.
Step 2: Accessing the Filter Housing
Locate the HEPA filter housing on the back of the main canister unit. You will see a plastic cover, usually rectangular, held in place by plastic clips or a twist-lock mechanism. On models with clips, you’ll typically find one or two on the top edge and sometimes one on the bottom. Gently pry these clips outward (away from the vacuum body) using your fingers. You should hear a soft click as they release. For twist-lock models, rotate the cover counter-clockwise (usually a quarter-turn) until it disengages. Apply even pressure; these components are plastic and can crack if forced.
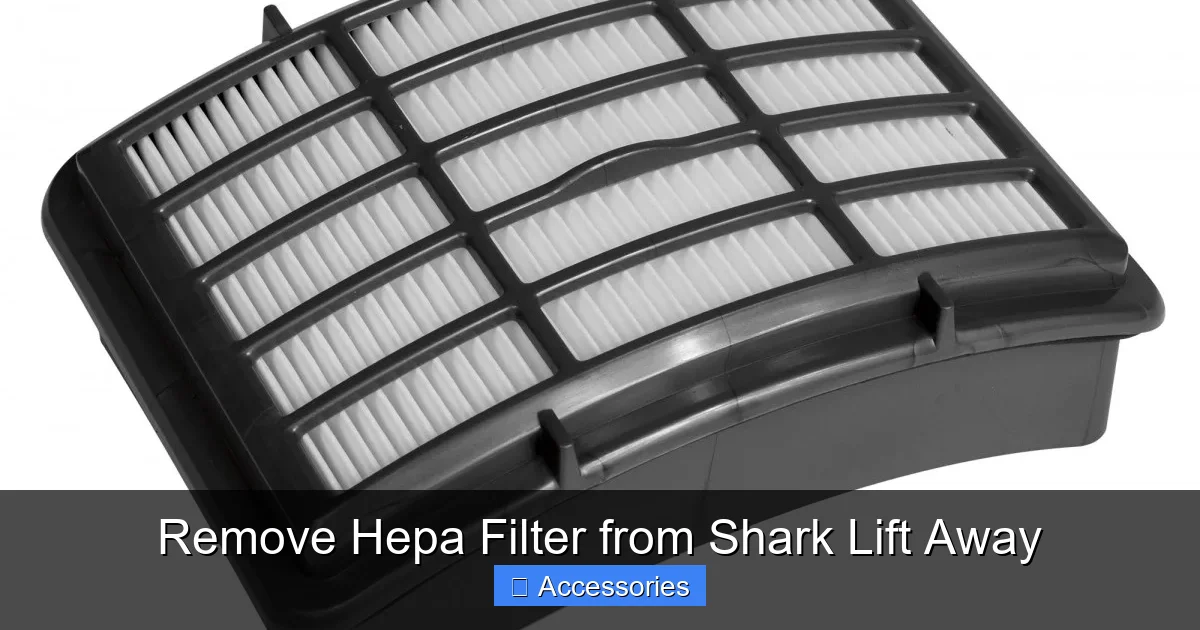
Step 3: Removing the Old HEPA Filter
Once the cover is removed, you will see the HEPA filter itself. It is a pleated cartridge, usually white or off-white when new, sitting snugly in a plastic frame or holder. There may be a thin rubber seal around the edge of the filter’s frame to ensure an airtight fit. Do not grab the pleated filter material itself. Instead, firmly grasp the rigid plastic frame of the filter cartridge. Gently pull the filter straight out. It should come out with a slight resistance due to the seal. If it feels stuck, check for any hidden clips or tabs you may have missed. Do not rock or twist the filter violently, as this can tear the delicate pleats. Once free, set the old filter aside on a clean surface for inspection.
Step 4: Inspection and Decision Point
Now, examine the removed filter. Look at the color of the pleats. If they are uniformly dark gray or black, the filter is fully loaded and needs immediate replacement. If they are only lightly gray, you might be able to gently clean the *surface* debris (more on this in the next section). Check the pleats for any physical damage—tears, holes, or areas where the paper has become brittle and flaking. Any damage means the filter must be replaced immediately. Also, inspect the rubber seal on the filter’s frame. If it is cracked, torn, or missing, the filter is compromised and should be replaced, as it will no longer create a proper seal in the housing.
Cleaning and Replacing Your HEPA Filter: Best Practices
This is a critical point of clarification that causes much confusion: most Shark Lift Away HEPA filters are NOT washable. The pleated paper material is designed to capture microscopic particles through a complex web of fibers. Wetting this paper destroys its electrostatic charge and structural integrity, rendering it useless and potentially causing it to disintegrate inside your vacuum. The only exception is if your specific filter is explicitly labeled as “Washable” or “Rinseable” in the product documentation or on the filter itself. If you are unsure, assume it is not washable.
The Correct Way to “Clean” a Non-Washable HEPA Filter
For non-washable HEPA filters, the only safe maintenance is gentle surface debris removal. After removing the filter, take it outside or over a trash can. Gently tap the filter frame against a solid surface to dislodge loose dust and debris from between the pleats. You can use a soft-bristled brush (like a clean, dry paintbrush) to very lightly sweep across the pleats to remove surface dust. Never use water, cleaning solutions, or compressed air, as the latter can damage the filter fibers by forcing debris deeper in. This process might extend the filter’s life by a week or two in very dusty environments, but it is not a substitute for replacement. The filter’s true cleaning capacity is determined by its internal fiber matrix, which cannot be restored once loaded.
Selecting and Installing the Correct Replacement Filter
When replacement is necessary (which it will be), you must use the exact Shark-certified replacement filter for your model. Using an incorrect filter can lead to poor fit, air leaks, and inadequate filtration. Locate your vacuum’s model number, usually on a sticker on the back or bottom. Then, search for “Shark [Your Model Number] HEPA filter” or visit the official Shark website’s accessories page. Genuine Shark filters (part numbers often starting with “HF”) are engineered to meet strict specifications. Installation is the reverse of removal: align the new filter with the housing, ensuring the rubber seal is properly seated and any tabs on the filter frame align with slots in the housing. Press it in firmly and evenly until it sits flush. Reattach the plastic housing cover, listening for the clips to click or twisting the lock back into place until it is snug. Ensure the cover is fully secured before using the vacuum.
Maintenance Schedule and Pro Tips for Longevity
Adopting a consistent maintenance schedule is the key to hassle-free ownership. For the HEPA filter, a good rule of thumb is to inspect it every 1-2 months and plan for replacement every 3-6 months with average use (a few times per week). Homes with pets, allergies, or high dust levels will require more frequent attention. Remember, the foam pre-motor filter is a separate item; it should be removed and washed with water monthly (and fully dried for 24 hours before reinstallation).
Integrating Filter Care into Your Routine
Make filter inspection part of a larger monthly vacuum check-up. When you remove the HEPA filter, also take this opportunity to check the brush roll for tangled hair, clean the suction nozzles, and empty the dust cup completely. Wipe down the exterior of the vacuum with a damp cloth. By bundling these tasks, you ensure your machine receives comprehensive care. Keep a log—a simple note on your phone or calendar—of the last time you checked or replaced each filter. This prevents you from forgetting and extends the life of your investment.
Storage and Handling Tips
Always handle filters by their rigid frames. Store spare filters in their original packaging in a cool, dry place away from direct sunlight and moisture. Do not stack heavy objects on them, as this can crush the pleats. If you need to store your Shark Lift Away for an extended period (e.g., seasonal use), it’s a good practice to remove both filters. Store the foam filter dry and the HEPA filter in a sealed plastic bag to protect it from absorbing ambient dust and humidity.
Troubleshooting: What If My Vacuum Still Loses Suction After Filter Replacement?
You’ve followed the guide, removed the old, clogged HEPA filter, and installed a brand-new one, but the suction problem persists. Don’t panic—the filter is just one potential point of failure in an airflow path. Here’s your systematic checklist:
- Check the Dust Cup: Is it completely full? Even a small amount of debris packed tightly in the cup can restrict airflow. Empty it completely and ensure the lid is sealed properly.
- Inspect the Hose and Wand: Detach the hose from the vacuum and look through it. Is there a visible obstruction, like a toy or a wad of paper? Use a long, flexible brush to clean the interior of the hose and wand attachments.
- Examine the Brush Roll: Is the brush roll spinning freely? Remove it (usually by pressing two release tabs) and clear any hair, string, or carpet fibers wrapped around the bearings. A jammed brush roll creates massive drag.
- Check for Air Leaks: After confirming the new HEPA filter is installed correctly, listen for unusual whistling sounds during operation. This can indicate a leak elsewhere—perhaps a cracked hose, a missing gasket on the dust cup, or a damaged connection between the wand and the floor head.
- Pre-Motor Filter: Did you wash and fully dry the foam pre-motor filter? A damp foam filter will block airflow just as effectively as a dirty one. It must be 100% dry.
If you’ve exhausted this checklist and suction is still weak, the issue may be internal, such as a failing motor or a clogged internal air duct. At this point, consulting the Shark customer support website or a authorized service center is the recommended next step.
Conclusion: A Simple Act for a Powerful Clean
Mastering the simple procedure to remove HEPA filter from Shark Lift Away vacuums is one of the most impactful maintenance skills a homeowner can possess. It directly translates to a more effective clean, a healthier home environment free of recirculated allergens, and a longer-lasting, reliable appliance. The process—unplug, locate, release clips, pull out—takes less than a minute but yields rewards that last for years. Remember the golden rules: never wash a non-washable HEPA filter, always use genuine Shark replacements, and incorporate regular inspection into your cleaning calendar. By treating your vacuum’s filtration system with this level of care, you ensure that your Shark Lift Away remains the powerful, air-purifying cleaning workhorse it was designed to be, episode after episode, year after year. Your vacuum, your floors, and your lungs will thank you for it.
Frequently Asked Questions
How often should I remove and check the HEPA filter on my Shark Lift Away?
You should visually inspect the HEPA filter every 1-2 months. For an average household, plan to replace it every 3-6 months. Homes with pets, allergy sufferers, or high-dust environments may need to check and replace it more frequently.
Can I wash the HEPA filter from my Shark Lift Away with water?
No, the standard HEPA filter in Shark Lift Away models is a pleated paper filter and is not washable. Washing it will destroy its electrostatic charge and structural integrity, ruining its filtration capability and potentially causing it to disintegrate. Always check your specific filter’s labeling; if it does not explicitly say “Washable,” do not get it wet.
What happens if I reinstall the HEPA filter incorrectly or without the seal?
An improperly seated HEPA filter will create an air leak. This means unfiltered, particle-laden air will bypass the filter and be exhausted back into your room. Additionally, the leak will cause a severe loss of suction power because the vacuum’s airflow is no longer being directed efficiently through the filter. You will notice poor cleaning performance and may hear whistling noises.
Where can I find the correct replacement HEPA filter for my model?
The safest source is the official Shark website’s accessories page. Locate your exact model number (e.g., NV352, AZ6002) on the vacuum’s body label, then search for that model number plus “HEPA filter.” You can also use authorized retailers or major online marketplaces, but always verify the part number (usually starting with “HF”) matches your model to ensure a perfect fit and performance.
My vacuum’s suction is weak even with a new HEPA filter. What else could be wrong?
>A clogged or full dust cup, a blocked hose or wand, tangled debris in the brush roll, or a damp (not fully dry) pre-motor foam filter are all common culprits that restrict airflow. Systematically check each component in the airflow path from floor to exhaust to identify the blockage.
Is it normal for the HEPA filter to get dirty quickly?
Yes, it is designed to get dirty—that’s its job! A filter that is capturing fine dust and allergens will visibly darken over time. The speed at which it gets dirty depends on your home’s environment. If you have pets, live in a dusty area, or have allergy sufferers, the filter will load much faster. This is normal and expected; it simply means your filtration system is working hard to protect your air.