Mastering multi-floor cleaning with your Shark Robot is simpler than you think. Shark’s IQ Navigation and multi-map memory allow you to create distinct floor plans for each level of your home. The key is setting up a dedicated home base on each floor, letting the robot learn and store separate maps. Use the Shark app to manage these maps, set up no-go zones for stairs or delicate areas, and schedule cleanings for specific floors. With proper setup and a few strategic tips, your Shark Robot can effortlessly maintain every level of your home.
So, you’ve got a beautiful multi-story home, and you’ve wisely invested in a Shark Robot vacuum to help keep it clean. But now you’re staring at the stairs, wondering, “How on earth does this little guy handle my upstairs and downstairs?” It’s a fantastic question, and the answer is one of the best features of modern Shark Robot vacuums. Using your Shark Robot on multiple floors isn’t just possible; with the right setup, it becomes an autonomous, floor-hopping cleaning assistant. This guide will walk you through every single step, from the underlying tech to pro-level tips, to ensure your Shark Robot works seamlessly across every level of your home.
First, let’s set the stage. Not all Shark Robots are created equal in the multi-floor department. The capability hinges on a technology suite often called IQ Navigation or Shark AI Ultra technology. This system uses a combination of optical sensors, an upward-facing camera, and sophisticated algorithms to see your home like a grid, creating a detailed floor plan you can view on your phone. Robots without this mapping capability (basic random navigation models) will clean a single floor adequately but are not designed for reliable, efficient multi-floor management. If your model has an app that shows a map of your home, you’re in the right club. This guide focuses on those map-enabled Shark Robots.
Key Takeaways
- Shark’s Core Technology: Models with IQ Navigation (like the Shark AI Ultra, Shark Vertex, and most ION series) use smart sensors and vSLAM to map your home, which is essential for multi-floor use.
- One Base, Multiple Maps: You create and save a unique map for each floor. The robot recognizes which map to use based on its starting location on that specific floor.
- Strategic Base Station Placement: For true multi-floor cleaning, you ideally need a charging base station on each floor, or you must manually carry the robot and base to the new floor to start a cycle.
- App is Your Command Center: The Shark Clean app is non-negotiable for managing multiple maps, naming floors, drawing no-go zones (like around stairs or pet bowls), and scheduling.
- Physical Transitions Matter: Pay attention to thresholds between rooms and floors. Use ramp accessories or ensure smooth transitions to prevent the robot from getting stuck or confused.
- Maintenance is Multi-Floor Too: Regularly clean sensors, brushes, and wheels on each floor’s map cycle. Different floor types (carpet vs. hard floor) may require more frequent brush cleaning.
- Patience with Learning: The first 2-3 runs on a new floor are the robot “learning” the layout. Let it complete its exploration without interrupting it for the best map results.
📑 Table of Contents
- Understanding the Core Technology: How Shark “Sees” Your Home
- Step-by-Step: Setting Up Your Shark Robot for Multiple Floors
- Optimizing Cleaning Performance on Different Floor Types
- Common Challenges and Troubleshooting for Multi-Floor Homes
- Essential Maintenance for a Multi-Floor Shark Robot
- Advanced Tips and Pro Strategies for the Multi-Floor Power User
- Conclusion: Your Multi-Floor Home, Effortlessly Clean
Understanding the Core Technology: How Shark “Sees” Your Home
Before diving into the “how,” it’s crucial to understand the “why.” Why does a Shark Robot need a map to work on multiple floors? The answer is efficiency and intelligence. A robot that bumps randomly can clean a single room, but it has no context. It doesn’t know it has finished a room, where it is in the house, or if it has missed a spot. A mapping robot, however, builds a mental (well, a digital) model of your space.
The Role of vSLAM and Sensors
Shark’s navigation system is a form of vSLAM (visual Simultaneous Localization and Mapping). As the robot drives, its camera takes continuous pictures of the ceiling—light fixtures, ceiling fans, unique patterns. It uses these visual landmarks to triangulate its position, much like you might use a distinctive tree to know you’re near your friend’s house. Simultaneously, its cliff sensors (the ones that keep it from falling down stairs), wheel encoders (measuring distance traveled), and bumper sensors feed it data about obstacles and drop-offs. All this data is compiled into that clean, linear map you see in the app. For multi-floor use, this map becomes the “memory” of a specific level.
Multi-Map Memory: The Game Changer
Here’s the magic feature: multi-map memory. Your Shark Robot isn’t just storing one map; it can store several—one for each floor. When you place the robot on the living room floor and press “Clean,” it loads the “Living Room Map.” When you carry it (and its base) upstairs to the bedroom floor and press “Clean,” it recognizes it’s in a new location and loads the “Upstairs Map.” The robot identifies which map to use based on the initial scan of its surroundings. If the visual data from the ceiling doesn’t match any stored map perfectly, it will either start a new map or ask for your guidance in the app. This is why consistent starting points on each floor yield the best results.
Step-by-Step: Setting Up Your Shark Robot for Multiple Floors
Now, the practical part. Let’s get your robot configured for its new multi-floor life. This process is methodical but only needs to be done once per floor.
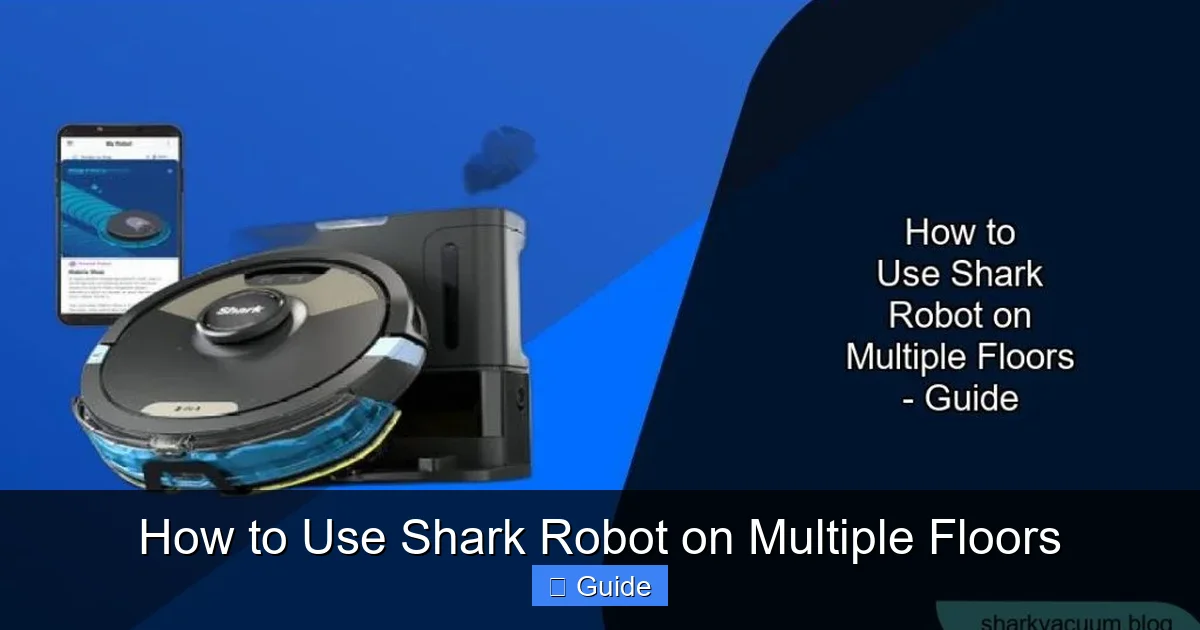
Visual guide about How to Use Shark Robot on Multiple Floors
Image source: sharkvacuum.blog
Step 1: The Golden Rule – One Base Per Floor (The Ideal Scenario)
The absolute easiest way to use your Shark Robot on multiple floors is to have a dedicated charging base station on each floor. Why? Because the robot always starts its cleaning cycle from its base. If the base is in the kitchen on the first floor, the robot will always return to that kitchen base. To clean the second floor, you’d have to carry the robot upstairs, but without a base there, it can’t recharge and resume a long cleaning job. It would run until its battery dies.
Solution: Purchase an additional official Shark charging base for your model. Place one on each primary floor you want to clean. Now, you simply place the robot on its designated base on the floor you want to clean, tap “Clean” on the robot or in the app, and it will clean that entire floor’s map and return to *that* base. This is the set-and-forget, fully autonomous multi-floor experience.
Step 2: The Manual Carry Method (If You Have One Base)
If you only have one base, you can still clean multiple floors, but it requires manual intervention.
- Complete First Floor Map: Set up your base on the first floor. Let the robot complete at least 2-3 full cleaning runs to generate a detailed, accurate map. Name this map “First Floor” in the app.
- Prepare for the Second Floor: Once the first-floor map is saved, carry the robot (and its single base station) upstairs to the second floor. Place the base in a central, open location on that floor, plug it in, and place the robot on it.
- Initiate Map Creation: In the Shark Clean app, you should see a prompt that a new environment has been detected. Start a new cleaning cycle. The robot will explore and build the “Second Floor” map. Let it finish. Save and name this map.
- Repeat: For a third floor (like a finished basement), repeat the process: carry base + robot down, let it map, save.
- Cleaning Cycle: Now, to clean the upstairs, you manually carry the robot (and base) upstairs, place it on its base, and start the “Upstairs” map cycle from the app. When done, you carry the whole setup back downstairs. This is more work but absolutely works.
Step 3: App Configuration – Naming and Managing Your Maps
Once maps are created, your app’s interface becomes your control panel.
- Naming Floors: Go to your map settings. Clearly label each map “Main Floor,” “Upstairs Bedrooms,” “Basement.” This avoids confusion later.
- Editing Maps: After a few runs, you might see the robot missed a corner or created an odd room division. Use the “Edit Map” or “Split/Combine Rooms” tool in the app to correct boundaries. This is vital for accurate no-go zones and scheduling.
- Setting No-Go Zones: This is critical for multi-floor homes. On each floor’s map, draw virtual walls or no-go polygons around:
- The top and bottom of staircases (even if they have baby gates, the robot might bump them).
- Pet food and water stations.
- Delicate area rugs that tangle the brush roll.
- Areas with lots of cords or potential entanglement.
These no-go zones are saved to that specific floor’s map, so they’re active only when cleaning that level.
Optimizing Cleaning Performance on Different Floor Types
Your multi-floor home likely has a mix of surfaces: hardwood and tile downstairs, plush carpet upstairs, maybe a shag rug in the basement. Your Shark Robot is designed to handle this, but you can optimize its performance for each surface type on each floor.
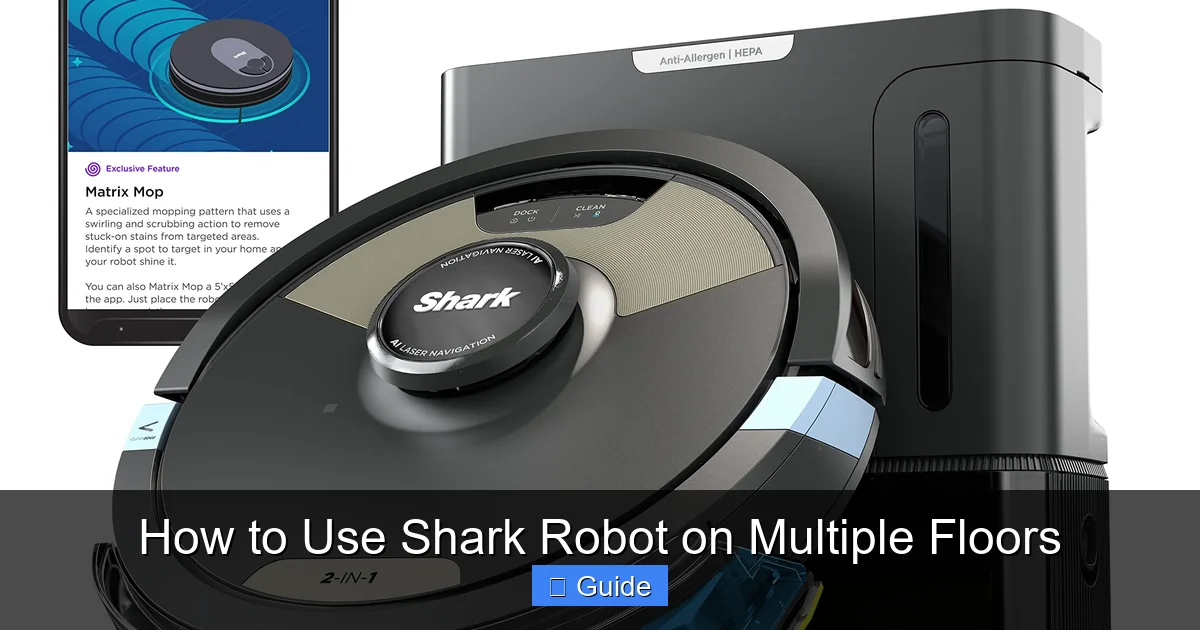
Visual guide about How to Use Shark Robot on Multiple Floors
Image source: sharkvacuum.blog
Suction Power and Brush Settings
Shark robots with DuoClean or Self-Cleaning Brushroll technology are particularly good at transitioning. However, you can still set preferences.
- Hard Floors: Use standard or “Eco” mode. The brush roll will pick up debris effectively without flinging it. Ensure the rubber bristles are clean of hair wraps.
- Low-Pile Carpet: “Normal” or “Max” mode works well. The increased suction will pull debris from the fibers.
- High-Pile/Shag Carpet: Use “Max” mode. Be aware that very thick, loose-weave rugs can sometimes trip up the robot’s sensors or cause wheel slippage. Consider setting a no-go zone over these if they consistently cause problems.
Some newer Shark AI models have a carpet boost feature that automatically increases suction when carpet is detected. Ensure this is turned on in the app settings.
Handling Thresholds and Transitions
The seams between rooms and the transitions from one floor type to another (e.g., hardwood to carpet) are common trouble spots.
- Doorway Thresholds: A high, uneven threshold can stop a robot dead. Use a thin, sturdy ramp (like a piece of plywood or a commercial robot ramp) to bridge the gap temporarily during cleaning.
- Floor Type Changes: The robot should glide over a typical ¼-inch transition strip. If it struggles, check for debris caught in the transition or a strip that is warped. A small piece of double-sided tape can secure a loose strip.
- Different Floor Levels: If you have a step down into a sunken living room or up to a landing, this is a major hazard. These must be blocked with a physical barrier (like a baby gate) or a very carefully drawn no-go zone in the app. Never rely solely on a no-go zone for a true step.
Common Challenges and Troubleshooting for Multi-Floor Homes
Even with perfect setup, the unique challenges of a multi-floor home can cause hiccups. Here’s how to solve them.
Visual guide about How to Use Shark Robot on Multiple Floors
Image source: m.media-amazon.com
The Robot Gets “Lost” or Creates a Bad Map on a New Floor
Symptom: On the second floor, the map is fragmented, shows loops, or the robot repeatedly bumps into walls it should have learned.
- Solution: Ensure good lighting on that floor. vSLAM needs light to see ceiling features. Close blinds or turn on lights if it’s dark. Start the robot from a central, open location on that floor, not tucked in a corner. Do not interrupt the first 2-3 exploration runs. Let it fully charge and complete its cycle. If problems persist, delete the map for that floor and start over, ensuring no temporary obstacles (like a moved chair) confuse it.
The Robot Won’t Leave Its Base on a Different Floor
Symptom: You’ve carried the robot and base upstairs, but when you press clean, it just sits there or does a tiny circle and returns.
- Solution: This usually means the environment doesn’t match any saved map closely enough. The robot is confused. Go into the app and manually select the correct map for that floor before starting the clean. You may need to slightly adjust the robot’s starting position on the base to give it a different initial view. If it consistently fails, you may need to re-map that floor.
Stair Avoidance Failure
Symptom: The robot repeatedly approaches and bumps the top of the stairs, causing anxiety.
- Solution: First, clean the cliff sensors (the black windows on the underside front) with a microfiber cloth. Dust or debris can blind them. Second, and most importantly, draw a no-go zone that extends at least 2-3 feet from the staircase edge on the map in your app. This creates a virtual wall the robot will not cross, providing peace of mind.
Poor Performance on One Specific Floor
Symptom: The robot cleans fine downstairs but misses a lot of debris upstairs.
- Solution: Analyze the floor type. Is the upstairs all plush carpet? You may need to increase suction power specifically for that floor’s map in the app settings. Also, check the brush roll. Long pet hair from a carpet can wrap tightly around the bristles, reducing effectiveness. Clean the brush roll thoroughly after cleaning that floor. Finally, re-examine the map. Did it accurately capture all the rooms on that floor? An incomplete map will lead to incomplete cleaning.
Essential Maintenance for a Multi-Floor Shark Robot
With more floor space comes more debris, more hair, and more wear. A disciplined maintenance routine is key to keeping your robot performing well on all levels.
The Weekly/Multi-Floor Checklist
After every 2-3 runs (which might cover multiple floors), perform this quick check:
- Empty the Dustbin: This is job #1. A full bin reduces suction and can cause the robot to leave debris behind on all floors.
- Clean the Brush Roll: Remove any hair, string, or carpet fibers wrapped around the bristles. This is especially important after cleaning carpeted floors. Use the included cleaning tool.
- Wipe the Sensors: Use a dry, soft microfiber cloth to gently clean the sensors:
- The drop/cliff sensors on the underside front.
- The navigation camera on the top (if accessible).
- The bumper sensor area.
Dirty sensors are a leading cause of mapping and navigation errors.
- Check the Wheels: Wipe them clean. Debris caked in the wheel wells can affect movement and traction on different floor surfaces.
The Monthly Deep Clean
Once a month, or more frequently if you have pets, do a more thorough teardown:
- Remove and clean the filter. Tap out debris and wash if your model’s filter is washable. Let it dry completely for 24 hours before reinserting.
- Disassemble the brush roll housing and clean out any hidden debris in the channels.
- Check the drive wheels for hair wraps.
- Wipe down the entire exterior of the robot and the charging contacts on both the robot and the base.
Remember, a clean robot is an efficient robot, regardless of which floor it’s on.
Advanced Tips and Pro Strategies for the Multi-Floor Power User
Once you have the basics down, you can unlock even greater efficiency and convenience.
Leveraging Schedules for Floor-Specific Cleaning
This is the pinnacle of multi-floor automation. In the Shark Clean app, you can create schedules that are tied to a specific map.
- Create a schedule called “Weekday Downstairs Clean” that runs the “First Floor” map every Monday, Wednesday, and Friday at 10 AM.
- Create another schedule called “Weekend Upstairs Clean” that runs the “Upstairs” map every Saturday at 9 AM.
- As long as the robot is on the correct floor on its base when the scheduled time arrives, it will execute that floor’s map automatically. This means if your robot’s base is upstairs, the upstairs schedule will run. If you carried it downstairs for a guest, the downstairs schedule will run. It’s beautifully adaptive.
Using “Clean Zones” for Targeted Multi-Floor Messes
Spilled cereal in the kitchen on the first floor *and* a knocked-over plant on the upstairs landing? Don’t run full-floor cycles. In the app, on the relevant map, draw a small “Clean Zone” (a rectangle) around the specific messy area on each floor. You can then send the robot to clean just those zones, one after the other. It’s a fantastic way to handle spot messes across your home without wasting time on already clean areas.
Managing Pets and Children Across Floors
If your pet’s bed is upstairs and their food bowl is downstairs, your no-go zones will be floor-specific. This is perfect. Just remember to check that your pet hasn’t moved their bed to a new spot on the upstairs map, invalidating your no-go zone. Similarly, if toys are left out on the playroom floor (basement), either clean them up or draw a temporary no-go zone to prevent the robot from getting tangled.
Conclusion: Your Multi-Floor Home, Effortlessly Clean
Using your Shark Robot vacuum on multiple floors transforms it from a simple room cleaner into a whole-home cleaning system. The journey begins with understanding that your robot’s maps are its memory—a unique memory for each level. By investing in the simple but powerful step of having a charging base on each floor, or by mastering the manual carry method, you unlock that potential.
The real control lies in the Shark Clean app. Taking the time to meticulously name, edit, and protect each floor’s map with no-go zones pays dividends in reliability and peace of mind. Combine this with a rigorous, multi-floor-aware maintenance schedule, and your Shark Robot will faithfully keep every level of your home tidy, day after day.
Embrace the learning curve. The first few runs on a new floor are the robot’s exploration phase—let it learn. Then, fine-tune. Soon, you won’t even think about the stairs. You’ll simply press “Clean” from your phone, confident that whether it’s the ground-level kitchen or the attic office, your Shark Robot is on the case, navigating your unique multi-floor world with smart, efficient precision.
Frequently Asked Questions
Can I use my Shark Robot on multiple floors if I only have one charging base?
Yes, you can. You will need to manually carry both the robot and its single charging base to each floor you want to clean. After setting up the map for that floor, you start a cleaning cycle from the base. Once finished, you carry the setup to the next floor. It requires manual effort but works effectively.
My robot keeps getting stuck on the transition between my hardwood and carpet. What should I do?
First, clean the robot’s wheels and the transition area itself of any debris. If the threshold is high or uneven, consider using a thin, sturdy ramp to bridge it. In some cases, a very thick, shaggy carpet can cause wheel slippage; you may need to set a no-go zone over that specific rug if it consistently traps the robot.
How do I prevent my Shark Robot from falling down the stairs?
Always ensure the cliff sensors on the robot’s underside are clean. More importantly, use the Shark Clean app to draw a no-go zone that extends at least 2-3 feet from the top of the staircase on your floor’s map. This creates a virtual barrier the robot will not cross, providing a critical safety layer.
The robot created a messy, incomplete map on my second floor. How do I fix it?
Delete the incorrect map for that floor. Ensure the floor is well-lit during the mapping process. Place the robot and its base in a central, open location on that floor. Start a new cleaning cycle and allow it to complete 2-3 full runs without interruption to build an accurate map. Then, use the app’s editing tools to split or combine rooms as needed.
What does the “New Environment Detected” message mean in the app?
This means your robot’s current location and view of the ceiling do not match any of your saved maps. It’s asking if you want to create a new map for a new floor (if you carried it upstairs) or if something has changed dramatically on a known floor (like all the furniture was moved). Confirm you’re on a new floor to start the mapping process for that level.
Can I schedule different floors to clean on different days?
Absolutely. In the Shark Clean app, you can create multiple schedules. When setting a schedule, you select which specific saved map (e.g., “Upstairs” or “Basement”) it should run. So, you can set the “Main Floor” map to run Monday, Wednesday, Friday, and the “Upstairs” map to run on Saturday. The robot will run the schedule for the floor it is currently residing on.