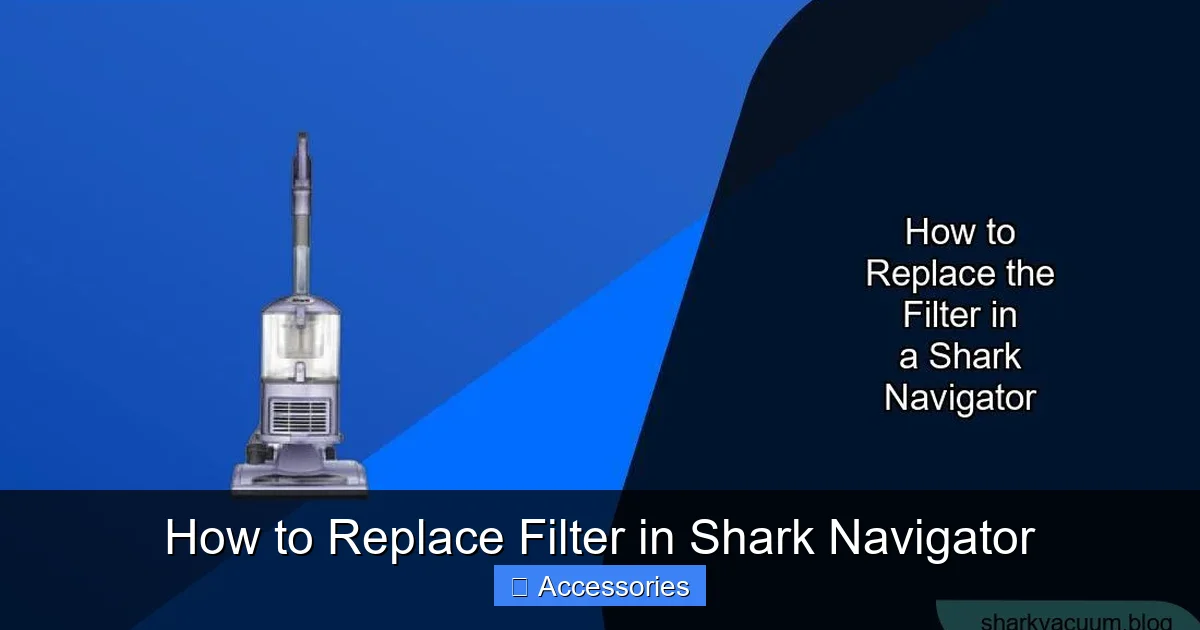
Replacing the filter in your Shark Navigator vacuum is a simple, crucial maintenance task that directly impacts suction power, air quality, and the machine’s lifespan. This guide provides detailed, model-specific instructions for locating, removing, and installing both pre-motor and post-motor filters. By following these steps and establishing a regular cleaning/replacement schedule, you ensure your vacuum operates at peak efficiency and protects your home’s air.
Has your trusty Shark Navigator vacuum started to feel a little… weak? Is that familiar powerful suction now more of a mild puff? Before you panic and think about costly repairs, the answer is likely sitting right inside your dust cup. More often than not, a drop in performance points directly to a clogged or worn-out filter. Replacing the filter in your Shark Navigator isn’t just a chore; it’s the single most important piece of regular maintenance you can do to keep your vacuum cleaning like new, protect your investment, and even improve the air you breathe in your home. Think of the filter as your vacuum’s lungs. If they’re clogged, the whole system struggles. This complete guide will walk you through everything you need to know, from identifying your filters to mastering the replacement process for any Shark Navigator model.
We’ll break it down into simple, no-stress steps. No technical expertise is needed—just a few minutes of your time and a willingness to get(acquainted with the inner workings of your cleaning powerhouse. Whether you have a classic Navigator Lift-Away, a sleek Navigator Pro, or any model in between, the core principles are the same. By the end of this article, you’ll be a filter-replacement pro, ready to restore your vacuum’s power and extend its life for years to come. Let’s dive in and get your Shark Navigator breathing freely again.
Key Takeaways
- Filter Location Varies: Your Shark Navigator has at least two filters—a foam pre-motor filter (usually washable) and a pleated post-motor filter (often replaceable)—located in the dust cup assembly and near the motor.
- Regular Cleaning is Key: The washable foam filter should be cleaned after every 3-4 uses and air-dried completely for 24 hours to maintain performance and prevent mold.
- Post-Motor Filters Expire: The HEPA or exhaust filter is not washable and typically needs replacement every 3-6 months, depending on usage, to trap fine allergens and protect the motor.
- Correct Model Identification: Always verify your exact Shark Navigator model number (found on the back or underside) before purchasing replacement filters to ensure a perfect fit.
- Simple Tools Required: Most filter replacements require no tools, just your hands. Having a soft brush or vacuum attachment handy helps clean the filter housing during the process.
- Maintenance Prevents Problems: Neglecting filter maintenance is the leading cause of reduced suction, overheating, and premature motor failure in Shark Navigator vacuums.
- Accessory Kits Available: Shark often sells filter combo kits that include both the foam and exhaust filters for your specific model, which is cost-effective and ensures you have the right parts.
📑 Table of Contents
- Understanding Your Shark Navigator’s Filtration System
- Essential Tools and Preparation Before You Start
- How to Identify and Purchase the Correct Replacement Filter
- Step-by-Step: Replacing the Washable Pre-Motor Foam Filter
- Step-by-Step: Replacing the Post-Motor HEPA/Exhaust Filter
- Model-Specific Considerations and Tips
- Establishing a Maintenance Schedule and Troubleshooting
- The Bottom Line: A Small Effort for Maximum Reward
Understanding Your Shark Navigator’s Filtration System
Before we touch a single screw or filter, it’s vital to understand what you’re looking at. Shark Navigator vacuums use a multi-stage filtration system designed to capture debris of all sizes while protecting the motor from fine dust. Most models feature at least two primary filters, each with a distinct job and maintenance schedule.
The Two Main Filters: Pre-Motor and Post-Motor
The first line of defense is the pre-motor filter, typically made of foam. This filter sits right after the dust cup and catches larger particles like hair, lint, and carpet fibers before the air reaches the sensitive motor. Its job is to protect the motor from clogs and abrasion. The good news? This foam filter is almost always washable and reusable. The second critical filter is the post-motor filter (also called exhaust or HEPA filter). Located after the motor, its job is to catch the finest dust and allergen particles that the first filter missed, ensuring the air expelled from your vacuum is clean. This filter is usually a pleated paper or fabric media and is not washable—it must be replaced periodically.
Some advanced Shark Navigator models may also include an additional anti-allergen complete seal filter or a secondary foam filter in a different location, but the pre-motor (foam) and post-motor (pleated) are the dynamic duo you need to know. Identifying which is which is the first step to successful maintenance.
Why Filter Maintenance is Non-Negotiable
You might be thinking, “It’s just a filter, how big of a deal can it be?” A very big deal, actually. A clogged pre-motor filter acts like a blanket over your vacuum’s motor, forcing it to work harder, run hotter, and consume more energy. This leads directly to a dramatic loss of suction power—the very thing your vacuum is bought to provide. Furthermore, a saturated post-motor filter means fine dust and allergens are not being captured and are being blown back into your home’s air, defeating the purpose of vacuuming for health. Prolonged operation with blocked filters can cause the motor to overheat and fail prematurely, turning a simple $20 filter replacement into a $100+ repair bill. Simply put, clean filters equal a powerful, efficient, and long-lasting vacuum.
Essential Tools and Preparation Before You Start
Replacing your Shark Navigator filter is designed to be a tool-free process for most models. However, a little preparation goes a long way in making the job smooth and mess-free. Gather these items before you begin:
Visual guide about How to Replace Filter in Shark Navigator
Image source: sharkvacuum.blog
- Your Shark Navigator Vacuum: Obviously! Ensure it is unplugged from the wall outlet. Safety first.
- Replacement Filter(s): This is the star of the show. You must get the correct filter for your specific model. We’ll cover how to find your model number and the right part in the next section.
- A Soft Brush or Microfiber Cloth: For gently brushing out any lingering dust or debris from the filter housing. A vacuum crevice tool can also work.
- A Designated Cleaning Area: Choose a spot like a laundry room, garage, or outdoors where a little dust is no problem. Avoid doing this over a freshly made bed or on a clean carpet.
- Optional: Gloves: If you have allergies or simply don’t want dusty hands, a pair of disposable gloves is helpful.
The most critical piece of preparation is identifying your exact Shark Navigator model number. This alphanumeric code (e.g., NV356, NV501, HV322) is your key to ordering the perfect filter. Look for a silver sticker on the back or underside of the vacuum’s body, near the wheels or power cord wrap. It might also be on the original box or in your user manual. Write this number down—you’ll need it.
How to Identify and Purchase the Correct Replacement Filter
Ordering the wrong filter is the most common mistake. It might not fit, seal properly, or could even be the wrong type (e.g., trying to install a washable foam filter where a HEPA filter belongs). Here’s how to guarantee you get the right part every time.
Visual guide about How to Replace Filter in Shark Navigator
Image source: everydaycheapskate.com
Decoding the Model Number
Your model number is the ultimate authority. It’s usually a combination of letters and numbers like “NV352,” “HV322,” or “AZ6002.” Once you have this, you have two excellent paths to the correct filter.
Using the Official Shark Website
The most reliable method is to visit the official Shark website (sharkclean.com). Navigate to their “Accessories & Parts” section. There will be a search bar or a model lookup tool. Enter your exact model number. The site will populate a list of all compatible accessories for your specific vacuum. Look for items named “Filter Kit,” “Foam Filter,” “HEPA Filter,” or “Exhaust Filter.” This method eliminates all guesswork.
Understanding Part Numbers and Kit Names
You’ll see filters sold individually or as kits. A “Filter Kit” or “Complete Filter Kit” for your model is often the best value, as it includes both the washable foam pre-motor filter and the replaceable post-motor filter. Common part numbers you might see include:
- For older Lift-Away models (NV300-NV500 series): Look for filters compatible with the NV350, NV356, NV500, etc.
- For newer Navigator Pro models (HV300-HV400 series): Filters are often specific to the HV322, HV381, etc.
- For AZ series (Shark Vertex, etc.): These have unique filters, like the AZ6002 series.
If buying from Amazon or another retailer, always filter your search by your exact Shark Navigator model number in the product title or description. Reading reviews from other owners of your same model is a great way to confirm fit and quality.
Step-by-Step: Replacing the Washable Pre-Motor Foam Filter
This is the filter you’ll service most often. It’s designed to be removed, cleaned, and reused. Let’s get it out and give it a fresh start. The process is remarkably similar across almost all Shark Navigator models.
Visual guide about How to Replace Filter in Shark Navigator
Image source: i5.walmartimages.com
1. Accessing the Dust Cup Assembly
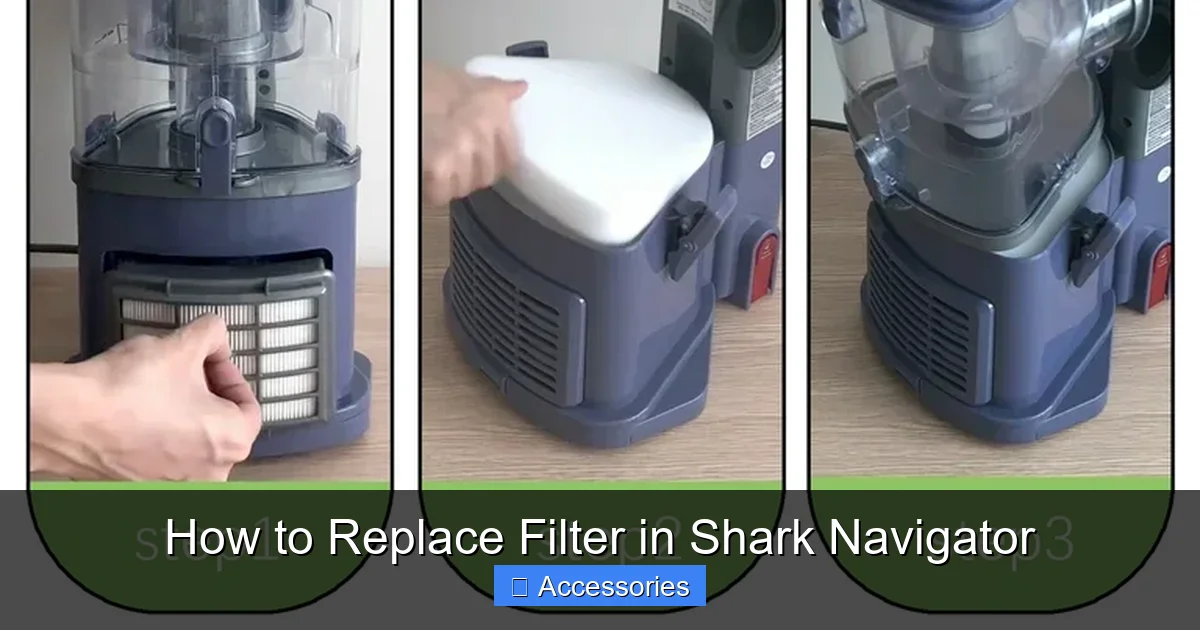
Start by ensuring your vacuum is unplugged. Locate the dust cup release button or latch, usually on the top or front of the vacuum body. Press it and pull the dust cup assembly straight down and off the vacuum. You now have the main cleaning unit in your hands.
2. Opening the Dust Cup
With the dust cup detached, find the dust cup release button or latch on the cup itself (this is different from the one that released it from the vacuum). Press or slide this latch and separate the two halves of the dust cup. You’ll now see the inner cylinder and the foam filter sitting snugly around it.
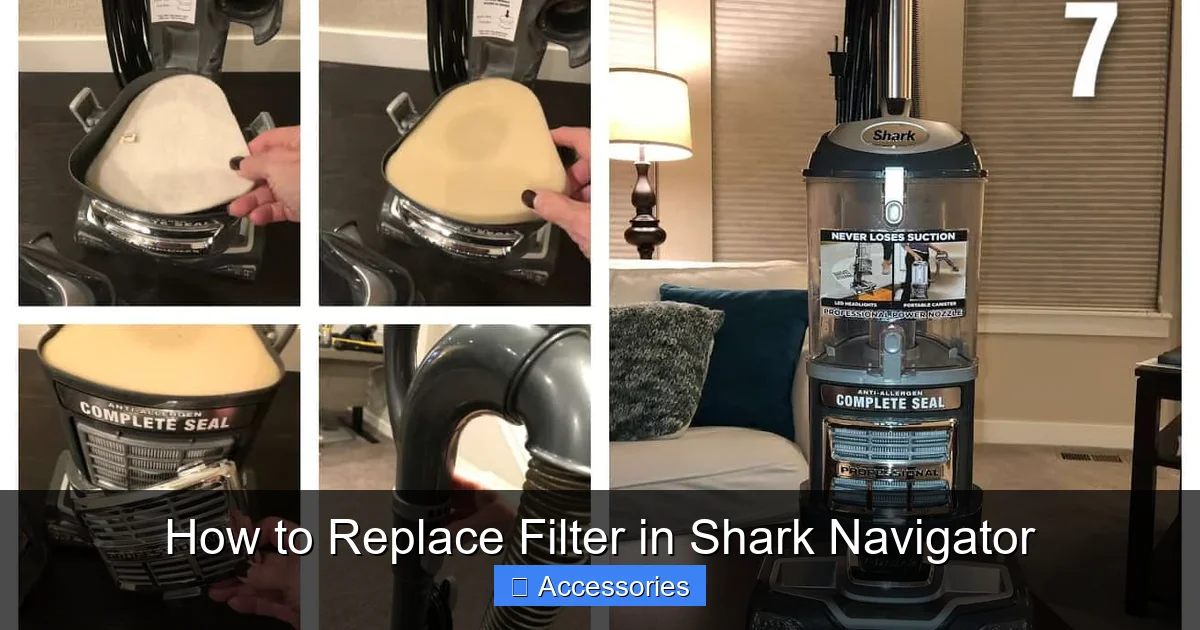
3. Removing the Foam Filter
The foam filter is a cylindrical sleeve that slides over the inner cyclone assembly. Simply grip it firmly and pull it straight off. It may have some dust and hair clinging to it. Be gentle; old foam can become brittle.
4. Cleaning the Foam Filter
Take the foam filter to your sink. Use cool or lukewarm water and gently squeeze and massage the foam to push out the trapped dust and debris. Do not use soap or detergent, as residues can damage the foam and reduce airflow. Rinse thoroughly until the water runs clear. Gently squeeze out excess water—do not wring or twist, as this can tear the foam.
5. Drying is Crucial
This is the most important step. The filter must be 100% completely dry before reinstallation. Place it in a well-ventilated area, away from direct heat or sunlight. Prop it up if needed. Allow it to air dry for at least 24 hours. Using a hair dryer is not recommended, as high heat can melt the foam. Patience is key; a damp filter will clog instantly and promote mold growth.
6. Reinstallation
Once bone-dry, simply slide the clean foam filter back over the inner cylinder until it sits flush and secure. Re-latch the two halves of the dust cup until you hear a click. Finally, align the dust cup’s connector with the vacuum’s intake port and push it back onto the body until it locks into place. You’re done with the pre-motor filter!
Step-by-Step: Replacing the Post-Motor HEPA/Exhaust Filter
This is the filter that truly needs replacing, not washing. Its location is consistent but requires a different access point than the dust cup. This filter cleans the air *after* it passes through the motor.
1. Locating the Filter Cover
Turn your Shark Navigator over so the bottom is facing you. On the back, near the wheels or motor housing, you will see a small, often rectangular or circular, plastic cover secured with one or two plastic clips or a single screw. This is the filter access door. On some newer models, it might be on the side or top rear. Consult your manual if unsure, but it’s typically on the rear base.
2. Opening the Filter Compartment
Gently release the plastic clips by pressing them inward and prying the cover off. If there is a screw, use a Phillips-head screwdriver to remove it. Set the small screw aside in a safe place. The cover should pop off easily, revealing the pleated filter inside.
3. Removing the Old Filter
The filter is a rectangular or square pleated cartridge. It may have a plastic frame or handle. Simply pull it straight out of its housing. Note its orientation—which side faced the motor and which faced the exhaust vent. There is usually an arrow on the filter frame or housing indicating airflow direction. Take a mental note or a quick photo.
4. Cleaning the Housing (Optional but Recommended)
Before installing the new filter, use your soft brush or a vacuum crevice tool to gently clean out any dust, hair, or debris that has accumulated in the empty filter housing. A clean housing ensures optimal airflow for the new filter.
5. Installing the New Filter
Take your new, correct replacement filter. Align it exactly as the old one was, respecting the airflow direction arrow (it should point toward the exhaust vent/away from the motor). Gently but firmly slide the filter into its housing until it sits flush and fully inserted. It should fit snugly with no gaps.
6. Securing the Cover
Place the plastic cover back over the filter compartment. Press firmly around all edges until you hear the plastic clips snap securely into place. If your model uses a screw, reinsert and tighten it just until snug—do not overtighten and crack the plastic. That’s it! The critical post-motor filter is now replaced.
Model-Specific Considerations and Tips
While the core process is universal, a few Shark Navigator lines have minor quirks. Here are tips for common variants:
Shark Navigator Lift-Away (NV Series)
These are the classic models with a detachable pod. The pre-motor filter access is identical to the steps above. The post-motor filter is always on the rear base, accessed by removing a small rectangular cover with two clips. The foam filter is a simple cylindrical sleeve.
Shark Navigator Pro (HV Series)
These often have a slightly different dust cup release mechanism—a large button on top of the pod instead of a latch. The foam filter may be a more oval-shaped “donut” that fits over the cyclone. The post-motor filter location is the same (rear base), but the cover might be a single large clip. Always confirm with your model number.
Shark Navigator with Anti-Allergen Complete Seal
Models with this marketing term have an enhanced seal and often a more advanced HEPA filter. The post-motor filter might be larger and have a rubber gasket to ensure an airtight seal. When replacing, ensure the gasket is clean and seated properly on the new filter to maintain the “complete seal” promise.
The “Self-Cleaning” Brush Roll Indicator
Some newer Navigators have a red brush roll indicator light. If this light comes on, it often means debris is wrapped around the brush roll, but a severely clogged pre-motor filter can also trigger it by causing a drop in suction pressure. So, when you see that light, check and clean your foam filter first!
Establishing a Maintenance Schedule and Troubleshooting
Now that you’ve done the job, let’s talk about how to make it a habit and what to do if things don’t go perfectly.
Creating Your Filter Maintenance Calendar
Consistency is what separates a smoothly running vacuum from a struggling one. Here is a simple, effective schedule:
- Foam Pre-Motor Filter: Wash after every 3-4 uses. If you have pets, allergies, or vacuum frequently, clean it after every use. Always air-dry for 24 hours.
- Post-Motor HEPA/Exhaust Filter: Inspect monthly. Tap it gently; if you see dust puff out, it’s time to replace. As a rule, replace it every 3-6 months with normal household use. With pets, allergies, or heavy use, plan for replacement every 2-3 months.
Mark these tasks on your phone calendar or in a home maintenance journal. It takes two minutes to check and prevents hours of frustration with poor performance.
Troubleshooting: What If My Vacuum Still Has Low Suction?
You’ve replaced both filters, but the power isn’t back? Don’t worry; there are other common culprits:
- Clogged Hose or Wand: Detach the hose from the vacuum and look through it. Use a long broom handle or a flexible brush to dislodge any blockages.
- Full or Dirty Dust Cup: Empty the dust cup after every single use. A full cup blocks airflow instantly. Also, wipe out the inner cyclone assembly with a damp cloth (never the filters!).
- Obstructed Brush Roll: Turn the vacuum over. Use a seam ripper or scissors to cut away any hair or carpet fibers wrapped around the brush roll. Rotate it by hand to ensure it spins freely.
- Worn or Clogged Belts: If the brush roll isn’t spinning at all, the belt may be broken or stretched. This is a slightly more advanced repair but a common issue.
Address these areas systematically. In 90% of cases, poor suction is due to one of these five issues: filters, dust cup, hose, brush roll, or belts.
The Bottom Line: A Small Effort for Maximum Reward
Taking the time to learn how to replace the filter in your Shark Navigator is one of the smartest investments you can make in your cleaning routine. It’s a 5-10 minute task that costs less than $20 for a quality filter kit, yet it protects a vacuum that likely cost you $200 or more. You’ll enjoy consistently powerful suction that makes cleaning faster and more effective. You’ll breathe easier knowing allergens are being trapped, not recirculated. And you’ll add years to the life of your vacuum’s motor, delaying the day you need to replace the entire machine.
So, locate your model number, order the correct filters, and mark your calendar. Become the master of your Shark Navigator. Your floors—and your vacuum—will thank you for it. Remember, a clean filter is a happy vacuum, and a happy vacuum makes for a happy, healthier home.
Frequently Asked Questions
How often should I replace the HEPA filter in my Shark Navigator?
The post-motor HEPA filter is not washable and should be replaced every 3 to 6 months with normal use. If you have pets, allergies, or vacuum daily, plan to replace it every 2 to 3 months for optimal performance and air filtration.
Can I wash the HEPA/exhaust filter in my Shark Navigator?
No. The post-motor HEPA or pleated exhaust filter is made of delicate paper or fabric media that is damaged by water. Washing it will destroy its ability to capture fine particles and can cause it to disintegrate. It must be replaced with a new one when it becomes clogged.
My foam filter is clean and dry, but suction is still weak. What else could be wrong?
Check these common issues: ensure the dust cup is completely empty and the cyclone is clean, inspect the hose and wand for blockages, and verify the brush roll is spinning freely and isn’t wrapped with hair. Also, make sure the post-motor HEPA filter isn’t overdue for replacement.
Where is the model number on my Shark Navigator?
Look for a silver sticker on the back or underside of the vacuum’s main body, typically near the wheels, power cord wrap, or motor housing. It’s a combination of letters and numbers (e.g., NV356, HV322). You may also find it on the original packaging or in the user manual.
Do I need tools to replace the filters?
For most Shark Navigator models, you do not need any tools to replace either the foam pre-motor filter or the HEPA post-motor filter. The filter covers are secured with simple plastic clips. You may need a Phillips-head screwdriver for some older models where the post-motor filter cover is screw-secured.
What happens if I don’t replace the filters regularly?
Neglecting filter maintenance leads to severely reduced suction power, causes the motor to overheat and work harder (shortening its lifespan), and allows dust and allergens to blow back into your home’s air. Ultimately, it can result in complete motor failure, making a cheap filter replacement turn into an expensive repair or new vacuum purchase.