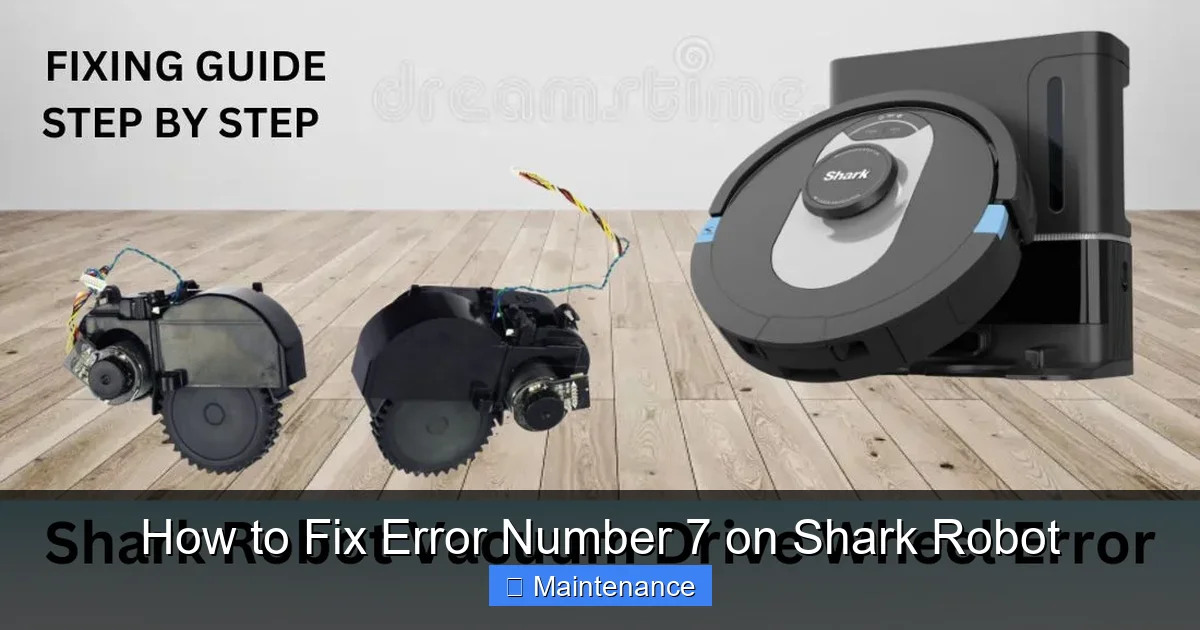
Error 7 on your Shark Robot vacuum indicates a wheel motor problem, usually caused by debris or obstruction. This comprehensive guide walks you through immediate resets, deep cleaning procedures, obstruction checks, and advanced troubleshooting steps. Follow these detailed instructions to diagnose and fix the issue yourself, saving on service costs and getting your robot vacuuming again.
So your trusty Shark Robot vacuum has suddenly stopped in its tracks, beeping frantically and displaying the dreaded “Error 7” on its little screen. Don’t panic! This is one of the most common—and thankfully, most fixable—error codes you’ll encounter with these clever little machines. Unlike some cryptic error codes, Error 7 has a very specific meaning: your Shark Robot is telling you it has detected a problem with its wheel motor system. This doesn’t necessarily mean the motor is fried. In fact, the vast majority of the time, it’s a straightforward mechanical issue caused by the very things your robot was designed to tackle: hair, carpet fibers, dust bunnies, and small debris.
Think about it. Your robot’s wheels are its feet. They’re constantly in contact with the dirtiest parts of your floor, spinning and gripping. It’s inevitable that some of that grime works its way into the精密 (jīngmì -精密) spaces around the wheel axles and into the motor gears themselves. When enough debris builds up, it creates resistance, prevents the wheel from spinning freely, or even stops it entirely. The robot’s brain senses this unusual load or lack of movement and triggers Error 7 as a safety precaution to prevent further damage. The good news? With some patience, a few common household tools, and a systematic approach, you can almost always fix Error 7 on a Shark Robot yourself. Let’s get into it.
Key Takeaways
- Error 7 Means Wheel Motor Issue: Shark Robot error code 7 specifically points to a problem with one or both wheel motors or their assemblies, not a general failure.
- Debris is the Prime Culprit: Over 80% of Error 7 cases are caused by hair, string, carpet fibers, or grit jamming the wheel axles or motor gears.
- Systematic Cleaning is Key: A methodical deep clean of the wheels, axles, and internal motor compartments is the most effective first-line fix.
- Check for Physical Obstructions: Always inspect for tangled debris around the wheel towers and inside the chassis where the wheel motors sit.
- Software Reset Can Help: A full power cycle reset (removing the battery) can clear false error codes after a mechanical obstruction is removed.
- Know When to Seek Help: If cleaning and resetting fail, the wheel motor itself or its internal Hall effect sensor may be faulty, requiring professional repair or part replacement.
- Prevention is Crucial: Regular maintenance, including weekly wheel inspections and cleaning, prevents most Error 7 occurrences.
📑 Table of Contents
- Understanding Error 7: What Your Shark Robot Is Really Saying
- Immediate First Steps: The Quick Reset and Visual Inspection
- Deep Cleaning the Wheel Motor Assemblies: The Heart of the Fix
- Checking for Obstructions in the Wheel Towers and Chassis
- Advanced Troubleshooting: When Cleaning Isn’t Enough
- When to Seek Professional Repair or Replacement
- Preventive Maintenance: Keeping Error 7 Away for Good
- Conclusion: You’ve Got This
Understanding Error 7: What Your Shark Robot Is Really Saying
Before we start taking things apart, it’s important to understand exactly what “Error 7” signifies across the Shark ION robot lineup. Whether you own an older Shark ION Robot Vacuum (like the RV750, RV862) or a newer Shark AI Ultra (with the same core wheel motor design), the error code is consistent. It is not a battery error, not a sensor error for cliff or bump, and not a main brush error. It is exclusively a wheel motor assembly error.
The Wheel Motor Assembly: A Closer Look
The wheel motor assembly is more than just a motor and a wheel. It’s a compact unit that includes:
- The DC Motor: The small electric motor that provides the spinning force.
- The Gearbox: A series of tiny plastic gears that transfer and adjust the motor’s rotation to the wheel.
- The Wheel Axle: The metal shaft the wheel rotates on, which passes through the gearbox.
- The Hall Effect Sensor: A tiny magnetic sensor inside the motor assembly that tells the robot’s mainboard how fast and in which direction the wheel is turning. A jammed wheel can also cause this sensor to give a false reading.
- The Wheel Itself: The rubber-tired wheel that contacts your floor.
Error 7 can be triggered by a failure in any part of this chain. The motor might be stalled because gears are stripped or jammed. The axle might be physically blocked. The sensor might not detect movement. Our troubleshooting will address all these potential failure points, starting with the most common: obstruction and debris.
Immediate First Steps: The Quick Reset and Visual Inspection
When Error 7 first appears, your initial reaction might be to immediately dismantle the robot. Resist that urge. Start with these simple, non-invasive steps that often resolve the issue or at least give you more information.
Visual guide about How to Fix Error Number 7 on Shark Robot
Image source: sharkvacuum.blog
Step 1: The Full Power Cycle Reset
Sometimes, a temporary glitch or a minor jam that has since cleared can leave the error code stuck. A full reset clears the robot’s memory.
- Turn Off and Place on a Flat Surface: Pick up the robot and place it on a table or counter.
- Remove the Dustbin: Take out the main dustbin to access the battery compartment (on most models).
- Disconnect the Battery: Locate the battery connector inside the bin cavity. Press the tab and pull the connector apart to fully disconnect the battery. If your model has an external battery release, use that.
- Wait 60 Seconds: Let the robot sit completely powerless. This ensures all capacitors discharge and the mainboard resets.
- Reconnect and Power On: Firmly reconnect the battery plug. Place the robot back on the floor and press the power button. Observe if the error returns immediately or after it tries to move.
Pro Tip: If the robot starts moving normally after this reset, the error was likely a false positive from a past jam. However, keep an eye on it for the next few runs. If Error 7 returns, there is a persistent physical issue that needs cleaning.
Step 2: The Quick External Visual Inspection
Before any deep cleaning, give the robot a quick once-over.
- Flip it Over: Place the robot upside down on a soft towel.
- Look at the Wheels: Do both wheels spin freely by hand? Is one stuck or gritty? Do you see any large clumps of hair or carpet string wrapped around the axle between the wheel and the plastic wheel tower?
- Check the Wheel Wells: Look into the openings where the wheels retract into the body. Can you see any obvious debris packed in there?
- Spin the Wheels: Gently rotate each wheel. Listen for grinding, crunching, or feel for resistance. Note which wheel feels different if any.
If you immediately see and can easily remove a large hairball or string from around a wheel axle, do so with needle-nose pliers or scissors (be very careful not to damage the rubber tire). Then try a reset and run. If the error is gone, you got lucky! If not, or if the wheels feel gritty, it’s time for a deep clean.
Deep Cleaning the Wheel Motor Assemblies: The Heart of the Fix
This is the most critical and effective step for resolving Error 7. You will need a few simple tools: microfiber cloths, cotton swabs (Q-tips), a small soft-bristled brush (like a clean toothbrush or paintbrush), compressed air (a can of “dust-off” is ideal, but you can use a strong puff from your lungs), and optionally, a can of electronic contact cleaner (like DeoxIT D5). Always ensure the robot is powered off and the battery is disconnected before starting any disassembly.

Visual guide about How to Fix Error Number 7 on Shark Robot
Image source: i.ytimg.com
Accessing the Wheel Motors
The process is very similar across most Shark ION models (RV750, RV862, RV1001A, etc.).
- Remove the Main Brushes and Side Brush: Take off the main rubber brush roll and the side brush. This gives you clear access to the underside.
- Remove the Bottom Plate: Locate the four screws on the underside of the robot. They are often hidden under small plastic caps or stickers. Use a Phillips head screwdriver to remove them. Gently pry off the large bottom plastic cover. You will now see the chassis, the two wheel motors on the sides, and the main brush motor in the middle.
- Locate the Wheel Motor Units: On each side, you’ll see a plastic housing containing the wheel motor. The wheel itself is attached via a single screw or a clip. The motor is mounted to the chassis with 2-3 screws.
Disassembly and Cleaning Process (Per Wheel)
Work on one side at a time.
- Remove the Wheel: Unscrew the wheel from the motor shaft (usually a single small Phillips or Torx screw). Gently pull the wheel straight off. Be mindful of any small washers or spacers; note their order and orientation.
- Inspect the Axle and Gear: With the wheel off, you’ll see the exposed end of the metal axle and the gear at the base of the wheel. This is the prime debris collection zone. Use your brush and compressed air to dislodge any packed hair or dust. A cotton swab dipped in a tiny bit of isopropyl alcohol (90%+) can help clean greasy grit. Do not use water.
- Access the Motor Gearbox (If Possible): Some models allow you to remove the entire wheel motor assembly from the chassis by unscrewing its mounting screws. If you can do this, it gives you full access. Once removed, you can often gently pry open the plastic gearbox casing (there may be small clips) to visually inspect the internal gears. Look for stripped teeth, plastic shavings, or debris. If you see plastic shavings, the gears are worn and the motor assembly likely needs replacement. Clean everything meticulously with your brush and air.
- Check the Hall Sensor Magnet: Inside the motor housing, near the axle, is a small magnet that works with the Hall effect sensor. Ensure it is clean and securely attached. A loose or dirty magnet can cause a false Error 7.
- Lubricate (Carefully):strong>: This is optional and for advanced users only. If the axle spins with some resistance but no debris is present, a tiny drop of white lithium grease or silicone-based lubricant on the axle (not the gears) can help. Never use oil or WD-40, as they attract dust and degrade plastic.
- Reassemble: Reattach the wheel, ensuring it’s seated properly and the screw is snug but not over-tightened. If you removed the motor assembly, screw it back to the chassis securely.
Repeat the entire process for the other wheel motor. Take your time. Rushing can lead to lost screws or damaged connectors.
Checking for Obstructions in the Wheel Towers and Chassis
Even with perfectly clean wheel motors, Error 7 can persist if something is physically blocking the wheel’s travel or movement within its “tower” (the plastic housing it moves up and down in for suspension).
Visual guide about How to Fix Error Number 7 on Shark Robot
Image source: vacuumist.com
The Wheel Tower Mechanism
Each wheel is mounted on a small suspension system that allows it to move up and down slightly to adapt to different floor surfaces. This mechanism can get jammed.
- With the bottom plate off, locate the plastic wheel tower. It’s a cylindrical or square plastic housing the wheel shaft passes through.
- Manually move the wheel up and down. Grip the wheel (with the wheel still attached) and try to push it up into the robot and pull it down. It should move smoothly with a little resistance from a spring. If it’s stiff or stuck, debris is likely inside the tower.
- Clear the Tower: Use your brush and compressed air to blow into the top and bottom of the tower. You can often see debris packed at the bottom where the wheel rests. Poke carefully with a plastic dental pick or a wooden toothpick (not metal, to avoid scratching) to dislodge it.
Inspecting the Chassis and Cables
Look inside the chassis where the wheel motor assemblies are mounted.
- Check Wiring: Ensure the small wires leading from the wheel motor to the mainboard are not pinched, torn, or caught on anything. A damaged wire can cause an intermittent connection, mimicking a motor fault.
- Look for Foreign Objects: Sometimes a small screw, a piece of a toy, or a large crumb can fall into the chassis and jam a wheel from the inside. Use a flashlight and your brush/air to clear any such objects.
- Connector Seats: If you unplugged any connectors (like the main brush motor), ensure they are fully and firmly reconnected before replacing the bottom plate.
Advanced Troubleshooting: When Cleaning Isn’t Enough
If you’ve performed a meticulous deep clean, verified the wheel towers move freely, checked for obstructions, and done a full battery reset, but Error 7 returns immediately or after a few seconds of operation, the problem is likely internal to the motor assembly itself.
Diagnosing a Faulty Motor Assembly
The two most common internal failures are:
- Worn or Stripped Gears: The plastic gears inside the gearbox wear out over time, especially if the robot frequently encounters thick carpet or gets jammed. You might have seen plastic shavings during cleaning. A motor with stripped gears will spin but not transfer power to the wheel, or will make a loud whining noise.
- Failed Hall Effect Sensor: This sensor tells the robot the wheel is spinning. If it fails, the robot thinks the wheel is stalled even if it’s not. Diagnosing this definitively requires an oscilloscope, but a symptom is that the wheel might spin when you manually turn it, but the robot still throws Error 7.
The “Bench Test”
Before ordering a part, you can perform a simple test.
- Reassemble the robot partially: Put the bottom plate back on but leave the dustbin off so you can see the wheels.
- Manually power on the robot: Place it on a table and turn it on.
- Initiate a Manual Drive: Use the Shark app or the physical buttons to make it drive forward in a straight line.
- Observe Both Wheels: Watch both wheels closely. Does one wheel spin while the other doesn’t? Does one spin erratically or slower? Does one make a grinding noise? This will confirm which side is faulty.
If one wheel motor assembly is clearly dead or struggling, it needs to be replaced.
Sourcing and Replacing the Wheel Motor Assembly
Shark does not typically sell individual internal gears or sensors. You must replace the entire wheel motor assembly unit.
- Find Your Model Number: It’s on a sticker on the underside of the robot or inside the dustbin compartment. It will look like “Shark ION Robot Vacuum RV750” or similar.
- Search for the Part: Use the model number plus “wheel motor” or “drive wheel motor” to find the correct OEM (original equipment manufacturer) or high-quality third-party replacement. Sites like Amazon, eBay, and specialty appliance part stores carry them. Ensure the part matches your exact model.
- Replacement: Replacement is the reverse of the disassembly. Unscrew the faulty motor assembly from the chassis, disconnect its wire harness (note the orientation!), and install the new one. It’s a straightforward swap if you kept track of screws.
Important Warranty Note: If your robot is still under the limited Shark warranty, opening it may void it. Contact Shark support first to describe your troubleshooting. They may offer to replace the motor under warranty if the unit is eligible, which is the best-case scenario.
When to Seek Professional Repair or Replacement
There are times when a DIY fix isn’t the best or safest route.
Signs It’s Time to Call It
- No Improvement After Full Service: You’ve cleaned everything, reassembled perfectly, and Error 7 persists immediately.
- Visible Motor Burn Smell: If you smell a strong electrical burning odor from the motor area, the motor windings are likely fried. Stop using it immediately.
- Physical Damage to Gears or Housing: If you see cracked plastic gear housings or severely stripped gear teeth during disassembly, the unit is physically broken beyond simple cleaning.
- Lack of Confidence: If you’re uncomfortable with small electronics, delicate connectors, or using tools, it’s okay to seek help. Forcing parts can cause more damage.
Your Options
- Authorized Shark Service Center: The safest but often most expensive option. They use genuine parts and provide a warranty on the repair. Call Shark customer support to locate a center.
- Local Appliance Repair Shop: Some small appliance repair shops handle robot vacuums. Call ahead to see if they service Shark models.
- Evaluate Replacement Cost: A new wheel motor assembly might cost $40-$80. A new Shark ION robot can range from $200 to $600+. If your robot is several years old and you have other worn parts (like a weak battery), it might be more economical to replace the entire unit rather than repair it.
Preventive Maintenance: Keeping Error 7 Away for Good
The best fix is the one you never need. Integrate these simple habits into your routine to prevent Error 7 from ever darkening your robot’s screen.
Weekly and Monthly Habits
- Weekly Wheel Wipe-Down: After every few runs, flip the robot over and wipe the wheels and wheel wells with a slightly damp microfiber cloth. This removes grit before it packs in.
- Monthly Deep Inspection: Once a month, do a quick wheel spin check. If they feel gritty, remove the wheels and clean the axles as described earlier. This takes 5 minutes and is the single most effective preventive task.
- Keep the Environment Clean: Pick up large hair ties, string, and small objects that are notorious for wrapping around wheel axles. Be extra vigilant if you have long-haired pets or shaggy rugs.
- Clean on Hard Floors First: If possible, let your robot start its cycle on a hard floor surface. This allows the wheels to spin freely and fling off loose debris before it hits the carpet, where fibers can pack into the axles.
- Use the “Clean While Docking” Feature: If your model has it (in the Shark app), enable this. It makes the robot do a final little wiggle and spin when it docks, which can help fling debris off the wheels.
Understand Your Robot’s Limits
Your Shark Robot is a marvel of engineering, but it’s not a tank. It struggles with:
- Very High-Pile or Shag Carpets: The wheels can sink and pack with deep fibers. Consider using boundary strips to keep it off these areas.
- Thresholds and Transition strips: Repeatedly climbing over high door thresholds puts strain on the wheel motors. Use ramps if possible.
- Wet or Sticky Floors: Never run a dry robot on wet floors. The moisture will turn dust and hair into a cement-like sludge that will pack into every joint, including the wheels.
By respecting these limits and maintaining the wheels, you’ll extend the life of your robot and enjoy years of hassle-free cleaning.
Conclusion: You’ve Got This
Facing Error 7 on your Shark Robot can be frustrating, but it’s overwhelmingly a solvable problem. Remember the core principle: debris is the enemy. Your mission is to methodically find and remove every last bit of hair, fiber, and grit from the wheel axles, gears, and suspension towers. Start with the simple reset and visual inspection. Move to the systematic deep clean. Diagnose which component is failing. Replace the motor assembly if needed, or seek professional help if the fix is beyond your comfort zone. By adopting a regular preventive maintenance schedule, you can make Error 7 a rare visitor rather than a frequent nuisance. Your Shark Robot is a valuable helper—a little TLC for its wheels will keep it rolling faithfully around your home for years to come. Now, go grab your screwdriver and give those wheels some love!
Frequently Asked Questions
What does Error 7 mean on my Shark Robot vacuum?
Error 7 indicates a wheel motor assembly fault. The robot’s system has detected that one or both wheels are not moving freely or as expected, usually due to a physical obstruction like hair or debris jamming the wheel axle or internal gears.
Can I fix Error 7 myself, or do I need a professional?
Yes, you can almost always fix Error 7 yourself. Over 80% of cases are resolved by thoroughly cleaning debris from the wheel axles, gears, and suspension towers. Only if the motor gears are stripped or the motor itself is burned out is professional repair or part replacement necessary.
How often should I clean my Shark Robot’s wheels to prevent Error 7?
For optimal prevention, perform a quick wheel wipe-down weekly and a full wheel removal and axle deep clean monthly, especially if you have pets or thick carpets. This prevents debris from packing in and causing jams.
What tools do I need to fix Error 7?
You’ll need a Phillips head screwdriver (sometimes a Torx), needle-nose pliers, a small soft-bristled brush (like a toothbrush), compressed air, cotton swabs, and optionally isopropyl alcohol and a microfiber cloth. Always disconnect the battery before starting.
If I clean everything, why does Error 7 come back?
If a thorough cleaning doesn’t fix it, the issue is likely internal to the motor assembly. The plastic gears inside the gearbox may be stripped from a past major jam, or the Hall effect sensor that detects wheel movement may have failed. In this case, the entire wheel motor unit needs replacement.
Will using my Shark Robot on thick carpet cause more Error 7 problems?
Yes, thick, high-pile, or shag carpets are the most common environment for Error 7. Fibers pack deeply into the wheel axles and suspension. To prevent this, use boundary strips to limit robot access to such carpets, or consider a robot designed specifically for high-pile carpets.