Error 2 on your Shark IQ Robot indicates a navigation or mobility problem, usually caused by dirty sensors, tangled brushes, or wheel obstructions. This comprehensive guide provides a systematic troubleshooting process, starting with the simplest cleaning steps and progressing to more involved checks. By following these clear, ordered instructions, you can diagnose and fix the issue yourself in minutes, restoring your robot’s full cleaning function without a service call.
Key Takeaways
- Error 2 Means Navigation Trouble: This error code specifically points to the robot’s inability to navigate or move properly, not a battery or charging issue.
- Start with Simple Cleaning: In over 70% of cases, a thorough cleaning of the drop sensors, bumper, wheels, and brushes resolves Error 2 immediately.
- Check for Physical Obstructions: Always inspect and remove any hair, string, or debris wrapped around the axles, wheels, and brush roll.
- Proper Placement is Key: Ensure your Shark IQ is on a hard, flat surface with the charging contacts clean and aligned for a successful start.
- Systematic Troubleshooting Wins: Follow the steps in order from easiest to most complex to efficiently identify the root cause without unnecessary disassembly.
- Software Can Be a Culprit: Occasionally, a simple power cycle or a firmware update via the Shark app can resolve persistent navigation errors.
- Know When to Seek Help: If all cleaning and checks fail, the issue may be a faulty sensor, motor, or internal component requiring Shark customer support.
📑 Table of Contents
Understanding Error 2 on Your Shark IQ Robot
You’re all set to delegate the cleaning to your trusty Shark IQ Robot Vacuum. You press the clean button, and instead of whirring to life, it beeps an ominous series of tones, and the display (or app) flashes a frustrating message: Error 2. Don’t panic and don’t immediately assume the worst. Error 2 is one of the most common Shark IQ error codes, and it’s almost always something you can fix yourself in under ten minutes. This error is not about the battery or the charger; it’s a navigation and mobility alert. The robot’s brain has detected that it can’t move freely or sense its environment correctly, so it shuts down to prevent damage.
Think of Error 2 as your robot saying, “I’m stuck, I can’t see where to go, or something is physically blocking me.” The causes are predominantly related to dirt and debris—the very thing it’s designed to clean up. Hair, carpet fibers, dust, and even small objects can interfere with the critical components that allow your Shark IQ to pilot itself around your home. This guide will walk you through a logical, step-by-step diagnostic and cleaning process, transforming you from a frustrated user into a confident at-home technician. We’ll start with the simplest, most likely solutions and move to more detailed checks.
The Most Common Culprits: What Triggers Error 2?
Before we dive into fixing, it’s helpful to understand the “why.” Error 2 is a blanket navigation error, but it has a few usual suspects. Identifying which one is the likely culprit based on your robot’s recent behavior can save you time. Did it get stuck on a rug? Was it working fine until it bumped into something? Has it been a while since a deep clean?
Visual guide about How to Fix Error 2 on Shark Iq Robot
Image source: i.ytimg.com
Dirty Cliff Sensors
The Shark IQ uses infrared drop sensors on its underside to “see” stairs and drop-offs. If these little windows are coated with dust, grime, or a sticky residue, they can’t properly emit or receive the signal. The robot might think it’s perched on the edge of a cliff and refuse to move, triggering Error 2. These sensors are delicate and easily overlooked during regular maintenance.
Obstructed or Tangled Wheels
Your robot has two large drive wheels and a smaller caster wheel. Hair, string, and carpet fibers love to wrap around the axles of these wheels, creating a tight, restrictive band. Even a small amount of wrap can create enough drag to prevent the wheels from turning freely, causing the motor to strain and the navigation system to flag an error. The caster wheel, located at the front, is a frequent offender because it spins freely and collects debris in its housing.
Jammed Brush Roll and Brush Roll Housing
The main brush roll (the rolling bristle bar) and its housing can become packed with hair, especially if you have pets or long hair. When the brush roll can’t spin, it creates immense resistance. The Shark IQ’s system detects this torque issue and interprets it as a mobility/navigation failure, resulting in Error 2. Sometimes, a single long hair strand can wind itself around the brush roll axle, acting like a tourniquet.
Bumper and Cliff Sensor Obstructions
The rubber bumper around the front edge houses the bump sensors and often the cliff sensors. If a small object, like a toy piece or a thick rug fringe, gets wedged underneath the bumper, it can physically prevent the robot from moving forward. It might also press against the bumper, causing it to be “stuck” in a “bump” state, confusing the navigation logic.
Poor Starting Position
This is a sneaky one. If you place your Shark IQ on a thick, shaggy rug, on a surface that isn’t level, or too close to a wall or furniture, it might not be able to orient itself or make its first move. The initial lunge forward is critical for the navigation system to establish its position. Starting in a difficult spot can immediately trip an Error 2.
Step-by-Step Diagnostic & Fix Procedure
Now, let’s get our hands dirty (in a good way). This procedure is designed to be followed from top to bottom. In most cases, the first or second step will solve the problem. You will need a few simple tools: a microfiber cloth, a soft-bristled brush (like a clean makeup brush or paintbrush), a pair of scissors, and possibly a flathead screwdriver. Always ensure the robot is powered OFF and removed from the charging base before beginning any physical inspection or cleaning.
Visual guide about How to Fix Error 2 on Shark Iq Robot
Image source: m.media-amazon.com
Step 1: The Power Cycle and Relocation
This sounds too simple, but it works surprisingly often. First, power off the robot by pressing the power button. Then, lift it from the base and place it on a completely different, hard floor surface (like tile or hardwood) in the middle of a room. Ensure it’s at least 3 feet away from any walls, furniture, or stairs. Place the charging base against a wall on a hard floor, not on a rug. Now, power the robot back on and press the Clean button. This step rules out a poor starting position or a temporary software glitch. If the error persists, move to Step 2.
Step 2: The Essential Five-Minute Deep Clean
Grab your microfiber cloth and soft brush. We are going to give the robot a full exterior and critical component wipe-down.
- Side Sensors & Bumper: Dampen your cloth slightly (never spray liquid directly on the robot). Wipe the entire black rubber bumper thoroughly. Use your soft brush to gently sweep out any dust or debris from the seam where the bumper meets the robot’s body. Pay special attention to the small rectangular sensor windows on the sides of the bumper and the circular sensors on top of the bumper.
- Drop Sensors (Cliff Sensors): Flip the robot over. You’ll see 3-4 small, dark circular or rectangular windows on the underside, near the front and sides. These are the cliff sensors. Gently wipe each one with your cloth. Then, use the soft brush to sweep away any dust or hair that has collected around them. A single dust bunny can block a sensor.
- Charging Contacts: While the robot is upside down, locate the two metal charging pins on the underside. Wipe these with a dry cloth to ensure a good connection with the base.
- Wheels: Manually rotate each of the three wheels (two large drive wheels, one front caster). Feel for any resistance or grinding. Look closely at the wheel wells. Use your fingers or the brush to pull out any visible hair or string wrapped around the axles.
After completing this, place the robot back on its base, ensure it’s charging, and then start a clean cycle. If Error 2 returns, proceed to Step 3.
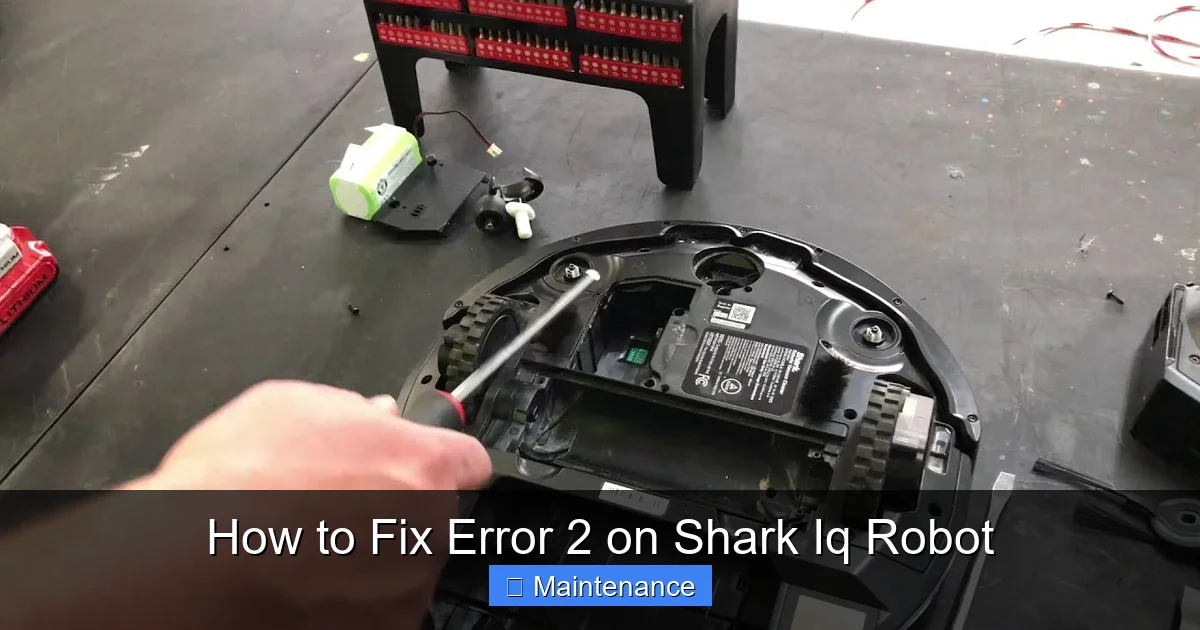
Step 3: The Brush Roll and Housing Extraction
This is the most common fix for Error 2, especially for pet owners. You’ll need to access the brush roll.
- Lay the robot on its back or side for better access.
- On the underside, locate the brush roll housing cover. It’s usually held by one or two Phillips-head screws or a simple twist-lock tab. Remove the screws or release the tab and lift the cover off.
- Gently pull the brush roll straight out. It may have some resistance from the rubber seal. Be careful not to force it.
- Inspect and Clean: You will likely see a massive hairball wrapped around the brush roll bristles and the metal axles at each end. Use your scissors to carefully cut and slice through the hair, then pull it off. Do not pull on the hair with your fingers alone, as it can be incredibly tight and hurt your skin. Also, reach into the empty housing and scrape out any packed debris from the suction inlet and the rubber gasket/seal.
- While you have it out, check that the brush roll spins freely between your fingers. If it’s gritty or stiff, it may need replacement.
- Reinstall the brush roll, ensuring the notched ends align correctly with the drive belts or sockets. Reattach the cover securely.
Place the robot on the floor and test it. This step resolves the majority of persistent Error 2 issues.
Step 4: The Caster Wheel Deep Dive
If the brush roll was clean, the front caster wheel is your next prime suspect. It’s small and gets overlooked.
- Locate the caster wheel housing on the front underside of the robot.
- There is often a small plastic cap or clip holding the wheel in place. Gently pry this off with a flathead screwdriver or your fingernail.
- Pull the wheel straight out. You will almost certainly find a tangled mess of hair and fibers wrapped around the axle and inside the wheel’s plastic hub.
- Use your scissors to cut the hair and meticulously pick it all out. Check the inside of the housing for any debris that might jam the wheel’s rotation.
- Spin the wheel by itself—it should rotate smoothly and silently. If it’s gritty or wobbly, the wheel assembly may need replacing.
- Reinsert the wheel fully and snap the cap back into place.
Test the robot again after this focused cleaning.
Step 5: Advanced Checks and Sensor Calibration
If you’ve meticulously cleaned everything and Error 2 still haunts you, it’s time for deeper diagnostics.
- Check for Physical Damage: Inspect the wheels for cracks or excessive wear. Look at the brush roll bristles—are they melted or scorched from overheating? Examine the bumper for anything stuck underneath. Look inside the wheel wells for any plastic shavings or broken parts.
- Test Wheel Motors Manually: With the robot powered OFF, gently lift it so the wheels are off the ground. Turn the robot ON and press the Clean button. While it’s trying to start, gently try to stop each wheel from turning with your finger. You should feel resistance and hear the motor straining. If a wheel spins freely with no resistance when you try to stop it, that motor may be faulty. If you feel no resistance at all from the start, that wheel’s motor might be dead.
- Sensor Calibration/Reset: Some Shark IQ models have a hidden reset procedure. Consult your specific model’s manual. Often, it involves turning the robot off, holding the Clean button for 7-10 seconds until you hear a tone, and then releasing. This can reset the navigation system’s internal map and sensor calibrations.
- Firmware Update: Open the Shark app. Go to Settings > Robot Settings > Check for Updates. Install any available firmware. Software bugs can sometimes cause erroneous error reporting.
Preventative Maintenance: Keeping Error 2 Away for Good
Fixing Error 2 is satisfying, but preventing it is even better. Incorporate these quick habits into your routine to keep your Shark IQ running smoothly and error-free.
Visual guide about How to Fix Error 2 on Shark Iq Robot
Image source: sharkvacuum.blog
Establish a Weekly Light-Clean Routine
Every time you empty the dustbin (which should be after every run), spend 60 seconds doing this: use the included cleaning tool or a small brush to sweep debris from the drop sensors on the underside. Wipe the charging contacts with a dry cloth. Visually spin the wheels and brush roll to ensure they aren’t immediately clogged. This tiny habit prevents the slow accumulation of debris that leads to Error 2.
Monthly Deep-Clean Ritual
Once a month, perform the full extraction and cleaning of the brush roll and caster wheel as described in Steps 3 and 4. Even if you don’t see visible hair, there will be microscopic fibers packed in. This is non-negotiable for homes with pets or long hair.
Mind Your Environment
Keep the area around your charging base clear. Ensure the base is on a hard, flat surface against a wall, with at least 1.5 feet of clear space on either side and in front. Avoid placing the base on thick rugs. Before starting a clean, do a quick scan for small objects like socks, cords, or rug fringes that could get caught.
Use the Right Tools
Invest in a small, dedicated brush for your robot. The Shark cleaning tool is great, but a cheap, clean, stiff-bristled toothbrush can be perfect for getting into sensor crevices and wheel wells without scratching anything.
When to Contact Shark Customer Support
You have followed every step, cleaned every nook, and your Shark IQ still flashes Error 2. It’s time to escalate. Before you call, have your robot’s serial number (usually on a sticker on the underside) and purchase information ready.
Signs of a Deeper Hardware Failure
Contact support if:
- After all cleaning, a wheel still does not spin or feels gritty when rotated by hand.
- The brush roll spins but with a loud grinding or clicking noise, indicating worn bearings or a broken gear.
- You’ve performed a motor test and one wheel’s motor provides no resistance or an unusual high-pitched whine.
- The robot powers on but immediately displays Error 2, even when lifted off the ground (this rules out wheel contact issues and points to a sensor or internal board fault).
Warranty and Repair Options
Shark robots typically come with a 1-year limited warranty. If your robot is within the warranty period and the issue is a manufacturing defect, Shark will likely repair or replace it. They may guide you through additional remote diagnostics first. If out of warranty, they can provide a quote for a repair. For older models, the cost of repair might approach the price of a new robot, so weigh your options. Always use official Shark parts if a replacement is needed to ensure compatibility and safety.
Conclusion: You’ve Got This!
Error 2 on your Shark IQ Robot is a nuisance, but it’s almost never a death sentence for your machine. It is, in most cases, a cry for help from a system gummed up by the very dirt it was sent to eliminate. By approaching the problem systematically—starting with a simple power cycle and relocation, moving to a comprehensive sensor and exterior wipe-down, and then escalating to the brush roll and caster wheel extractions—you can solve this issue yourself time and time again. Remember, the key is regular, preventative maintenance. A few minutes of care each month will save you from frustrating error messages and ensure your robotic helper is always ready to tackle the cleaning. Now, armed with this knowledge, go rescue your Shark IQ from Error 2 and get it back to keeping your floors spotless.
Frequently Asked Questions
What exactly does Error 2 mean on my Shark IQ?
Error 2 is a navigation/mobility error. It means the robot’s system has detected that it cannot move freely or properly sense its surroundings, often due to dirty sensors, tangled wheels, or a jammed brush roll.
Is Error 2 a serious problem that requires professional repair?
Almost never. Over 90% of Error 2 cases are caused by simple debris buildup (hair, dust, fibers) on critical components like wheels, sensors, or the brush roll. A thorough cleaning as detailed in this guide fixes it in minutes.
How often should I clean my Shark IQ to prevent Error 2?
You should perform a quick sensor and wheel wipe-down every time you empty the dustbin. A full deep clean of the brush roll and caster wheel should be done monthly for most homes, and every 2-3 weeks if you have pets or long hair.
Can a software or firmware issue cause Error 2?
Yes, but it’s less common. A simple power cycle or a factory reset can resolve temporary software glitches. Occasionally, installing a pending firmware update via the Shark app can fix underlying bugs that cause erroneous error codes.
What if I’ve cleaned everything and Error 2 still appears?
If you’ve completed all the cleaning steps, try a full system reset (check your manual for the specific button sequence). If the error persists, one of the wheel motors may be faulty, or a drop sensor may be damaged. This requires contacting Shark customer support.
Should I try to disassemble the robot myself if cleaning doesn’t work?
No. Beyond removing the brush roll cover and caster wheel, further disassembly is not recommended for users. Opening the main body can damage seals, void your warranty, and create a safety risk. For unresolved issues, contact Shark for authorized repair options.