Regularly emptying your Shark robot vacuum is non-negotiable for maintaining its suction power and longevity. A full bin restricts airflow, causing the vacuum to struggle and work inefficiently. This guide provides step-by-step instructions for every Shark model, from standard dustbins to the advanced Self-Empty Base, ensuring a clean, hygienic, and powerful clean every time. Mastering this simple task prevents clogs, protects motors, and keeps your home genuinely spotless.
So, your trusty Shark robot vacuum has been diligently cruising your floors, but you’ve noticed it seems… quieter. Or maybe it’s bumping into things more often, or simply not picking up as much as it used to. Before you panic and think your robotic helper has given up the ghost, there’s one incredibly simple, yet critically important, task you might be overlooking: emptying its dustbin. It might seem like a no-brainer, but doing it correctly—and regularly—is the single most effective way to keep your Shark performing like the day you brought it home. This isn’t just about dumping a cup of dirt; it’s about understanding your machine’s anatomy and giving it the quick TLC it deserves. Let’s dive into the complete, step-by-step guide for every Shark robot vacuum on the market, from the iQ series to the AI Ultra and everything in between.
Key Takeaways
- Power Down First: Always turn off and place your Shark on a flat surface before opening any compartments to avoid accidental starts and ensure safety.
- Know Your Model: The emptying process differs significantly between standard bin models and those with a Self-Empty Base; identify your specific model for correct instructions.
- Empty Over a Bin: Always open the dustbin over a trash can to contain dust and debris, minimizing mess and airborne particles.
- Clean the Bin & Filters: Emptying is only half the task; regularly wash the dustbin (if applicable) and clean/replace filters as per the manual for optimal performance.
- Check for Clogs: Use emptying time to inspect the bin intake, brushroll housing, and side brushes for hair and debris wrap, which are common performance killers.
- Re-seal Securely: Ensure all latches and seals are fully closed after emptying and cleaning to prevent dirt leakage during operation and maintain suction.
📑 Table of Contents
- Why Emptying Your Shark Vacuum is So Important
- How to Empty a Standard Shark Robot Vacuum Dustbin
- Emptying the Shark Self-Empty Base (For IQ/AI Ultra Models)
- Model-Specific Nuances and Tips
- Deep Cleaning and Maintenance During Emptying
- Troubleshooting: What to Do If Emptying Doesn’t Fix Suction Loss
- Conclusion: Making Emptying a Seamless Habit
Why Emptying Your Shark Vacuum is So Important
Think of your Shark’s dustbin as its stomach. When it’s full, the machine can’t “breathe” properly. The motor has to work overtime to try and pull air through a clogged filter and packed bin, which leads to a cascade of problems. Suction power drops dramatically, the battery drains faster because it’s working harder, and you might even start to notice unpleasant odors emanating from the unit. More importantly, a chronically full bin forces debris back into the brushes and wheels, creating clogs that require deep cleaning. By making a habit of emptying the bin after every 1-2 runs (or when the app indicator tells you), you prevent this domino effect. You’re not just maintaining a vacuum; you’re protecting a significant investment in your home’s cleanliness.
The Science of Suction: It’s All About Airflow
Your Shark robot vacuum is an air pump at its core. It creates a path: air (with dirt) enters through the brushroll, travels through the hose, into the dustbin, passes through the filter, and exits out the exhaust. A full dustbin physically blocks that path. The air has fewer places to go, so the velocity drops. It’s like trying to drink a thick milkshake through a straw that’s half clogged—it’s just not going to work efficiently. Emptying the bin restores that clear, unobstructed path, allowing the motor to operate at its designed capacity and deliver the powerful suction you paid for.
Hygiene and Odor Prevention
Let’s be honest: a vacuum full of hair, dust, dander, and fine particulate is a breeding ground for smells. Especially if you have pets, that bin can develop a musty, “old vacuum” odor surprisingly quickly. This smell doesn’t just stay in the bin; it gets circulated back into your home’s air every time the vacuum runs. Regularly emptying the bin, and periodically washing it with mild soap and water (as Shark recommends for many models), breaks this cycle. A clean bin means cleaner air and a fresher home environment.
How to Empty a Standard Shark Robot Vacuum Dustbin
The majority of Shark robot vacuums, including popular models like the Shark ION Robot Vacuum RV750, RV761, and many in the AI series without the self-empty station, use a removable, washable dustbin. This is the classic design and the process is straightforward once you know where the release mechanisms are. Always start by placing the robot on a flat, stable surface and turning it off using the power button on the unit or via the app. This prevents any sudden brush activation while your fingers are near the bin.
Visual guide about How to Empty Your Shark Robot Vacuum
Image source: cdn-bande.nitrocdn.com
Step-by-Step for Removable Bins
First, locate the dustbin release. This is almost always a prominent button or latch on the top or rear of the robot. On many models, you’ll find a large, gray or black button labeled “Dustbin” or simply a tab you press inward. Press this release firmly. The entire dustbin assembly—which often includes the filter—will pop or slide out. Pro Tip: Hold the bin over a trash can immediately. Use your other hand to press the second release (usually a smaller button or tab on the bin itself) that opens the bottom flap or door. This allows all the debris to fall out cleanly. Give the bin a gentle tap or shake to dislodge any compacted dust or pet hair stuck in the corners.
Cleaning the Bin and Filter
Once empty, inspect the bin. If it’s visibly dirty or has a lingering smell, it’s time for a wash. Shark explicitly states that most dustbins and filters are NOT dishwasher safe. Use lukewarm water, a mild dish soap, and a soft cloth or non-abrasive sponge. Pay special attention to the rubber gasket or seal around the bin’s door; this area often traps fine dust. Rinse thoroughly with clean water and allow both the bin and the filter to air-dry completely for at least 24 hours before reinserting. Reinserting a damp bin or filter can damage the motor and promote mold growth. Slide the bin back into the robot until you hear a definitive click, ensuring it’s seated properly to create a seal.
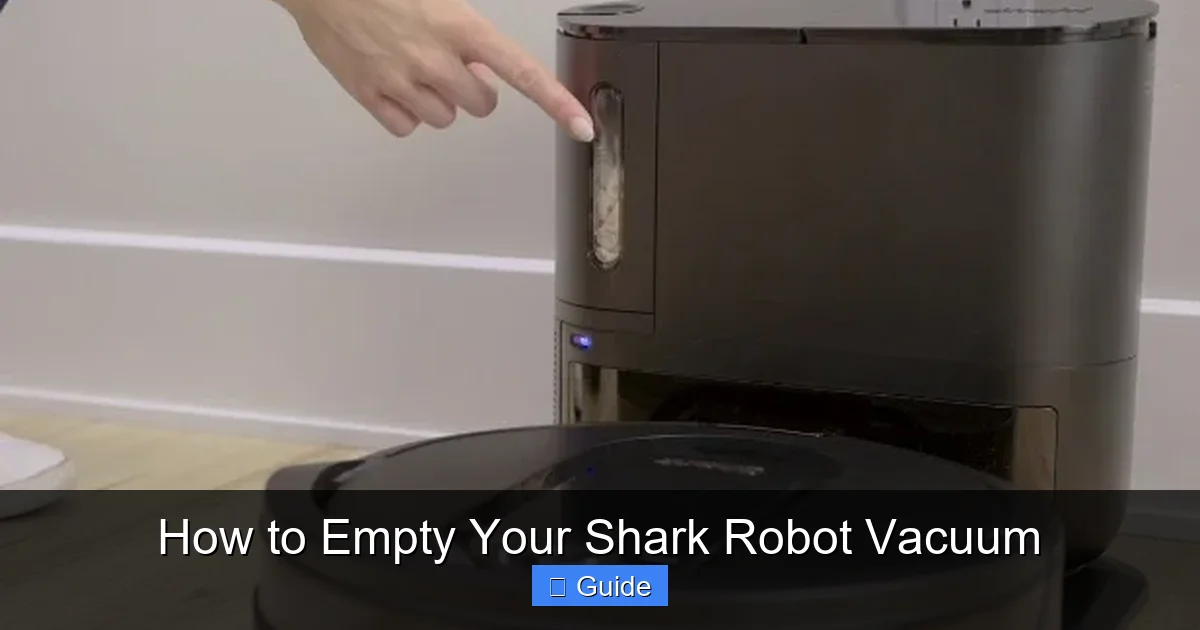
Emptying the Shark Self-Empty Base (For IQ/AI Ultra Models)
If you own a Shark robot vacuum with a Self-Empty Base (like the Shark ION Robot Vacuum with Self-Empty Base RV1001AE, or the Shark AI Ultra with Self-Empty Base), your emptying routine changes, but it’s even easier. The robot automatically docks and empties its own bin into the larger, sealed dustbag inside the base station after every cleaning job. Your job is to manage the base station itself. The base will beep or send an app notification when its internal dustbag is full, typically after 30+ runs depending on your home’s dirt level.
Visual guide about How to Empty Your Shark Robot Vacuum
Image source: vacuumspal.com
Locating and Removing the Dustbag
The process is beautifully simple. Unplug the Self-Empty Base from the wall. On the front or top of the base station, you’ll find a large, rectangular door or panel, often with a prominent handle or release tab. Open this door. Inside, you’ll see a cylindrical or rectangular fabric dustbag, similar to a vacuum cleaner bag, that is now full. Grasp the fabric bag’s handle (or the tab on the bag itself) and pull it straight out. You’ll notice a plastic clip or seal on the bag’s opening—this is crucial. Pinch this clip closed to seal the bag, trapping all the dirt and allergens inside. This is a key hygiene feature that prevents a cloud of dust from billowing out.
Disposing and Installing a New Bag
Take the sealed bag directly to your outdoor trash bin. Do not try to shake it out or reuse it. These are single-use, sealed-system bags designed for allergen containment. Once disposed of, remove the new bag from its packaging. You’ll see a plastic collar on the new bag. Align this collar with the opening inside the base station and push it in firmly until it clicks into place. You should feel it seat securely. Close the base station’s door firmly until it latches. Plug the base back in. The robot will be ready to empty into the fresh bag on its next return to the dock. Shark typically includes 1-2 bags with the initial purchase; you’ll need to purchase replacement Shark-branded dustbags (model-specific) for ongoing use.
Model-Specific Nuances and Tips
While the core principles are universal, some Shark models have little quirks. The Shark AI Ultra (with the round, square base) has a dustbin that you remove from the *top* of the robot, and it has a clever one-touch bottom release. The Shark ION F50 (with the side brush that lifts) requires you to first lift the side brush module to access the bin release. The best advice? Keep your user manual. It has the definitive diagrams for your exact serial number. However, here are some universal tips that apply across the lineup.
Visual guide about How to Empty Your Shark Robot Vacuum
Image source: i.pcmag.com
The “Button Combo” for Stuck Bins
Sometimes, especially if the bin is packed full or has collected a lot of static-charged dust, it can feel stuck in the robot. Do not force it. First, ensure you are pressing the correct primary release button on the robot’s body. If it still won’t budge, locate the secondary release on the bin itself (often a small button near where it connects to the robot). While pressing and holding the primary release on the robot, use your other hand to press the secondary release on the bin. This dual-action release almost always frees a stuck bin without damage.
Accessing the Filter
The filter is almost always housed inside the dustbin assembly. After you’ve removed the full bin from the robot, look for a small compartment door or a twist-lock cap on the bin itself. This is your filter access point. Gently open it and slide the filter out. This is the perfect time to tap excess dust off the filter outdoors (over a trash can) or use the small, soft brush cleaning tool that came with your Shark. For a deep clean, follow the manual’s instructions—most foam and mesh filters can be rinsed with water but must be 100% dry before reuse.
Deep Cleaning and Maintenance During Emptying
Emptying the bin is your prompt for a quick 60-second health check of your entire vacuum. While you have the robot on its side or back, take a moment to perform these critical checks that prevent 90% of common performance issues.
Inspect and Clean the Brushroll
This is the #1 culprit for suction loss. Flip the robot over. Use the included cleaning tool or a pair of scissors to carefully cut away any hair, string, or carpet fibers wrapped around the brushroll. Gently pull the debris out. Then, wipe the rubber blades of the brushroll with a damp cloth to remove any sticky residue. Check the two rubber brushroll end caps—they should spin freely. If they’re jammed with gunk, clean them out.
Clear the Intake and Side Brushes
Look at the hole where the bin connects to the robot’s body—this is the intake. Shine a light into it. If you see a dust bunny or a clump of hair blocking it, use a long, thin tool (like a plastic skewer or the cleaning tool’s hook) to gently dislodge it. Next, check the side brushes. They are notorious for collecting long hair at their bases. Pull the side brush off (they usually just pop off) and clean the hair from the plastic shaft and the brush bristles themselves. A clean side brush spins freely and effectively sweeps debris into the main brushroll’s path.
Wipe the Sensors and Charging Contacts
Find the cliff sensors (usually small windows on the underside) and the charging contacts (metal pins on the bottom). Wipe these gently with a dry microfiber cloth. Dirty cliff sensors can cause the robot to think it’s on a ledge and stop, while dirty charging contacts prevent a solid electrical connection, leading to unreliable docking and charging.
Troubleshooting: What to Do If Emptying Doesn’t Fix Suction Loss
You’ve emptied the bin, cleaned the brushroll, and checked for obvious clogs, but your Shark still seems weak. Don’t give up yet. There are a few more things to investigate, all related to the airflow path.
Filter Deep Dive
The filter is the final barrier before air exits the vacuum. Over time, even if you tap it clean, the fine mesh becomes saturated with microscopic dust. If your filter is more than 3-6 months old and you haven’t washed or replaced it, it’s almost certainly the problem. Depending on your model, you have a foam pre-filter and a pleated paper or mesh filter. Both need regular maintenance. The foam can be washed and reused. The paper/mesh filter is often a “replace every 3-6 months” item. A clogged filter restricts airflow just like a full bin does. Replacing it is one of the cheapest and most effective fixes for restoring suction.
The Hidden Clog: Inside the Hose
Rarely, debris can travel past the bin and lodge in the narrow hose that connects the brushroll housing to the bin inlet. This requires a bit more disassembly. You’ll need to remove the brushroll housing (usually by unscrewing a few screws). Once removed, you can see the short hose. Shine a light through it. If it’s blocked, use a long, flexible brush (like a bottle brush) or a gentle puff of compressed air to clear it. Be careful not to damage the hose.
Odor Issues After Emptying
If a bad smell persists even after you’ve emptied and washed the bin, the odor has likely migrated into the filter. A new filter will solve this. Also, ensure the bin is completely dry before reinserting it. A damp bin in a warm environment will grow mildew and smell terrible. Finally, check the brushroll. If it has old, sticky debris ground into it, that can smell. Give the brushroll a more thorough scrubbing with soapy water.
Conclusion: Making Emptying a Seamless Habit
Mastering how to empty your Shark robot vacuum isn’t a chore—it’s a cornerstone of smart robot ownership. It takes less than a minute but pays dividends in performance, battery life, and the longevity of your machine. By identifying your model type—standard removable bin or Self-Empty Base—and following the precise steps outlined here, you transform this task from a guess into a guaranteed success. Integrate it into your routine: empty the bin after your robot finishes its morning run, or set a weekly calendar reminder if you run it less frequently. While you’re at it, perform the quick visual inspections of the brushroll and sensors. This tiny investment of time keeps your Shark operating at its brilliant, best-in-class suction level, ensuring that every single cleaning session leaves your floors truly clean, not just “kind of clean.” Your robot works hard for you; give it this one simple thing in return, and it will keep your home spotless for years to come.
Frequently Asked Questions
How often should I empty my Shark robot vacuum’s dustbin?
For best results, empty the dustbin after every cleaning cycle, especially if you have pets, carpet, or a high-traffic home. At a minimum, empty it when the “bin full” indicator light illuminates on the robot or in the Shark app. Allowing it to run with a full bin severely reduces suction and can cause clogs.
My Shark robot has a Self-Empty Base. Do I still need to empty the robot’s small bin?
No, that’s the beauty of the Self-Empty Base. The robot automatically empties its own internal bin into the larger dustbag in the base station after each run. You only need to manage the larger dustbag in the base station when it becomes full, as indicated by an app notification or base station light.
Can I wash the dustbin and filter with soap and water?
Yes, the dustbin and most foam filters are washable with mild soap and lukewarm water. Use a soft cloth or sponge. Never use abrasive cleaners or scrubbers. Rinse thoroughly and allow both components to air-dry completely for at least 24 hours before reinserting. Never reinsert a damp bin or filter, as this can damage the motor.
What should I do if my Shark’s suction is weak even after emptying the bin?
First, clean the brushroll thoroughly for hair wrap. Next, check and clean the intake opening where the bin connects. Then, inspect your filter. If it’s older than 3-6 months or looks dirty even after tapping, replace it. Finally, check the internal hose (requires removing the brushroll housing) for a hidden clog.
How do I know when to replace the filter in my Shark robot?
Shark recommends replacing the pleated paper/mesh filter every 3-6 months under normal use. Signs it needs replacement include persistent weak suction after cleaning the bin and brushroll, a musty odor that won’t go away after washing the bin, or visible tears/discoloration in the filter material. Foam pre-filters can often be washed and reused for longer.
My Shark smells bad even after I empty and wash the bin. Why?
A lingering odor usually means the smell has embedded itself in the filter. Replace the filter with a new one. Also, ensure the bin is 100% bone-dry before reinserting it, as moisture causes mildew. Finally, give the brushroll a deep clean with soapy water, as old, sticky debris on the bristles can also produce odors.