Keeping your Shark Ion’s front wheel clean is crucial for its navigation and cleaning efficiency. Hair, string, and debris can wrap around the axle and bristles, causing the wheel to drag, stall, or fail to rotate properly. This guide provides a complete, safe disassembly and cleaning process using common household tools, ensuring your robot vacuum moves freely across all floor types. Regular maintenance, as outlined, prevents costly damage and extends your Shark Ion’s lifespan.
Key Takeaways
- Regular Cleaning is Non-Negotiable: The front caster wheel is your Shark Ion’s “steering wheel.” Inspect and clean it weekly to prevent debris buildup that hinders movement and navigation.
- Use the Right Tools: A microfiber cloth, compressed air, a small flat-head screwdriver or plastic pry tool, and tweezers are your primary allies. Avoid water and harsh chemicals near the wheel assembly.
- Focus on the Axle and Bristle Housing: The most common jam point is the small axle pin and the plastic bristle housing where hair winds tightly. These require meticulous, gentle clearing.
- Handle Electronics with Extreme Care: The wheel assembly is close to the vacuum’s mainboard and sensors. Never spray liquids near the opening, and be cautious when prying to avoid dislodging wires.
- Reassembly Matters: Ensure the wheel snaps fully back into its socket and spins freely before reinstalling the bottom plate. A misaligned wheel will cause immediate navigation errors.
- Preventative Habits Reduce Work: Keep floors clear of long hair, curtains, and rug tassels. Running the Shark Ion in short, frequent sessions prevents excessive debris accumulation on the wheel.
- Listen and Watch for Symptoms: Signs of a dirty front wheel include clicking sounds, difficulty turning, getting stuck on flat surfaces, and the “Clean” button blinking red. Address these immediately.
📑 Table of Contents
- Why Cleaning Your Shark Ion’s Front Wheel is Critical
- Essential Tools and Preparation for a Safe Clean
- Step-by-Step: Accessing and Inspecting the Front Wheel Assembly
- The Detailed Cleaning Process: From Axle to Housing
- Reassembly, Testing, and Final Installation
- Establishing a Proactive Maintenance Schedule
- Troubleshooting: What If Cleaning Doesn’t Fix It?
- Conclusion: A Small Part, A Big Impact
Why Cleaning Your Shark Ion’s Front Wheel is Critical
Imagine trying to walk with a pebble stuck in your shoe. That’s what your Shark Ion robot vacuum experiences when its front caster wheel is clogged. This small, seemingly simple wheel is the pivot point for the entire machine’s navigation system. It’s not a drive wheel; it’s a free-rolling caster that tells the robot’s brain which direction it’s facing and helps it turn smoothly. When hair, carpet fibers, carpet strings, or even tiny bits of grit wrap around the wheel’s axle or pack into its bristle housing, the consequences are immediate and frustrating.
The most common symptom is a distinctive, repetitive clicking or grinding noise as the wheel tries to turn but is held fast by debris. You’ll notice your Shark Ion struggling to make tight turns, bumping into furniture more often, or getting inexplicably stuck on perfectly flat, clear floors. Its navigation mapping can go haywire, leading to missed spots and inefficient cleaning patterns. Left unchecked, this strain can eventually burn out the small motor that helps lift the wheel over obstacles or even damage the delicate wheel assembly socket. Therefore, mastering the clean of this component isn’t just a tidying task—it’s essential preventative maintenance that directly impacts your vacuum’s intelligence, agility, and longevity. This guide will walk you through the entire process, from gathering tools to a flawless reassembly, ensuring your Shark Ion operates at its peak.
Essential Tools and Preparation for a Safe Clean
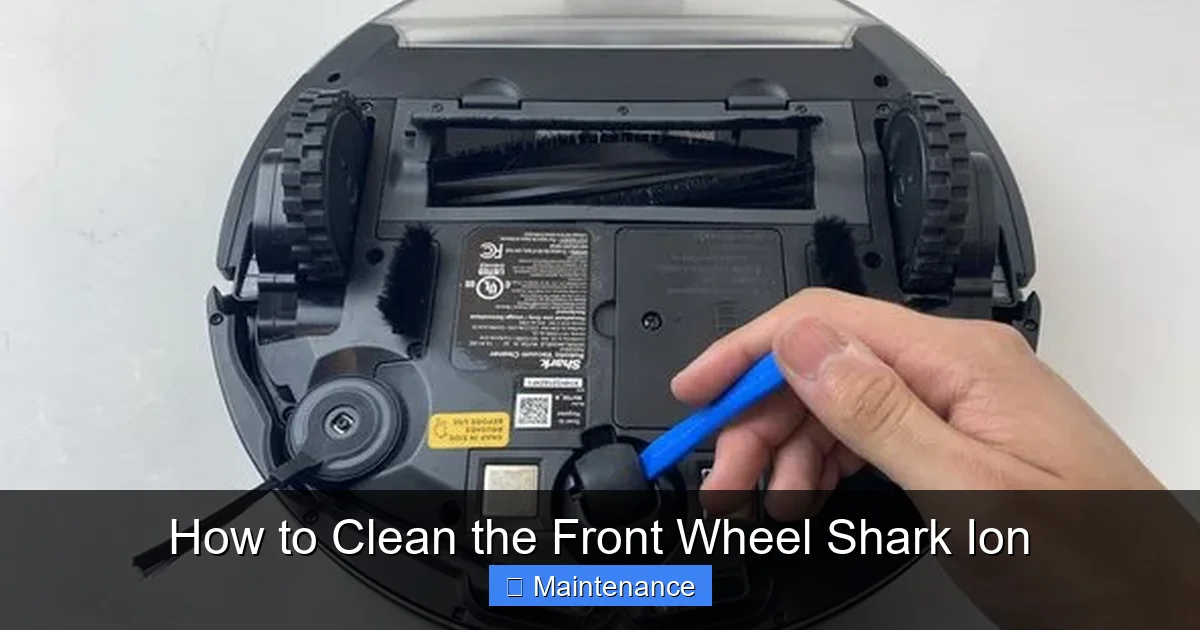
Before you even tilt your Shark Ion onto its side, a moment of preparation saves time and prevents damage. You need a clean, well-lit workspace—a kitchen table or countertop covered with a soft towel is ideal. This provides a stable surface and protects both your vacuum and your furniture from scratches. Gather your tools; having everything within arm’s reach makes the process smooth and prevents you from improvising with something that could cause harm.

Visual guide about How to Clean the Front Wheel Shark Ion
Image source: guide-images.cdn.ifixit.com
Your Tool Kit Checklist
- Microfiber Cloths (2-3): For wiping away loose debris and greasy residue. Microfiber is lint-free and highly effective.
- Compressed Air Duster (or a can of air): The single best tool for blasting out compacted lint and hair from the narrow wheel well without disassembly. A manual pump duster is a reusable, eco-friendly alternative.
- Small Flat-Head Screwdriver or Plastic Pry Tool: A plastic tool (like a guitar pick or dedicated phone opening tool) is safest to avoid scratching the plastic housing or shorting electronics. A very small, careful flat-head screwdriver can work in a pinch.
- Pointed Tweezers: For meticulously pulling out individual hairs and fibers wound tightly around the axle pin.
- Magnifying Glass (Optional but Helpful): The axle and inner housing are tiny. A magnifier illuminates hidden debris.
- Small Vacuum with Crevice Tool (Optional): To suck out debris as you loosen it, keeping your workspace clean.
- Rubber Gloves (Optional): Improve grip and keep your hands clean from dust and potential grease.
Critical Safety First Step: Always power down your Shark Ion completely. Press the power button to turn it off, and then flip the robot over and locate the main power switch on the side or bottom. Slide it to the “OFF” position. This is a non-negotiable safety step that prevents the robot from suddenly activating while you have tools near its wheels and sensors.
Step-by-Step: Accessing and Inspecting the Front Wheel Assembly
With your Shark Ion powered off and on its soft towel-covered surface, it’s time to access the wheel. The front caster wheel is housed in a plastic compartment on the underside, toward the front-center of the robot. It’s held in place by a small plastic retaining clip or a circular plate secured with a single screw, depending on your specific Shark Ion model (e.g., ION Robot, ION AV750, etc.). The process is fundamentally the same.
Visual guide about How to Clean the Front Wheel Shark Ion
Image source: guide-images.cdn.ifixit.com
Removing the Bottom Plate
First, you must remove the main bottom plate to access the wheel assembly from the inside. The Shark Ion’s bottom plate is secured by multiple screws, often with a single central screw that’s different from the others (sometimes a Torx or a longer screw). Use the appropriate screwdriver (Phillips head is most common) and carefully remove all screws, placing them in a small container to avoid loss. Gently pry the bottom plate off starting from a corner. It may be held by plastic clips; a gentle rocking motion with your plastic pry tool will release it. Set the plate aside, noting the orientation of any seals or connectors.
Locating and Releasing the Wheel Housing
Once the bottom plate is off, you’ll see the main brush roll, side brushes, and the large drive wheels. The front caster wheel assembly is a smaller unit, usually black or dark gray, mounted on the front frame. It is often held by either:
- A small plastic retaining clip: Pry this clip gently upward with your plastic tool. It will pop off.
- A circular retaining plate with a single screw: Unscrew this. The plate may have a rubber seal around it.
With the clip or plate removed, the entire wheel assembly—a plastic housing containing the small wheel, its axle, and bristles—should lift out or pop free. Grasp it firmly and pull it straight up. If it’s stuck, gently wiggle it. Be mindful of any thin wires or cables running alongside it; they are usually tucked safely but can snag.
The Critical Inspection
Now you have the wheel in hand. Hold it up to the light. You will likely see the problem immediately: a dense, felt-like mat of hair and carpet fiber packed around the tiny metal axle pin and inside the plastic bristle housing. The small rubber or plastic wheel itself may also have debris stuck in its tread. Use your fingers to try and rotate the wheel. It should spin freely on the axle with a faint whir. If it’s stiff, gritty, or doesn’t turn, you have confirmed the clog. Take a moment to also inspect the socket on the robot’s frame where the wheel assembly came from. Use your compressed air here to blow out any loose debris that fell into the chassis.
The Detailed Cleaning Process: From Axle to Housing
This is the heart of the operation. Patience and precision are key. Rushing here can break the tiny axle or damage the housing. Work methodically from the outside in.
Visual guide about How to Clean the Front Wheel Shark Ion
Image source: wheelndealmama.com
Cleaning the External Wheel and Bristles
Start with the obvious. Use your microfiber cloth to wipe down the outer rubber/plastic wheel. If there’s sticky residue (from floor finishes or dirt), a tiny drop of isopropyl alcohol on the cloth can help—but avoid getting it inside the housing. The bristles surrounding the wheel are designed to sweep debris away from the wheel’s path. Pick out any large, visible tufts of hair caught in these bristles using your fingers or tweezers.
Conquering the Axle Jam (The Core Problem)
The axle is a thin metal pin that the wheel rotates on. This is the primary jam point. Hair winds around it like a spool, creating a dense, tight knot that binds the wheel. Here’s how to clear it:
- Blast First: Hold the wheel assembly over your trash can. Use short, powerful bursts of compressed air directly into the gap between the wheel and the plastic housing, and from the side where the axle is visible. Often, this will dislodge the outer layer of debris.
- Tweeze with Precision: Switch to your pointed tweezers. Gently insert one tip into the packed debris mass. Your goal is not to yank, but to tease out individual strands. Start at the top or side of the mass and slowly, carefully pull a single hair or fiber. You’ll often find that pulling one strand loosens the entire structure slightly. Continue this painstaking process until the axle is completely visible and you can spin the wheel freely by hand. This can take 5-15 minutes for a severe jam, but it’s the safest method.
- Alternative (Use with Caution): For a very dense, compacted plug, you can use the tip of your flat-head screwdriver (wrapped in a microfiber cloth to prevent scratching) to very gently nudge the debris away from the axle. Do not lever or pry against the plastic housing. Think of it as scraping the sides of the plug inward.
Deep Cleaning the Bristle Housing
With the axle clear, turn your attention to the hollow plastic housing that surrounds the wheel. This area collects fine dust and lint that mixes with hair to form a cement-like paste. Use your compressed air again, inserting the nozzle into the housing opening from the side. Rotate the wheel as you blow to clear all chambers. Follow up by wrapping a microfiber cloth around a thin, flat tool (like a butter knife handle) to swab the interior surfaces. You should be able to see clean plastic all around. Any remaining greasy film can be removed with a cloth barely dampened with isopropyl alcohol, followed immediately by a dry cloth.
Reassembly, Testing, and Final Installation
A perfect clean is wasted if reassembly is sloppy. Take your time here.
Pre-Reassembly Checks
Before putting anything back, perform two vital checks. First, spin the cleaned wheel by hand. It should rotate smoothly, silently, and without any gritty feeling for at least 10 full spins. Second, inspect the wheel socket on the Shark Ion’s chassis. Use your compressed air to clear any debris that may have fallen in during your work. Ensure the electrical contacts (if visible) are clean.
Reinstalling the Wheel Assembly
Align the wheel assembly with its socket. The plastic housing usually has a small tab or notch that fits into a corresponding slot on the frame—this prevents incorrect installation. Gently but firmly press the assembly straight down into its home. You should feel and hear a distinct click as the retaining clip (if your model uses one) snaps over the top of the housing. If your model uses a screw-on plate, place the plate back, ensuring the rubber seal is seated correctly, and screw it in securely but do not overtighten.
The Crucial Spin Test
Before reattaching the bottom plate, flip the Shark Ion over (carefully, so the wheel doesn’t fall out) and give it a gentle push on a smooth surface. The front wheel should spin freely as the robot moves. There should be no dragging, clicking, or grinding. If you hear or feel resistance, the wheel is not seated correctly or is still obstructed. Re-inspect immediately.
Final Steps
Once the wheel spins perfectly, reattach the bottom plate. Align it carefully and press down around the edges to engage all plastic clips. Reinsert all screws in their correct holes and tighten them in a star pattern (tighten one a little, then the opposite one, etc.) to ensure even pressure and a proper seal. Double-check that no wires are pinched. Finally, flip the robot right-side up, slide the main power switch back to ON, and place it on the dock or floor. Press the “Clean” button. It should start with a quick wheel calibration spin and then move forward smoothly without any abnormal noises.
Establishing a Proactive Maintenance Schedule
Cleaning a severely jammed wheel is a task. Preventing the jam is easier. Integrate these habits into your routine.
Weekly Quick Inspection
Once a week, take 30 seconds. Tilt your Shark Ion and visually inspect the front wheel. Use a gloved finger to try and spin it. If it feels gritty or doesn’t spin easily, use your compressed air for a quick blast from the side. This weekly 30-second habit catches problems before they become a 30-minute project.
Monthly Deep Clean
Even if the wheel spins freely, schedule a full disassembly and deep clean as described above once a month for typical homes with medium-pile carpet. For homes with long-haired pets or high-shedding occupants, bi-weekly deep cleans may be necessary. Mark it on your calendar alongside other home maintenance tasks like changing HVAC filters.
Environmental Control
You can’t control the floors, but you can control some hazards. Keep long curtains and tablecloths from dragging on the floor where the robot can suck in the fringe. Secure rug tassels or consider using rug tape. Before running the Shark Ion, do a quick scan for stray hair ties, shoelaces, or string. These are the primary culprits for wheel lock-ups. If you have a pet that sheds heavily, consider running the robot more frequently in shorter sessions to avoid massive hair accumulation on the wheel.
Troubleshooting: What If Cleaning Doesn’t Fix It?
You’ve followed every step, the wheel spins perfectly in your hand, but the robot still clicks or struggles after reassembly. Here are the next diagnostic steps.
Check the Wheel Socket
Debris can pack into the socket on the robot’s frame itself. With the wheel assembly removed, use your compressed air to thoroughly blast out the socket from multiple angles. Shine a light inside. Use a cotton swab lightly moistened with alcohol to clean the socket walls. Ensure the small spring (if present in your model) inside the socket is clean and functional.
Inspect for Physical Damage
Examine the wheel assembly closely. Is the tiny metal axle pin bent? Is the plastic housing cracked? Is the rubber wheel itself worn flat or split? Any physical damage means the assembly needs to be replaced. Shark sells official replacement front caster wheel assemblies. Using a damaged part will always cause noise and poor performance.
Sensor and Software Issues
Sometimes, a clogged wheel can confuse the robot’s internal sensors or navigation system. After a successful clean and reassembly, place the Shark Ion on a hard, open floor. Press and hold the “Clean” button for 7-10 seconds to force a full system reboot. This resets the navigation mapping and wheel calibration. If problems persist, consult the Shark Ion user manual for a “Factory Reset” procedure, which will erase its map but can resolve persistent sensor glitches.
When to Seek Professional Help
If you’ve verified a perfectly clean, undamaged wheel assembly spins freely in a clean socket, but the robot still exhibits wheel-related symptoms, the issue may lie deeper—potentially with the wheel motor itself or a control board problem. At this stage, contacting Shark Customer Support or an authorized repair center is the recommended path. Attempting to repair internal wiring or motors is beyond typical user maintenance and risks permanent damage.
Conclusion: A Small Part, A Big Impact
Cleaning the front caster wheel on your Shark Ion is not glamorous work. It’s a detailed, hands-on task that requires patience and a steady hand. But it is one of the most impactful maintenance procedures you can perform. This humble little wheel is the key to your robot’s graceful dance across your floors. When it’s clean and free-spinning, your Shark Ion navigates with confidence, turns on a dime, and tackles every corner with its original intelligent efficiency. When it’s clogged, it becomes a clumsy, noisy, inefficient machine that misses spots and wears itself out prematurely. By investing just a few minutes each month in this focused cleaning ritual, you protect your investment, ensure consistently clean floors, and extend the useful life of your robotic helper. You’re not just cleaning a wheel; you’re restoring your Shark Ion’s sense of direction and its ability to fulfill its promise of effortless, whole-home cleaning. Now, grab your tools and give that wheel the attention it deserves.
Frequently Asked Questions
How often should I clean the front wheel on my Shark Ion?
For most households, a full disassembly and deep clean of the front wheel is recommended every 1-2 months. However, you should perform a quick visual and spin check weekly, using compressed air to blow out any loose debris if the wheel feels gritty. Homes with pets, long hair, or high-pile carpet may need monthly deep cleans.
Can I use water or cleaning sprays directly on the wheel assembly?
No, you should avoid introducing liquids into the wheel housing or near the robot’s underside. Water can seep into the bearing, cause rust on the axle, and potentially reach sensitive electronics or sensors nearby. Use only dry methods like compressed air, tweezers, and dry microfiber cloths. For stubborn grime, a cloth barely dampened with isopropyl alcohol can be used sparingly on external plastic parts, followed immediately by a dry cloth.
My wheel still clicks after I cleaned it. What could be wrong?
First, ensure the wheel spins perfectly freely in your hand after cleaning. If it does, the issue is likely in the socket on the robot’s frame—debris may be packed inside it. Remove the wheel assembly again and thoroughly blast the socket with compressed air. Also, inspect the wheel assembly for any hair caught between the wheel and its inner plastic housing. Finally, ensure the wheel was snapped fully back into its socket during reassembly; an improperly seated wheel will make noise.
Is it normal for the front wheel to have some play or wobble?
Yes, a very small amount of side-to-side play is normal for the caster wheel as it’s designed to swivel. What is not normal is resistance when spinning the wheel, a gritty feeling, or a wheel that doesn’t spin at all when you push the robot. Play is fine; stiffness or grinding indicates a debris jam or damage.
What if the axle pin is bent or the plastic housing is cracked?
A bent axle or cracked housing means the wheel assembly is compromised and must be replaced. Continuing to use a damaged assembly will cause constant noise, poor navigation, and can lead to further damage inside the wheel socket. You can purchase an official Shark Ion front caster wheel replacement part from Shark’s website or authorized retailers.
Can a clogged front wheel cause my Shark Ion to get stuck on flat floors?
Absolutely. A front wheel that cannot spin freely creates significant drag. The robot’s motors have to work harder to move forward, and it may lack the torque to overcome even minor friction on hard floors or transitions between room dividers. This often presents as the robot stopping and beeping, seemingly for no reason, on a clear path. Cleaning the wheel almost always resolves this specific issue.