A clean Shark dust bin is non-negotiable for peak vacuum performance and a healthy home. Over time, dust, hair, and debris compact inside the bin and on filters, drastically reducing suction power and causing unpleasant odors. This guide provides a detailed, step-by-step process for safely and effectively disassembling, deep cleaning, and reassembling every component of your Shark vacuum’s dust collection system. You’ll learn the essential tools, proper techniques for different Shark models (like the Vertex, IZ, and Navigator), and crucial maintenance habits to prevent clogs and maintain powerful cleaning sessions every time.
Key Takeaways
- Unplug First: Always disconnect your Shark vacuum from the power source before attempting any cleaning or disassembly to prevent accidental startup and ensure safety.
- Disassemble Completely: For a true deep clean, you must remove the dust bin, filter compartment, and all seals/rings. Skipping parts traps old dust and odors.
- Use the Right Tools: A soft-bristle brush, microfiber cloths, mild soap, and a can of compressed air are your most effective allies for removing packed debris without damaging components.
- Never Submerge Electronics: The motor unit, electrical contacts, and main body of the vacuum should never get wet. Only wash the removable dust bin and filters as directed.
- Dry Thoroughly: Reassemble your Shark vacuum only when every single part—especially the foam and felt filters—is completely dry to prevent mold, mildew, and motor damage.
- Clean Regularly: A quick tap-out after every use and a full wash every 3-4 uses prevents debris from compacting, making each cleaning session faster and more effective.
[FEATURED_IMAGE_PLACEHOLDER]
📑 Table of Contents
- Why Cleaning Your Shark Dust Bin Isn’t Optional
- Gathering Your Tools: The Shark Dust Bin Cleaning Kit
- Step-by-Step: Disassembling Your Shark Vacuum
- The Deep Cleaning Process: Washing and Decontaminating
- Drying and Reassembly: The Final, Crucial Steps
- Maintaining a Clean Shark Dust Bin Between Deep Cleans
- Troubleshooting: When Cleaning Isn’t Enough
- Common Mistakes That Damage Your Shark Vacuum
- Conclusion: A Clean Bin for a Powerful Clean
Why Cleaning Your Shark Dust Bin Isn’t Optional
Let’s be honest: the dust bin is the messy heart of your Shark vacuum. It’s where all the dirt, hair, dander, and fine dust you suck up goes to live. But if you just tap it out into the trash and call it a day, you’re only dealing with the visible layer. Beneath that, a fine layer of dust coats the interior walls, the filter media becomes clogged, and rubber seals collect a gritty paste of dust and debris. This isn’t just a grossness issue; it’s a performance issue.
When the dust bin and filters are clogged, your Shark vacuum’s motor has to work exponentially harder to pull air through the system. You’ll notice a distinct drop in suction power, the vacuum might feel hotter during use, and you’ll have to go over the same spot multiple times. Furthermore, trapped organic matter like pet dander and skin cells can become a breeding ground for bacteria and mold, releasing odors back into your home every time you vacuum. Regularly learning how to clean a Shark dust bin properly is the single most important maintenance task you can perform to protect your investment, ensure efficient cleaning, and maintain a healthier indoor environment.
Gathering Your Tools: The Shark Dust Bin Cleaning Kit
Before you touch a single screw, gather everything you’ll need. This prevents you from searching for a tool mid-disassembly and makes the process smooth. You don’t need anything fancy or expensive.
Visual guide about How to Clean Shark Dust Bin
Image source: sharkvacuum.blog
Essential Cleaning Supplies
- Soft-Bristle Brush: An old toothbrush or a dedicated small cleaning brush is perfect for scrubbing crevices, the filter housing, and the bin’s interior without scratching plastic.
- Microfiber Cloths: Several lint-free cloths for wiping down surfaces. Paper towels can leave behind fibers.
- Mild Dish Soap: A few drops in warm water create a gentle, effective cleaning solution that cuts through grease and grime without damaging seals or filters.
- Can of Compressed Air: This is a game-changer. Use it to blow out dry debris from the filter compartment, motor vents (from a safe distance), and tight spaces in the bin where a brush can’t reach.
- Warm Water: For rinsing. Avoid hot water, which can warp plastic components.
- Towel or Drying Rack: A clean surface to lay all the wet parts on for air drying.
What You Should NOT Use
Never use harsh chemicals like bleach, ammonia, or abrasive cleaners (Comet, powdered cleansers). These can degrade the plastic, rubber seals, and especially the delicate filter media. Also, avoid high-pressure water sources like a powerful sink sprayer, as they can force water into bearings and electrical areas. Stick to gentle hand washing with soapy water and thorough rinsing.
Step-by-Step: Disassembling Your Shark Vacuum
The exact process varies slightly between Shark models (Navigator, Rotator, Vertex, IZ, etc.), but the core principles are identical. Always have your user manual handy for model-specific diagrams. If you’ve lost it, Shark’s website has digital copies.
Visual guide about How to Clean Shark Dust Bin
Image source: live.staticflickr.com
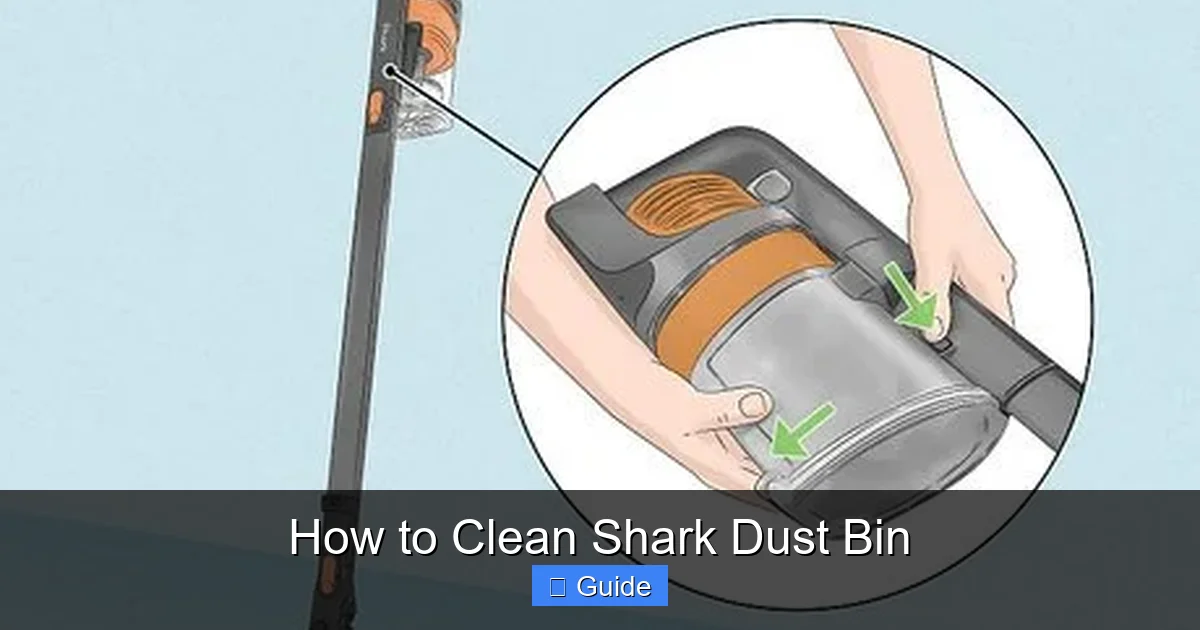
1. The Initial Emptying and Preliminary Tap-Out
Start with the vacuum unplugged. Press the bin release button and remove the entire dust bin assembly from the vacuum body. Take it to a trash can. Press the bottom release (or follow your model’s specific mechanism) to open the bin and dump the large debris. Now, take the bin outside or over a large trash bag and give it a firm, sharp tap all around. This dislodges the fine dust that’s caked onto the walls and bottom. You’ll be amazed at the cloud of dust that comes out even after the initial dump.
2. Separating the Bin from the Filter Housing
Your Shark dust bin is usually a two-part system: the bottom collection chamber and the upper filter housing. Look for a release latch, button, or twisting lock mechanism where they join. On many models, you press a button and pull the bin away from the filter unit. On others, like some Vertex models, you may need to rotate the bin to unlock it. Gently separate these two pieces. This is crucial—you must clean the interior of the filter housing separately from the main bin.
3. Accessing and Removing the Filters
With the filter housing exposed, you’ll see one or two filters. Most Sharks use a two-stage filtration system: a foam pre-motor filter and a pleated felt or HEPA-style post-motor filter. There is almost always a plastic grate or cover holding them in place. Release this cover (it may snap or unscrew) and carefully pull out the filters. Note their orientation so you can reinstall them correctly. Some models have a third, small circular filter behind the motor—consult your manual.
4. Removing Seals and Rubber Gaskets
Pay close attention to the rubber seals. There is typically a large, floppy rubber seal around the opening where the bin attaches to the filter housing, and often a smaller one around the filter cover. Gently pry these up with your fingers or a plastic tool. They are not glued in place but held by a groove. Pulling them out ensures you can clean the groove underneath, which is a notorious trap for compacted dust paste. Lay these seals aside for cleaning.
The Deep Cleaning Process: Washing and Decontaminating
Now you have all the parts separated: the main bin, the filter housing, the foam filter, the felt filter, and the rubber seals. It’s time to wash.
Visual guide about How to Clean Shark Dust Bin
Image source: wikihow.com
Cleaning the Dust Bin and Filter Housing
Fill your sink or a basin with warm water and add a drop of mild dish soap. Submerge the plastic bin and filter housing. Use your soft-bristle brush to scrub every nook, cranny, and corner. Pay special attention to the area where the rubber seal sits—this groove will be black with compacted dust. Rinse thoroughly under a gentle stream of lukewarm water until all soap suds are gone and the water runs clear. Shake off excess water.
Washing the Filters: A Critical Distinction
This is where many people make a critical error. The foam pre-motor filter is almost always washable. Gently agitate it in your soapy water, squeeze it, and rinse it until the water is clear. Squeeze out as much water as possible but do not wring it forcefully, as this can tear the foam.
The felt or pleated HEPA-style filter is usually NOT washable. Check your manual. If it is labeled as “non-washable” or “replaceable,” you should not get it wet. Instead, take it outside and gently tap it over a trash can to dislodge debris, then use your can of compressed air to blow air through the filter from the clean side out. If your specific model’s manual states the pleated filter is washable (some newer ones are), then wash it extremely gently with a tiny drop of soap, rinse immediately, and air dry for 24-48 hours. When in doubt, tap and blow it out.
Reviving the Rubber Seals
Rubber seals get stiff and collect dirt in their ridges. Wash them with your soapy cloth, scrubbing the grooves with the soft brush. Rinse them well. To restore their flexibility, you can wipe them down with a tiny amount of mineral oil or a dedicated rubber conditioner (like for car door seals), but this is usually not necessary. Just ensure they are clean and dry before reassembly.
Drying and Reassembly: The Final, Crucial Steps
Patience here is not just a virtue; it’s a requirement for your vacuum’s health.
The 24-Hour (Minimum) Drying Rule
Shake out all parts and place them on a clean towel or drying rack in a well-ventilated area, away from direct sunlight or heat. The plastic parts will dry quickly, but the filters—especially the foam one—hold water like a sponge inside. Do not be tempted to reassemble until every single part is bone dry to the touch. This means the foam filter needs at least 24 hours, often longer. Reassembling with a damp filter will cause it to smell musty immediately and can potentially allow moisture to reach the motor, causing catastrophic damage. Use your finger to check the center of the foam filter for dampness.
Reassembly in Reverse Order
Once everything is dry, begin reassembly. Start with the rubber seals—press them firmly back into their clean grooves on the bin and filter housing. They should seat flatly all the way around. Next, reinsert the filters exactly as they came out. The foam filter usually goes in first, closer to the motor, and the pleated filter behind it. Secure the filter cover. Finally, align the tabs on the filter housing with the slots on the main bin and press or twist them together until you hear a firm click. Ensure the bin release latch functions properly before reattaching the whole assembly to the vacuum body.
Maintaining a Clean Shark Dust Bin Between Deep Cleans
A full disassembly and wash every 3-4 uses (or weekly for heavy pet hair households) is ideal. But what about in between? A few habits make the big clean much easier.
The Post-Use Emptying Ritual
Never store your Shark vacuum with a full bin. After every single use, empty it. Don’t just dump the big stuff. Take it to the trash, press the release, open the bin fully, and use your hand or a tool to scrape the sides and bottom where fine dust cakes on. Then, give it 5-10 sharp, alternating taps against the side of the trash can. This dislodges the fine dust from the filter housing area that falls down when you open the bin.
Filter Care Schedule
Your foam filter should be washed every 3-4 washes of the bin, or monthly with regular use. The non-washable pleated filter should be tapped out and blown with compressed air after every 3-4 uses. A visibly dirty filter (gray or black) is overdue for maintenance. Remember: a clean filter is a sign of a healthy vacuum.
Checking and Cleaning Seals
Every time you do a deep clean, inspect the rubber seals. Look for tears, cracks, or areas where the seal isn’t making full contact. A compromised seal allows dust and air to bypass the filter system, reducing suction and blowing dust back into your room. If a seal is damaged, contact Shark for a replacement part—it’s often inexpensive and easy to install.
Troubleshooting: When Cleaning Isn’t Enough
Sometimes, even a clean bin doesn’t solve the problem. Here’s what to check if suction is still weak.
The Brush Roll: Hair and Fibers’ Favorite Hideout
The brush roll (beater bar) on the vacuum head is a major source of suction loss. Turn your Shark over and look at the brush roll. Use a seam ripper or a dedicated brush roll cleaning tool to cut and remove any hair, string, or carpet fibers wrapped around the bristles and ends. A jammed brush roll strains the motor and reduces agitation, making the whole cleaning process less effective.
Inspect the Hose and Wand for Blockages
A clog in the wand or the main suction hose will kill suction just as effectively as a dirty bin. Detach the hose from the vacuum body and look through it. Shine a flashlight from one end. If you see a blockage, use a long, flexible brush (like a drain snake) to gently dislodge it. You can also try sucking a small, lightweight object (like a ping pong ball) through the hose from the vacuum end to clear minor clogs.
Check the Motor Filter and Vents
Some Shark models have an additional small filter protecting the motor. If this is clogged, the motor can overheat and lose power. Use your compressed air to gently blow out any dust from the motor fan and vents (located on the main body of the vacuum, usually near the handle or base). Never stick objects into these vents.
Common Mistakes That Damage Your Shark Vacuum
Even with the best intentions, it’s easy to make a mistake that shortens your vacuum’s life.
- Using a Wet Filter: Reiterating the point because it’s the #1 killer. A damp filter in a closed bin creates a perfect storm for mold and can short the motor.
- Washing the Non-Washable Filter: This destroys the filter’s pleated structure and electrostatic charge, rendering it useless. You’ll need to buy a new one.
- Forgetting the Filter Housing: You clean the bin and the filters but ignore the plastic housing that connects them. This housing collects a massive amount of fine dust that never gets dumped. It must be scrubbed.
- Reassembling Incorrectly: Missing a seal, putting a filter in backward, or not clicking the bin together fully creates air leaks. Your vacuum will sound different (higher-pitched) and have no suction.
- Skipping the Brush Roll: You focus only on the dust bin but ignore the head. A clogged brush roll is often the real culprit behind poor performance.
- Using Harsh Chemicals: Bleach and ammonia degrade plastic and rubber, causing them to become brittle and crack over time.
Conclusion: A Clean Bin for a Powerful Clean
Learning how to clean a Shark dust bin properly transforms your vacuuming routine from a chore into a simple, satisfying maintenance habit. It’s not about obsession; it’s about respect for the tool that keeps your home clean. By taking 15 minutes every few weeks to disassemble, wash, and thoroughly dry every component—the bin, the housing, the filters, and the seals—you protect your investment, restore maximum suction power, eliminate odors, and create a healthier breathing environment for your family. Remember the golden rules: unplug, disassemble completely, wash gently with soap, dry completely (we mean completely), and reassemble carefully. Pair this deep clean with quick post-use emptying and regular filter tapping, and your Shark vacuum will deliver powerful, efficient cleaning for years to come. A clean dust bin isn’t just a part of maintenance; it’s the foundation of your vacuum’s performance.
Frequently Asked Questions
How often should I deep clean my Shark dust bin?
For average use (a few times a week in a non-pet home), a full deep clean every 3-4 uses is sufficient. If you have multiple pets, allergies, or vacuum daily, aim to clean it weekly. The key is to never let debris compact and dry hard inside the bin or filters.
Can I put my Shark dust bin in the dishwasher?
We strongly advise against it. The high heat and harsh detergents in dishwashers can warp the plastic bin, degrade the rubber seals, and damage the filter media (if you accidentally include them). Hand washing with mild soap and lukewarm water is the only safe method.
My Shark has a “non-washable” HEPA filter. How do I clean it?
>You cannot wash it. Instead, remove the filter and take it outside. Firmly tap it against a hard surface over a trash can to dislodge loose debris. Then, use a can of compressed air to blow air through the filter from the clean side (the side facing the motor) outward. Do this every 3-4 uses. When the filter is visibly gray and no amount of tapping/air helps, it’s time for a replacement.
How do I remove the dust bin if it’s stuck?
First, ensure the vacuum is unplugged. The bin lock mechanism can sometimes jam with debris. Locate the release button/latch. Press it firmly while gently wiggling and pulling the bin straight down or out—do not twist unless your manual specifies a twist-lock. Check for any visible debris around the locking points and remove it with a tool. If it’s truly stuck, consult your manual’s troubleshooting section for your specific model number.
How can I prevent odors in my Shark dust bin?
Odors come from organic matter (hair, skin cells, pet dander) decomposing. Prevent this by: 1) Emptying the bin after every single use. 2) Washing the bin and washable filters regularly with soapy water. 3) Ensuring all parts are 100% dry before reassembly. 4) Storing the vacuum with the bin slightly ajar (if possible) to allow air circulation, rather than sealed shut.
Is it normal for my Shark to lose suction after cleaning the bin?
No, it should not. If suction is weak after a proper deep clean and reassembly, you likely have one of these issues: 1) A filter (especially the foam one) is still damp. 2) A rubber seal is not seated correctly or is damaged, creating an air leak. 3) The brush roll is jammed with hair. 4) There is a clog in the hose or wand. Re-check your work, ensuring everything is dry and sealed properly, and inspect the brush roll and hose.