A clogged brush head is the #1 reason your Shark vacuum loses suction and smells bad. Regularly cleaning the roller brush, removing hair and debris, and checking the belt is essential maintenance. This guide provides simple, model-specific steps to disassemble, clean, and reassemble your Shark’s brush head quickly, ensuring peak performance and a longer vacuum lifespan. Neglecting this task leads to poor cleaning, motor strain, and costly repairs.
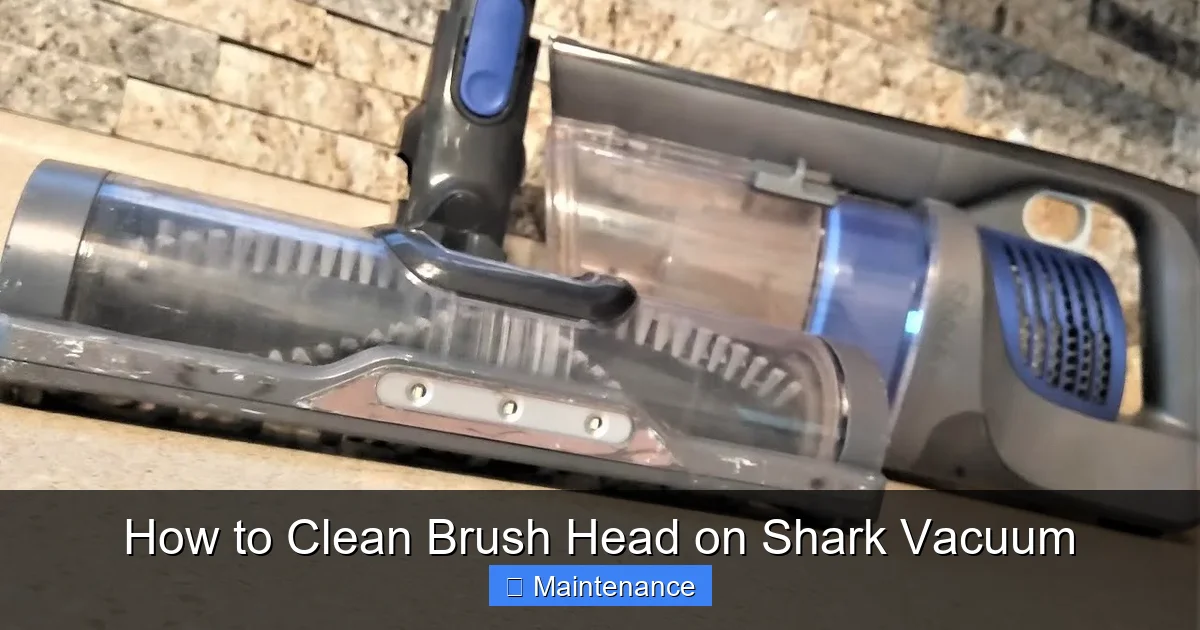
That satisfying whir of your Shark vacuum hitting the floor can quickly turn into a frustrating, weak whine. You push it over a patch of carpet, and instead of the deep-down clean you expect, it just glides over the top, leaving dirt behind. A distinct, musty smell might even start to follow you around. If this sounds familiar, your vacuum’s brush head—the spinning roller with bristles or rubber fins—is almost certainly the culprit. It’s the workhorse of your cleaning system, designed to agitate carpet fibers and fling debris into the suction path. But when it gets clogged with hair, string, carpet fibers, and gunk, it becomes a useless, smelly drag. Learning how to clean brush head on Shark vacuum isn’t just a chore; it’s the single most important piece of maintenance you can perform to restore your machine’s power and extend its life for years.
Unlike some vacuums with complicated disassembly, Shark makes the process relatively straightforward, but the exact steps vary by model series. Whether you own a classic Navigator, a versatile Rotator, or a powerful Vertex, the core principles are the same: remove the brush head, meticulously clear all obstructions, clean the components, inspect for wear, and reassemble correctly. This guide will walk you through every detail. We’ll cover the essential tools, provide step-by-step instructions for the main Shark families, share pro tips to make the job easier, and troubleshoot common problems. By the end, you’ll be a confident at-home technician, ready to tackle even the most hair-wrapped brush roll and get your Shark vacuum performing like new again.
Key Takeaways
- Clean Monthly: A monthly deep clean prevents hair wrap, maintains suction power, and avoids foul odors from decaying debris.
- Unplug First: Always disconnect your Shark vacuum from power before touching the brush head or any internal components for safety.
- Tools Are Key: Have scissors, a seam ripper or utility knife, a Phillips screwdriver, and a damp cloth ready before you start.
- Model Matters: The removal process differs between Navigator, Rotator, and Vertex series; always consult your specific model’s manual first.
- Check the Belt: While the brush head is off, inspect the drive belt for cracks, stretching, or debris entanglement and replace if worn.
- Dry Completely: Ensure the brush roll, bearings, and housing are 100% dry before reassembly to prevent rust and motor damage.
- Prevent Future Clogs: Use the “hard floor” setting on carpets to reduce hair wrap and routinely wipe the brush head after vacuuming pet hair.
📑 Table of Contents
- Why Cleaning Your Shark Brush Head Is Non-Negotiable
- Gathering Your Tools: The Essential Cleaning Kit
- Step-by-Step: How to Remove & Clean the Brush Head (By Model Series)
- Pro Maintenance Tips to Minimize Future Cleaning Hassles
- Troubleshooting: What to Do When Things Go Wrong
- Conclusion: A Clean Brush Head Is a Happy Vacuum
Why Cleaning Your Shark Brush Head Is Non-Negotiable
Before we dive into the “how,” let’s solidify the “why.” The brush head (often called the “brush roll” or “roller brush”) is a high-wear component. It’s in constant, abrasive contact with floors and carpets, collecting everything in its path. When this critical part is compromised, your entire vacuum’s efficiency plummets.
The Domino Effect of a Dirty Brush Head
Think of the brush head as the engine of your vacuum’s cleaning system. The motor creates suction, but the brush head agitates and lifts debris so the suction can capture it. When the brush is jammed:
- Suction Power Drops Dramatically: A hair-wrapped brush can’t spin freely. The motor works harder, but the brush just drags, creating friction instead of agitation. You lose the deep-clean agitation on carpets entirely.
- Foul Odors Emerge: Hair, skin cells, and organic debris collect around the bearings and inside the housing. As this material decomposes, it creates a persistent, unpleasant “wet dog” or mildew smell that blows back into your home.
- Premature Wear and Tear: The motor strains against the resistance of a stuck brush, generating excess heat. The drive belt (if equipped) can overheat, stretch, or snap. Bearings can seize from lack of cleaning and lubrication.
- Scatter and Streaking: On hard floors, a dirty brush head with caked-on debris can actually kick dirt and dust back out into the air instead of sucking it up.
- Potential for Costly Repairs: What starts as a simple hair clog can lead to a burned-out motor or a broken belt if left unaddressed, turning a 10-minute clean into a expensive service call.
For pet owners, families with long hair, or homes with lots of carpet, this maintenance becomes even more critical. Pet hair is notorious for wrapping tightly around brush rolls, and carpet fibers can mat together into solid felt-like masses. Ignoring the brush head is the fastest way to turn a high-performance Shark vacuum into a useless, smelly floor ornament.
Gathering Your Tools: The Essential Cleaning Kit
You don’t need a workshop to clean your Shark brush head. A simple, prepared toolkit will make the job 10 times faster and more effective. Gather these items before you start to avoid mid-job frustration.
Visual guide about How to Clean Brush Head on Shark Vacuum
Image source: i.ytimg.com
Basic Toolkit for Any Shark Model
- Phillips Head Screwdriver: This is your primary tool. Most Shark brush heads are secured with 2-4 Phillips screws. A magnetic-tipped screwdriver helps prevent screws from falling into the vacuum body.
- Sharp Scissors: For cutting through dense mats of hair and carpet fibers. A small, precise pair works best.
- Seam Ripper or Utility Knife: The secret weapon. A seam ripper (used in sewing) is perfect for slicing through hair wraps without damaging the bristles or rubber fins. A box cutter works in a pinch but requires extreme caution.
- Microfiber Cloths: For wiping down the brush roll, housing, and your hands. Microfiber is excellent at grabbing fine dust.
- Mild Dish Soap and Warm Water: For a deep clean. Avoid harsh chemicals, bleach, or abrasive cleaners that can degrade plastic and rubber parts.
- Old Toothbrush or Soft-Bristle Brush: Ideal for scrubbing the small nooks, crannies, and bearing caps.
- Can of Compressed Air (Optional): Great for blowing out fine dust from the housing and belt area.
- Bucket or Large Bowl: For your soapy wash water.
Pro Tip: Work over a large trash bag or newspaper. This contains the flying dust, hair, and debris that will inevitably shake loose during disassembly and cleaning.
Step-by-Step: How to Remove & Clean the Brush Head (By Model Series)
Now for the main event. The removal process is where model differences appear. Shark has several popular series, and while they’re similar, the latch or screw locations vary. Always consult your specific model’s user manual first. These instructions cover the most common configurations.
Visual guide about How to Clean Brush Head on Shark Vacuum
Image source: i.ytimg.com
General Precautions Before You Begin
1. Unplug the Vacuum: This is paramount. Never attempt to clean or remove the brush head with the vacuum plugged in.
2. Lay the Vacuum Flat: For upright models, lay the entire unit flat on its side on a protective towel or the trash bag.
3. Flip the Vacuum Over: You need clear access to the brush head housing on the underside of the nozzle/floor head.
For Shark Navigator, Rotator (NV), and Earlier Models
These models typically use a combination of a release lever and screws.
- Locate the Release Lever: On the top side of the floor head (the side that faces the floor when in use), you’ll find a red or gray plastic lever, often near where the wand connects. Push this lever firmly to release the bottom plate.
- Remove the Bottom Plate: The entire plastic housing covering the brush roll should now pivot down or come off entirely. If it’s hinged, let it swing down to expose the brush roll.
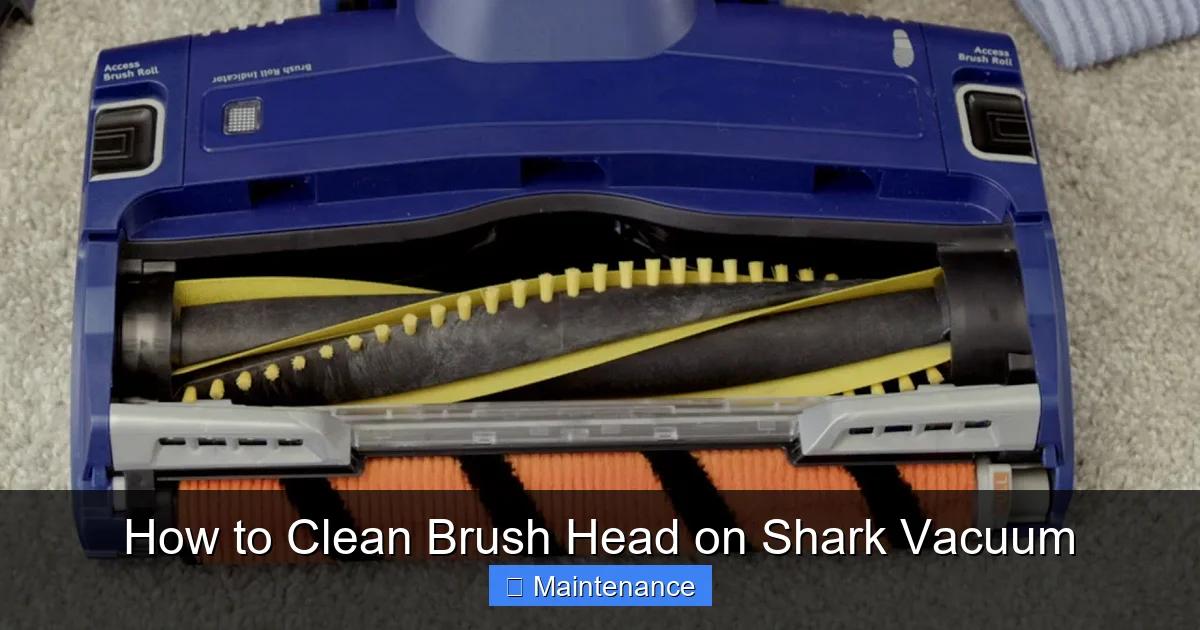
- Remove the Brush Roll: With the plate off, you’ll see the brush roll. It is usually held in place by two caps on either end. Pry off these rubber or plastic end caps. They may snap off or slide off. Once the caps are off, the brush roll should lift straight out. Note the orientation—which end faces which direction—for correct reassembly.
- Clear Debris: Take the brush roll to your cleaning area. Use the seam ripper to slice through hair wraps. Cut lengthwise along the brush roll core, not across the bristles, to avoid pulling them out. Scrape off any dried gunk with the edge of your scissors or a dull knife.
- Clean the Brush Roll: In your bucket of warm, soapy water, use the old toothbrush to scrub the bristles/rubber fins and the plastic core. Pay special attention to the ends where hair packs in. Rinse thoroughly under running water. Shake off excess water and set aside to air-dry completely (at least 2 hours).
- Clean the Housing: With the brush roll out, use your cloth, toothbrush, and compressed air to clean the empty housing. Remove all hair, dust, and debris from the channels, the belt pulley (if present), and the area where the end caps sat. Check the rubber seals.
- Inspect & Reassemble: Check the drive belt (if your model has one) for cracks or wear. Once everything is dry, reinsert the brush roll in the correct orientation. Snap the end caps back on securely. Align the bottom plate and snap or lever it back into place until it clicks. Ensure it’s seated flush.
For Shark Rotator Professional (NV350, NV356, etc.) & Some Vertex Models
These often feature a tool-free design with a prominent release button.
- Locate the Release Button: On the underside of the floor head, you’ll see a large, usually red, button labeled “Release” or with an icon. Press and hold this button.
- Pull the Brush Head Assembly: While holding the button, pull the entire brush head module (brush roll and surrounding plastic housing) straight out towards you. It should slide out of its tracks.
- Separate the Brush Roll: Once the module is out, flip it over. You’ll see the brush roll inside. There may be two release tabs or a single central screw holding the end caps. Press the tabs or unscrew the screw to free the brush roll from the module housing.
- Clean as Described Above: Take the brush roll to your cleaning station and use your seam ripper, scissors, and soapy water to clean it thoroughly. Clean the module housing separately.
- Reassemble: Slide the clean brush roll back into the module housing, secure the end caps/tabs/screw, and then slide the entire module back into the floor head tracks until it clicks and locks. Ensure the release button pops back out.
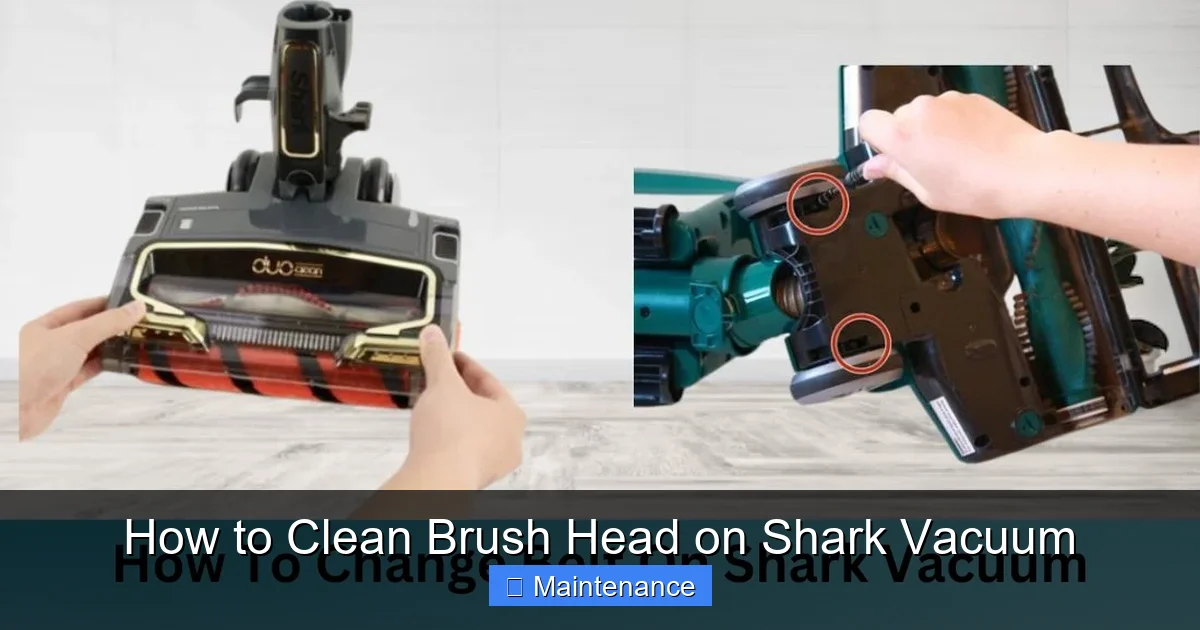
For Shark Vertex (AZ, IZ, etc.) & IQ Series
The Vertex series, known for its DuoClean technology (two brush rolls), and newer IQ models have slightly different access.
- Remove the Nozzle/Floor Head: On many Vertex models, you first need to detach the entire cleaning nozzle from the vacuum body. Press the wand release button and pull the nozzle straight off.
- Flip and Release: Place the nozzle on its top (handle side down). Look for a release lever or button on the bottom plate. Engage it to remove the bottom plate, just like with Navigator models.
- Access the Brush Rolls: You will now see one or two brush rolls (for DuoClean). The removal process for each individual roll is the same as described for Navigator models (remove end caps). Take note of their positions, as they may be different lengths or types.
- Clean Individually: Remove each brush roll and clean them separately. The DuoClean system has a combination of a standard bristle brush and a rubber fin roll. Clean both according to their material—be gentle with rubber fins to avoid tearing.
- Clean the DuoClean Housing: This housing has more channels and crevices. Use your compressed air and toothbrush diligently to clear all debris from the belt drives and the space between the two brush roll housings.
- Reassemble Carefully: Reinsert each brush roll in its correct, designated slot. Ensure they spin freely before snapping the bottom plate back on. Reattach the entire nozzle to the vacuum body.
Critical Note on Belts: If your model uses a drive belt (common in Navigator/Rotator), it will be visible once the brush roll is out. Gently slide it off the motor pulley and brush roll pulley. Inspect it thoroughly. If it’s cracked, glazed, stretched, or has hair embedded in its grooves, replace it. A new belt is inexpensive and crucial for proper function. Reinstall the new belt by hooking it onto both pulleys before placing the brush roll back in.
Pro Maintenance Tips to Minimize Future Cleaning Hassles
Cleaning the brush head is reactive maintenance. Proactive habits can drastically reduce how often you need to perform this deep clean and make each cleaning session easier.
Visual guide about How to Clean Brush Head on Shark Vacuum
Image source: sharkvacuum.blog
Adopt a “Quick Wipe” Routine After Every Use
Don’t wait a month for a major de-hairing. After you finish vacuuming, especially if you’ve tackled pet hair or carpet, do a 60-second brush head check.
- With the vacuum unplugged, flip it over.
- Use your fingers or the blunt end of scissors to pick off any visible hair or large debris wrapped around the brush roll ends.
- Wipe the bottom plate and the exposed brush bristles with a dry microfiber cloth.
- This simple habit prevents hair from compacting into solid, concrete-like masses that require a seam ripper and 30 minutes of cutting.
Use the Right Setting for the Job
Your Shark vacuum likely has different floor type settings (Carpet, Hard Floor, etc.).
- On Hard Floors: Use the “Hard Floor” or “Bare Floor” setting. This often turns off the brush roll entirely (on models with that feature) or reduces its speed. A spinning brush on hard floors can kick dust and small debris around rather than suctioning it efficiently. More importantly, it prevents unnecessary hair wrap when there’s no carpet to agitate.
- On Carpets: The “Carpet” setting engages the brush roll for deep cleaning. If you have a lot of hair, consider a slightly higher height setting if your vacuum has it, as a very low setting can pull the brush deeper into thick pile, making hair wraps tighter and harder to remove.
Invest in Prevention for Pet Hair
If you have dogs or cats that shed, consider these add-ons:
- Rubberized Brush Rolls: Some Shark models offer a “Anti-Hair Wrap” or rubber fin brush roll as an accessory or standard feature. These are far less prone to hair wrapping than traditional bristle brushes and are much easier to clean—often a simple wipe is enough.
- Pre-Vacuum with a Rubber Broom: On carpets, a quick pass with a rubber broom (like a Squeegee) before vacuuming can lift a massive amount of loose pet hair to the surface, allowing your vacuum to pick it up before it wraps around the brush roll deep in the pile.
Schedule It Like an Oil Change
Don’t wait for symptoms. Mark your calendar. For a typical home with no pets and minimal carpet, a full brush head cleaning every 2-3 months may suffice. For homes with pets, long hair, or mostly carpeting, commit to a deep clean every 4-6 weeks. This scheduled maintenance is far easier than dealing with a clogged, smelly vacuum that barely works.
Troubleshooting: What to Do When Things Go Wrong
Sometimes, you clean the brush head and the problem persists. Here’s how to diagnose common follow-up issues.
The Brush Roll Isn’t Spinning After Reassembly
This is the most common post-cleaning issue. Diagnose systematically:
- Is it properly seated? The most likely cause is that the brush roll wasn’t inserted correctly, or the end caps aren’t snapped on fully. One side might be slightly higher, preventing it from engaging with the belt or motor drive. Remove it and try again, ensuring it sits perfectly level.
- Is the belt installed correctly? If your model has a belt, it must be looped around both the motor pulley (usually at the back of the housing) and the brush roll pulley (on the brush roll itself). It should be taut but not twisted. A twisted or misaligned belt won’t transfer power.
- Is the belt broken or missing? Did it fall off during cleaning and get lost? Or did it snap? A missing or broken belt means no power transfer. You’ll need to install a new one.
- Is there still a jam? A single strand of hair caught in the bearing cap or between the brush roll and housing can stop it dead. Re-inspect both ends of the brush roll and the housing where it sits.
The Vacuum Still Smells Bad After Cleaning
If you’ve thoroughly washed and dried the brush roll and housing but the odor remains, the smell is likely coming from:
- The Exhaust Filter(s): The HEPA filter and/or foam pre-motor filter can absorb odors. These need to be cleaned (foam) or replaced (HEPA) according to your manual’s schedule. A clogged, dirty filter restricts airflow and can harbor smells.
- The Dust Cup or Bag: Empty the dust cup completely. Wipe it out with a damp cloth. If you use a bag, ensure it’s not overfilled and the bag collar is clean.
- Internal Hoses: A very stubborn clog or odor source might be deeper in the suction path. This is rarer but possible.
Hair or Fibers Are Stubbornly Woven Into the Bristles
For hair that’s woven *between* the bristles (not just wrapped around the core), a seam ripper is your best friend. Gently slide the sharp point under the hair loop and lift. Work your way around the circumference. Be patient to avoid pulling bristles out. For synthetic fibers, a fine-tooth comb can sometimes work after the main wraps are cut.
The Brush Roll Bearings Feel Gritty or Tight
After cleaning, spin the brush roll by hand. It should rotate smoothly and silently. If it feels gritty, squeaks, or has resistance:
- Disassemble the End Caps: Some models allow you to pop the bearing caps off the ends of the brush roll axle. Inside, you might find packed debris. Clean this out carefully with a cotton swab and a tiny bit of rubbing alcohol. Do not lubricate with oil; Shark bearings are usually sealed.
- The bearing is worn: If cleaning doesn’t help, the bearing itself is likely worn out. Unfortunately, on most Shark brush rolls, the bearings are not serviceable or sold separately. You will need to replace the entire brush roll assembly. This is a common wear item.
Conclusion: A Clean Brush Head Is a Happy Vacuum
Mastering how to clean brush head on Shark vacuum transforms your relationship with your cleaning tool. It shifts you from a frustrated user wondering why the vacuum isn’t working, to an empowered owner who knows exactly how to maintain its peak performance. The process, while model-specific, always follows the same logical sequence: safe removal, aggressive debris clearing, gentle soap-and-water cleaning, thorough drying, and careful reassembly with a belt and bearing check.
Think of it not as a dreaded chore, but as a quick tune-up that pays massive dividends. A clean brush head means maximum suction, deep-down carpet cleaning, odor-free operation, and a vacuum that will faithfully serve you for years instead of burning out prematurely. By incorporating a monthly deep clean and a quick post-vacuum wipe-down into your routine, you’ll prevent the vast majority of performance issues. You’ll save money on potential repairs, enjoy a consistently cleaner home, and get the full value from your Shark investment. Now, go grab your screwdriver and seam ripper—your vacuum’s performance awaits.
Frequently Asked Questions
How often should I clean my Shark vacuum’s brush head?
For most households, a full deep clean every 1-2 months is recommended. Homes with pets, long hair, or mostly carpeting should aim for every 4-6 weeks. Always do a quick visual check and wipe-down after heavy vacuuming sessions.
Can I use water to clean the brush roll and housing?
Yes, warm soapy water is ideal for the plastic brush roll and housing. Use a mild dish soap. Avoid soaking electrical components or the motor housing. Most importantly, ensure every part is completely dry (air-dry for 2+ hours) before reassembly to prevent rust and motor damage.
My brush roll spins freely but the vacuum still has no suction. Is it the brush head?
Not necessarily. A freely spinning brush head rules out a major jam, but suction loss can stem from a full dust cup, clogged filters (pre-motor foam or HEPA), a blocked hose, or a leaky seal. Check these components in order after confirming the brush head is clean and spinning.
What’s the best tool for removing hair wrapped tightly around the brush roll?
A seam ripper is the professional’s secret weapon. Its hooked blade slides under hair wraps and slices them cleanly without damaging bristles. Scissors work but require more precision to avoid cutting the bristles themselves.
Can I use bleach or household cleaners on the brush head?
No. Avoid bleach, ammonia, or abrasive cleaners. They can degrade plastic, rubber fins, and adhesive bonds. Stick to warm water and a small amount of mild dish soap. For sanitizing, a diluted white vinegar solution (1:1 with water) can be used, then rinsed well.
How do I know if my brush roll needs to be replaced instead of just cleaned?
Replace the brush roll if: the bristles/rubber fins are significantly worn down or missing; the axle spins roughly even after cleaning the bearings (indicating worn internal bearings); the plastic core is cracked; or it’s simply old and no longer agitating effectively despite being clean. Brush rolls are a consumable part designed for periodic replacement.