Replacing the motor in your Shark vacuum is a moderate DIY task that can restore powerful suction and extend your appliance’s life. The process requires careful preparation, the right tools, and meticulous attention to your specific model’s design. Always disconnect the power, consult your official manual, and document each step with photos to ensure correct reassembly. If you encounter sealed components, lack confidence, or your vacuum is under warranty, contacting Shark support or a professional is the safest and most cost-effective choice.
Key Takeaways
- Safety First: Always unplug the vacuum from the wall outlet before beginning any disassembly to prevent electric shock.
- Model Matters: Shark vacuum designs vary significantly; your exact replacement steps depend on the specific model series (e.g., Navigator, Rotator, Vertex).
- Diagnosis is Key: Confirm the motor is the problem by ruling out simpler issues like clogs, full bins, dirty filters, or worn drive belts first.
- Document Everything: Take clear photos or notes during disassembly, especially of wire connections and screw locations, to simplify reassembly.
- Handle Wires with Care: Motor electrical connectors are fragile; never pull on wires themselves, only on the plastic connectors, and ensure they are fully seated.
- Inspect Ancillary Parts: While the motor is out, inspect the motor mounts, gaskets, and nearby wiring for wear or damage and replace if necessary.
- Warranty Implications: Opening the vacuum may void the manufacturer’s warranty; check your warranty status and terms before proceeding with a DIY repair.
📑 Table of Contents
- Introduction: Breathing New Life Into Your Shark
- Understanding Shark Vacuum Motors & Diagnosing the Real Problem
- Essential Tools, Parts, and Safety Precautions
- Step-by-Step Disassembly: Gaining Access to the Motor
- Installing the New Motor: The Swap and Key Connections
- Reassembly, Testing, and Final Checks
- Troubleshooting, Warranty, and When to Call a Professional
Introduction: Breathing New Life Into Your Shark
There’s nothing more frustrating than your trusty Shark vacuum losing its legendary suction power. You’ve checked the filters, emptied the bin, and ensured there are no blockages, but it still feels like it’s just going through the motions. The culprit is often the heart of the machine: the motor. A failing motor can manifest as a whining sound, a burning smell, complete power loss, or that dreaded weak suction. Before you resign yourself to the expense of a new vacuum, consider this: replacing the motor yourself is a very achievable project for a confident DIYer. It saves money, reduces electronic waste, and gives you a deeper understanding of your appliance. This comprehensive guide will walk you through the entire process, from diagnosis to successful reassembly, ensuring you can tackle this repair with confidence. We’ll emphasize safety, model-specific considerations, and pro-tips to avoid common pitfalls.
Understanding Shark Vacuum Motors & Diagnosing the Real Problem
Before you grab a screwdriver, it’s crucial to be absolutely sure the motor is the issue. Shark vacuums, like all complex machines, have several components that can fail and mimic motor problems. Misdiagnosis can lead to unnecessary part replacement and wasted effort.
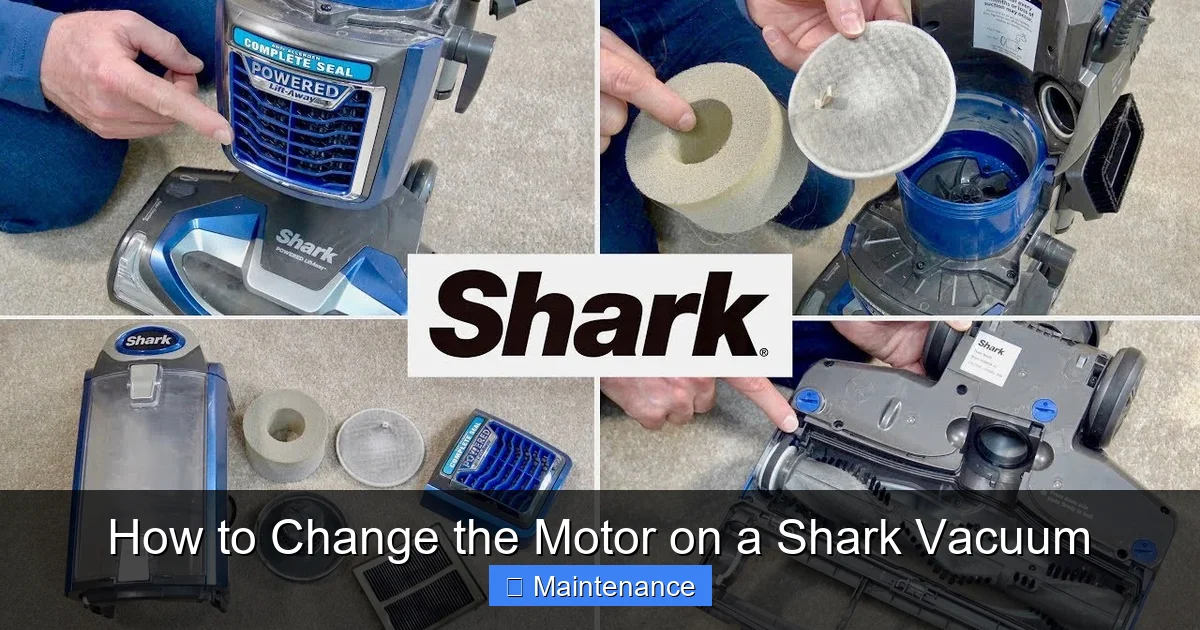
Visual guide about How to Change the Motor on a Shark Vacuum
Image source: i.ytimg.com
The Most Common Culprits (That Aren’t the Motor)
Start with the simplest checks. A severely clogged hose, wand, or brush roll housing is the #1 cause of lost suction. Use a long, flexible brush or a bent wire coat hanger to clear any obstructions. Next, a full or improperly sealed dust cup/bag can create an air leak. Empty it completely and check the seals. The filters—especially the foam pre-motor filter and the post-motor HEPA filter—are critical. A clogged pre-motor filter puts immense strain on the motor and reduces suction dramatically. Wash the foam filter with cold water and let it dry for 24 hours. Replace the post-motor filter if it’s dirty or damaged (these are not washable). Finally, inspect the drive belt (if your model has one) on the brush roll. A broken, stretched, or missing belt will stop the brush roll from spinning, making it seem like the vacuum is weak on carpets.
Signs That Point Directly to Motor Failure
If you’ve cleared all clogs, cleaned/replaced all filters, and the belt is intact, the motor is the likely suspect. Here are the definitive signs:
- No Power: The vacuum doesn’t turn on at all, and you’ve confirmed the outlet works with another device. This could be a switch or cord issue, but a completely dead motor is possible.
- Burning Smell: A distinct electrical burning odor, especially when the vacuum is running, is a major red flag. Turn it off immediately. This indicates overheating windings or failed components inside the motor housing.
- Extreme Noise: A very loud, high-pitched whining, grinding, or rattling sound that is new and worsening. This often means the motor’s internal bearings or fan are failing.
- Intermittent Operation: The vacuum starts, runs for a minute, then shuts off. After cooling, it might restart. This is classic thermal overload protection kicking in due to an overheating, failing motor.
- Weak Suction Persists: After all other checks, if the suction is palpably weak on both carpet and hard floor settings, the motor’s impeller may be damaged or its speed reduced.
Pro Tip: If your model has a reset button (often a small red button on the motor housing or near the power switch), try pressing it. If the vacuum runs briefly then shuts off again, the motor is likely drawing too much current and needs replacement.
Essential Tools, Parts, and Safety Precautions
Preparation is 80% of a successful repair. Having everything you need within arm’s reach prevents frustration and damage.
Visual guide about How to Change the Motor on a Shark Vacuum
Image source: m.media-amazon.com
The Tool Kit You’ll Need
Gather these common household and small mechanic tools:
- Screwdrivers: A set of Phillips-head (#1 and #2 are most common) and flat-head screwdrivers. Some models use Torx bits (T10, T15, T20). Having a precision screwdriver set is highly recommended.
- Putty Knife or Plastic Pry Tool: Essential for releasing plastic clips without cracking the vacuum’s outer shell. Avoid metal tools on plastic parts.
- Needle-Nose Pliers: For gripping small pins, releasing wire clips, or pulling stubborn connectors.
- Work Light or Flashlight: The interior of a vacuum is dark. A flexible LED work light is invaluable.
- Container for Screws: A small parts organizer or a piece of paper with tape to stick screws to, labeled by section (e.g., “Bottom Plate,” “Handle”).
- Camera or Smartphone: For taking step-by-step photos of wire routing and screw locations.
- Gloves and Safety Glasses: Basic protection from sharp edges and dust.
Acquiring the Correct Replacement Motor
This is the most critical part. Using the wrong motor will not work. You must identify your exact Shark vacuum model number. It’s typically on a sticker on the back or bottom of the machine, or on the original packaging. It will look like “NV352,” “AZ6002,” or “HV322.” Once you have it:
- Visit the official Shark website (sharkclean.com). Navigate to “Customer Support” or “Replacement Parts.” Enter your model number to find the exact motor assembly listed.
- Use authorized Shark part retailers like PartSelect, Encompass, or local vacuum repair shops. Provide them your model number.
- Important: Shark often sells the motor as part of a “Motor Assembly” which includes the motor, its mounting brackets, and sometimes the fan or impeller. Buy the complete assembly to ensure compatibility and ease of installation. Do not buy a generic “universal vacuum motor” unless it is explicitly listed for your specific Shark model.
Non-Negotiable Safety Precautions
Vacuums contain powerful motors, sharp edges, and stored electrical energy. Follow these rules without exception:
- Disconnect Power: Pull the plug from the wall outlet. Do not rely on an off switch.
- Discharge Capacitors: Some Shark models have a small start capacitor near the motor. If you see a cylindrical or oval component (often black or silver) with wires, carefully discharge it by placing the blade of your screwdriver across its two terminals for a few seconds. Wear safety glasses. If you are unsure, skip this and avoid touching any capacitor terminals.
- Work in a Clean, Well-Lit Area: A cluttered floor leads to lost screws and damage. Use a large blanket or towel to lay the vacuum on to protect your floors and the vacuum’s finish.
- Beware of Sharp Edges: The metal motor housing and internal plastic ribs can be very sharp. Wear gloves.
- No Liquid: Keep all drinks and liquids away from your workspace.
Step-by-Step Disassembly: Gaining Access to the Motor
Now, the careful surgery begins. The path to the motor varies by model series. Below is a generalized path common to many upright Shark models. Your specific model may differ, so constantly cross-reference with your manual and the photos you take.
Phase 1: Removing the Lower Housing and Brush Roll
1. Lay the vacuum flat on its back on your protective blanket. This gives you access to the bottom plate.
2. Remove the bottom plate. It is usually held by 4-6 screws. Some models have a release lever or clip. Use your putty knife to gently pry around the edges if it’s clipped in. Set the screws aside in your labeled container.
3. Remove the brush roll. Once the bottom plate is off, the brush roll (the cylindrical brush with bristles) will be visible. It is typically held by two caps or bearings on either end. Press the release tabs or remove the screws holding these caps. Slide the brush roll out. Take note of which side faces up—it’s usually asymmetrical. This is a good time to clean the brush roll thoroughly of any hair and debris.
4. Disconnect the brush roll motor belt (if applicable). On models with a separate brush roll motor, you’ll see a small rubber belt connecting the brush roll to its motor. Slide it off the brush roll pulley.
Phase 2: Opening the Main Body
1. Stand the vacuum upright. You now need to open the main plastic shell that houses the motor and fans.
2. Locate and remove all screws on the exterior. Check the handle, at the base where the wand connects, along the sides, and sometimes under the dust cup. Shark loves to hide screws under rubber grommets or stickers. Peer closely.
3. Release the plastic clips. After all screws are out, the two halves of the vacuum body (top and bottom) will still be held together by numerous plastic clips. Starting at a corner, insert your plastic pry tool and gently work your way around the seam. You should hear a series of pops as the clips release. Be patient and gentle to avoid cracking the plastic.
4. Separate the halves. Once all clips are free, carefully lift the top half (handle and top shell) away from the bottom half (which contains the motor and fans). Do not yank. There will be wires connecting the two halves—the main power switch wires and possibly hose connection wires. Let them rest naturally without stressing the connectors.
Phase 3: Accessing the Motor Housing
1. With the top half set aside, you now see the main air path and the motor/fan assembly at the rear of the bottom half.
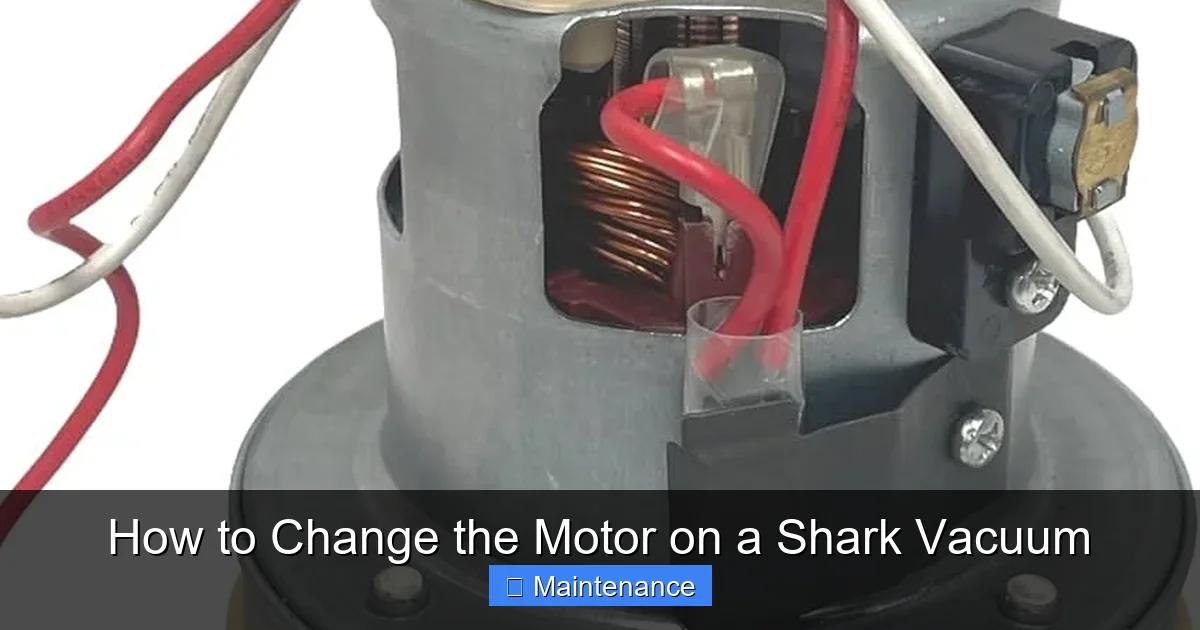
2. The motor is usually enclosed in a round or oval plastic/metal housing. It is connected to the main air path and has several wires coming from it.
3. Disconnect the wire harnesses. There are typically 2-3 connectors. Press the release tab on each plastic connector (usually a small lever or tab you must press down) and pull the two halves apart firmly. Never pull on the colored wires themselves. Take a photo of each connection before unplugging it.
4. Remove the motor housing screws. The motor assembly is mounted to the bottom housing with several screws (usually 4-6). Remove these and set them aside.
5. Gently lift the motor assembly out. It may be heavy. It’s often connected to the air path with a rubber gasket or seal. If it sticks, gently wiggle it; do not force it. Once free, place it on a clean surface.
Installing the New Motor: The Swap and Key Connections
Congratulations! You have the old motor out. The installation is essentially the reverse process, but with critical checks.
Pre-Installation Inspection
Before putting anything back, inspect the cavity where the motor sat. Look for:
- Debris: Clear out any accumulated dust, hair, or dirt. Use a vacuum cleaner with a crevice tool or compressed air.
- Gasket Condition: The rubber seal between the motor and the air path should be intact and pliable. If it’s cracked, brittle, or missing, you must replace it. A bad seal causes catastrophic air loss and zero suction. Order a new gasket if needed.
- Wiring Condition: Check the wires that connect to the motor for any signs of melting, fraying, or scorch marks from the old motor failure. If damaged, the wiring harness may need professional repair.
The Motor Swap
1. If your new motor assembly did not come with a pre-attached fan/impeller (rare for Shark assemblies), you would need to transfer the old fan to the new motor. This is a precise task involving a special tool to press the fan onto the motor shaft. For 99% of DIYers, buying the complete Shark-approved motor assembly is the correct path, as it comes pre-assembled and balanced.
2. Position the new motor assembly. Carefully place it into the housing, aligning it with the screw holes. Ensure the gasket (if separate) is seated correctly.
3. Hand-tighten all mounting screws. Do not use a screwdriver yet. Get all screws started and finger-tight to ensure the motor is sitting flat and not binding. Then, using your screwdriver, tighten them in a criss-cross pattern (like tightening a car wheel lug nut) to ensure even pressure and a proper seal. Do not overtighten and crack the plastic housing.
Reconnecting the Electrical System
This is the most delicate step. Refer to the photos you took.
- Identify each connector from the main vacuum body and match it to the corresponding socket on the new motor. They are often keyed (shaped differently) to prevent wrong connections.
- Align the connectors fully. You should feel and hear a firm click when they are fully seated. Gently tug on each wire to confirm it is locked in place. A loose connection will cause the vacuum to not start or shut off.
- Pay special attention to the wire for the power switch. It is critical.
- If any connector is corroded or damaged, clean it gently with electrical contact cleaner and a brush.
Reassembly, Testing, and Final Checks
With the new motor secured and wired, it’s time to put your Shark back together. This phase requires methodical patience.
Reversing the Disassembly
1. Reconnect the brush roll belt (if your model has one) by stretching it over the brush roll pulley and the motor pulley.
2. Reinstall the brush roll. Slide it back into its bearings, ensuring the belt is on it. Reinstall the bearing caps and secure them.
3. Reattach the bottom plate. Ensure any seals or foam strips on the plate are intact and seated. Screw it back on securely.
4. Connect the main body halves. Carefully lower the top shell onto the bottom half. First, ensure all wire harnesses are not pinched and are lying flat inside. Guide the connectors into their mates if they had to be separated. Let the plastic clips engage—you should feel and hear them snap into place all around the seam. Do not force it.
5. Reinstall all exterior screws. Go slowly and ensure each screw goes into its original hole. A misplaced screw can crack the plastic. Tighten firmly but gently.
The Critical First Test (Before Full Reassembly)
This is the most important safety and diagnostic step. Before you screw everything back together completely, do a “bench test”:
- With the vacuum still on the blanket, plug it into a wall outlet.
- Turn it on. Do not put it on the floor yet.
- Listen. The motor should start smoothly, without any grinding, excessive whining, or burning smell. The suction should feel strong if you place your hand over the wand inlet.
- Turn it off and unplug it immediately if anything seems wrong. Re-check all wire connections.
- If the test is successful, unplug it and finish the reassembly by securing any last screws or clips you might have missed.
Final Reassembly and First Use
Once the bench test passes:
- Reattach the hose/wand assembly if you disconnected it.
- Attach the dust cup or bag.
- Insert a clean filter.
- Screw in any final accessories.
For the first use, run the vacuum on a hard floor for 2-3 minutes without any attachments. Listen and smell. Then, engage the brush roll on a carpet. Check for normal operation. After this test run, turn it off, unplug it, and check the motor housing for any unusual heat (it will be warm, but not hot enough to be uncomfortable to touch briefly).
Troubleshooting, Warranty, and When to Call a Professional
Even with careful work, things can go wrong. Knowing what to do next is key.
Common Post-Repair Issues & Solutions
- Vacuum Won’t Start: Re-check every single electrical connector. Ensure they are fully clicked. Verify no wires were pinched during reassembly. Check your home’s circuit breaker.
- Weak Suction Persists: The new motor gasket may not be sealing. Power off and check for debris or misalignment. Ensure the dust cup seal is clean and the lid clicks shut properly. A pre-motor filter that wasn’t cleaned/replaced will still cause weak suction.
- Strange Noise from Brush Roll: The brush roll bearings may be worn out or hair-bound. This is unrelated to the motor. Remove and clean/replace the brush roll.
- Burning Smell Returns Immediately: Stop using it. This indicates a severe problem. The new motor may be defective (DOA), or there is a major electrical short in the wiring harness. Do not continue to run it.
The Warranty Dilemma
Shark warranties typically range from 1 to 5 years on the motor. However, the warranty almost always states that it is void if the product is “unauthorizedly repaired” or “opened.” By replacing the motor yourself, you are technically voiding the remaining warranty. Consider this:
- If your vacuum is less than 1-2 years old and under warranty, the best path is to contact Shark Customer Support. They may, at their discretion, offer to repair it for free or provide a replacement at a reduced cost. Be honest if asked if you opened it.
- If the vacuum is older than the warranty period, DIY is the clear economic choice.
- Some repair shops are “authorized” and can perform the repair while keeping warranty intact (if applicable), but they will charge labor.
When to Seek Professional Help
There is no shame in calling an expert. Do so if:
- Your specific model has a sealed motor housing that requires destructive or specialized tools to open (some newer Shark designs are moving this way).
- You are uncomfortable with any step, especially electrical work.
- You diagnose a shorted wiring harness or damaged switch, which requires more advanced soldering and electrical skills.
- The repair involves significant disassembly of the electrical system beyond just unplugging connectors.
- The cost of a new motor is very high relative to the value of the vacuum. A professional diagnosis might reveal a cheaper fix.
A local vacuum repair shop is your best bet. They have experience with all models, can often do the repair in under an hour, and provide a warranty on their labor and part.
Frequently Asked Questions
How much does a Shark vacuum motor cost to replace?
A genuine Shark motor assembly typically costs between $50 and $150, depending on the model. High-end or newer models may have more expensive motors. This is often 20-40% of the cost of a new comparable Shark vacuum.
How long does it take to change a Shark vacuum motor?
For a competent DIYer with the right tools and a clear guide, expect to spend 1 to 2 hours. The first time will be slower as you learn your model’s specific disassembly. A professional can often do it in 30-60 minutes.
Is changing a Shark vacuum motor difficult?
It is a moderate DIY project. It requires mechanical aptitude, patience, and attention to detail. The difficulty is not in the motor swap itself, but in navigating the maze of plastic clips, hidden screws, and wire connectors unique to your model. If you are comfortable disassembling complex electronics, you can likely do it.
Will opening my Shark vacuum to change the motor void the warranty?
Almost certainly, yes. Shark’s standard warranty is void if the product is opened or repaired by an unauthorized person. If your vacuum is still under the original warranty period (check your documentation), contact Shark Support first to discuss your options before proceeding.
Do all Shark vacuum models have replaceable motors?
No. While most traditional upright and canister Sharks have a user-serviceable motor assembly, some newer, more compact designs (especially certain stick vacuums) have motors that are sealed within the main body and are not intended to be replaced by consumers. Your model’s parts diagram on the Shark website will confirm if a motor part is listed for sale.
How do I know for sure the motor is bad and not something else?
Systematically rule out other causes: 1) Clear all clogs from hose to brush roll. 2) Empty the dust cup and clean the lid seal. 3) Wash the foam filter and replace the HEPA filter. 4) Inspect the drive belt (if equipped) for breaks or wear. 5) Listen for abnormal noises or burning smells. If all these are good and suction is still very weak or the vacuum won’t run, the motor is the likely failure point. A multimeter test for continuity on the motor windings can confirm, but is more advanced.