Changing your Shark Navigator filter is a critical, yet simple, maintenance task that directly impacts your vacuum’s performance and your home’s air quality. A clogged filter reduces suction power, strains the motor, and can blow dust back into your rooms. This guide provides a detailed, model-specific walkthrough to help you correctly identify, access, and replace your filter, ensuring your Shark operates at peak efficiency. By following these clear instructions and a regular replacement schedule, you protect your investment, maintain powerful cleaning, and create a healthier environment for your family.
Key Takeaways
- Regular Replacement is Non-Negotiable: Changing your Shark Navigator filter every 3-6 months (or per the indicator) is essential for maintaining suction power, protecting the motor from overheating, and ensuring clean exhaust air.
- Know Your Exact Model: Shark Navigator models (like the Lift-Away, Pro, or NV series) use different filter types (foam, felt, HEPA) and have unique access points. Always verify your model number before purchasing a replacement.
- Two Filters, Two Jobs: Most Navigators have a primary foam filter (protects the motor) and a secondary post-motor filter (traps fine dust). Both require regular cleaning or replacement for optimal performance.
- Cleaning vs. Replacing: The pre-motor foam filter is often washable and reusable. The post-motor pleated filter is typically a “replace-only” item. Never wash a non-washable filter.
- Simple Tools, Big Impact: You usually only need your hands and possibly a Phillips screwdriver. No special tools are required, making this a quick DIY task that saves on service calls.
- Reset the Indicator: After replacing the filter, locate the filter reset button (often on the back or inside the filter compartment) and press it to silence the maintenance reminder light.
- Buy Genuine for Guaranteed Fit: While third-party filters exist, genuine Shark OEM filters are engineered for a perfect seal and optimal filtration, preventing dust bypass and potential damage.
📑 Table of Contents
- Why Changing Your Shark Navigator Filter is Your Vacuum’s Most Important Tune-Up
- Know Your Navigator: Identifying Your Model and Filter Type
- Step-by-Step: How to Change Your Shark Navigator Filter
- Maintenance Schedule and Best Practices for Longevity
- Troubleshooting: What to Do When Things Don’t Go as Planned
- The Real Benefits: What You Gain by Staying on Top of Filter Changes
Why Changing Your Shark Navigator Filter is Your Vacuum’s Most Important Tune-Up
Let’s be honest: when was the last time you really thought about your vacuum cleaner’s filter? If you’re like most people, it’s probably only when the machine starts sounding like a dying lawnmower or, worse, when you notice a fine layer of dust settling back on your freshly cleaned floors. That frustrating scenario is almost always a filter issue. Your Shark Navigator’s filter is its lungs. Just as you wouldn’t breathe through a clogged mask, your vacuum can’t breathe through a dirty filter. This single component is the unsung hero (or villain) of your cleaning routine. A clean filter ensures powerful, consistent suction that lifts embedded dirt from carpets and bare floors. It protects the expensive motor from overheating and premature wear by allowing proper airflow. Most importantly, it captures the fine dust and allergens that would otherwise be expelled back into your home’s air, impacting your family’s health. Neglecting this simple task is the fastest way to turn a high-performance machine into a useless, dust-spewing brick. Understanding how and when to change your Shark Navigator filter isn’t just maintenance; it’s about preserving your investment and safeguarding your indoor air quality.
The Silent Performance Killer: What Happens When You Ignore the Filter
Think of your vacuum’s filter as a security guard at a door. Its job is to let air pass through while trapping 99.97% of particles as small as 0.3 microns (in the case of a HEPA filter). As it does its job, it gets full. A full filter is an inefficient filter. The immediate effect is a dramatic drop in suction power. You’ll find yourself going over the same spot multiple times, with diminishing returns. The motor now has to work much harder to pull air through a resistant barrier, leading to increased noise, higher energy consumption, and, most critically, excess heat buildup. This chronic overheating is a primary cause of motor failure. Furthermore, a saturated filter can lose its electrostatic charge (in the case of HEPA media) and its structural integrity, allowing trapped dust and allergens to escape back into your home. That “stale” smell after vacuuming? That’s often exhausted dust from an overstuffed filter. Proactively changing the filter is infinitely cheaper and easier than replacing a burned-out motor or dealing with poor indoor air quality.
Know Your Navigator: Identifying Your Model and Filter Type
Shark has produced numerous Navigator iterations over the years. The “Navigator” name encompasses several series, including the original Navigator, Navigator Lift-Away, Navigator Pro, and the newer NV series. Each has subtle differences in filter configuration and access. The first, most crucial step is to locate your model number. It’s on a silver sticker typically on the back or underside of the canister body or the motor housing. Common prefixes include NV350, NV356, NV360, NV352, etc. Once you have your model, you can accurately identify the filter setup. Most modern Shark Navigators use a two-filter system:
Visual guide about Change Shark Navigator Filter
Image source: i5.walmartimages.com
- The Pre-Motor (Foam) Filter: This is the first line of defense, located right after the dirt cup. It catches larger debris like hair and carpet fibers to protect the motor and the finer filters downstream. It’s almost always a black, rectangular or square foam filter. This one is designed to be washable and reusable. You clean it, let it dry completely for 24 hours, and reinstall it.
- The Post-Motor (Pleated) Filter: This is the fine filtration workhorse, located after the motor and before the air exhaust. It’s a pleated, paper-like filter, often white or off-white. Its job is to capture the microscopic dust and allergens. This is a replace-only filter. It is not washable and must be discarded and replaced when soiled. Some higher-end models (like those with “Anti-Allergen Complete Seal” technology) use a HEPA version of this filter, which is even more critical to replace on schedule.
Older or specific models might have a single combination filter or a different orientation. Always cross-reference your model number with the filter diagrams on the official Shark website or the instructions that came with your vacuum. Using the wrong filter type or installing it incorrectly will break the seal and render your vacuum’s entire filtration system useless.
How to Find Your Model Number Quickly
If the sticker is worn, here’s a foolproof method: Empty the dust cup and look inside the main air pathway. Often, the model number is molded into the plastic housing near where the filters sit. You can also check the original box or manual. If all else fails, the Shark website has a helpful “Find Your Model” tool where you can visually match your vacuum’s body style. Taking a clear photo of your vacuum’s front, side, and filter compartment and comparing it to images online for “Shark Navigator” models will usually pinpoint the exact generation you own. This 5-minute detective work saves you from buying the wrong $20 filter.
Step-by-Step: How to Change Your Shark Navigator Filter
Now for the hands-on part. Changing your Shark Navigator filter is designed to be a user-friendly, tool-free process. However, a little patience and the right order of operations make it smooth every time. Always perform this task on a clean, flat surface with good lighting. Have a small container handy for any screws. The process varies slightly between models with a Lift-Away canister and those with a fixed canister, but the core principles are identical.
Visual guide about Change Shark Navigator Filter
Image source: d3nevzfk7ii3be.cloudfront.net
General Preparation and Safety First
Before you touch anything, ensure the vacuum is unplugged from the wall outlet. This is a non-negotiable safety step. Next, empty the dust cup completely over a trash can. Press the cup release button and detach it from the vacuum body. Give it a good tap to dislodge any compacted debris. For models with a Lift-Away feature, you will press the Lift-Away pedal on the foot of the vacuum to release the entire pod/canister unit from the floor head. This gives you full 360-degree access to the filter housing, which is a major advantage.
Accessing and Removing the Pre-Motor Foam Filter
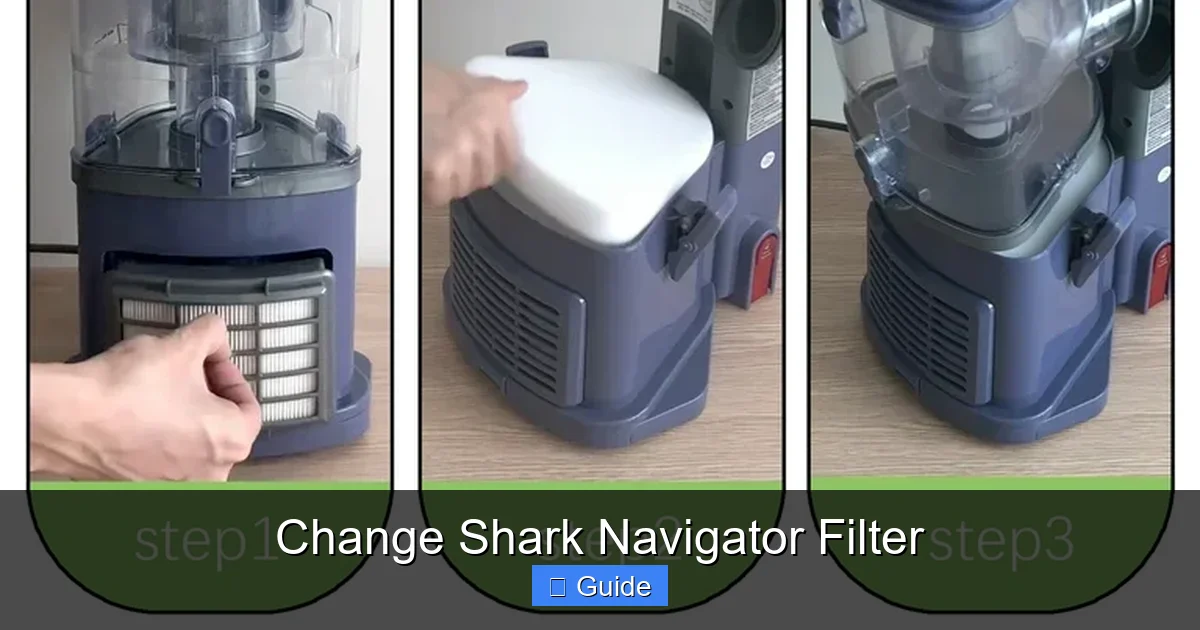
With the dust cup removed, you will see the filter compartment. On most Navigators, the pre-motor foam filter is the first thing you encounter. It is held in place by a plastic filter cover, which is usually a rectangular or circular door that either clips on or is secured by one or two screws.
- Locate the Filter Cover: Look for the compartment directly behind where the dust cup was attached. It often has a grille or vent pattern.
- Remove the Cover: If it has screws, use a Phillips head screwdriver to remove them. Keep the screws safe. If it’s a clip-on cover, press the release tabs (usually on the sides) and gently pry the cover off with your fingers. It may require a bit of wiggling.
- Extract the Foam Filter: Once the cover is off, the black foam filter will be visible. Gently pull it straight out. It might be slightly compressed. Note its orientation—which side faced the dust cup and which faced the motor. There is often a tab or a specific shape that only fits one way.
Pro Tip: The foam filter can be quite dirty. Take it to a sink and rinse it under lukewarm water. Gently squeeze and massage it to release the trapped dust. Do not use soap or detergent unless specifically recommended by Shark, as residues can degrade the foam. Rinse until the water runs clear. The most critical step: let it air-dry completely for at least 24 hours. Never reinstall a damp filter. It will inhibit airflow and could damage the motor. If your foam filter is crumbling, disintegrating, or has holes, it’s time to replace it. Genuine Shark foam filters are inexpensive and last for many washes.
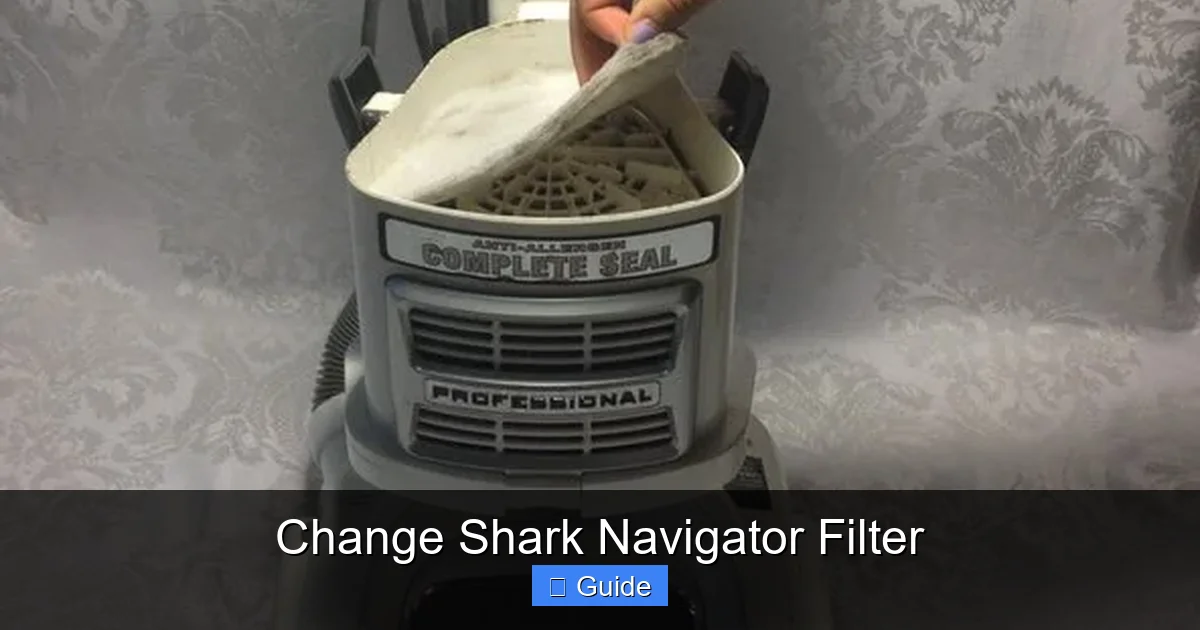
Accessing and Replacing the Post-Motor Pleated Filter
With the pre-motor filter out, you have a clear view into the deeper channel leading to the motor. The post-motor filter is located further down this path, usually held in a rectangular housing.
- Find the Filter Housing: You’ll see a plastic cage or frame holding the pleated filter. It is often secured by a latch, a twist-lock mechanism, or another small cover with screws.
- Release the Mechanism: If it’s a twist-lock, turn it counter-clockwise. If it’s a latch, press the tab and pull. If it has screws, remove them. Gently pull the entire filter cartridge/housing out.
- Remove the Old Filter: The pleated filter media is usually sandwiched inside a plastic frame. Carefully pry the old filter out of the frame. Note its orientation—the pleats should face a specific direction (often indicated by an arrow on the frame showing airflow direction).
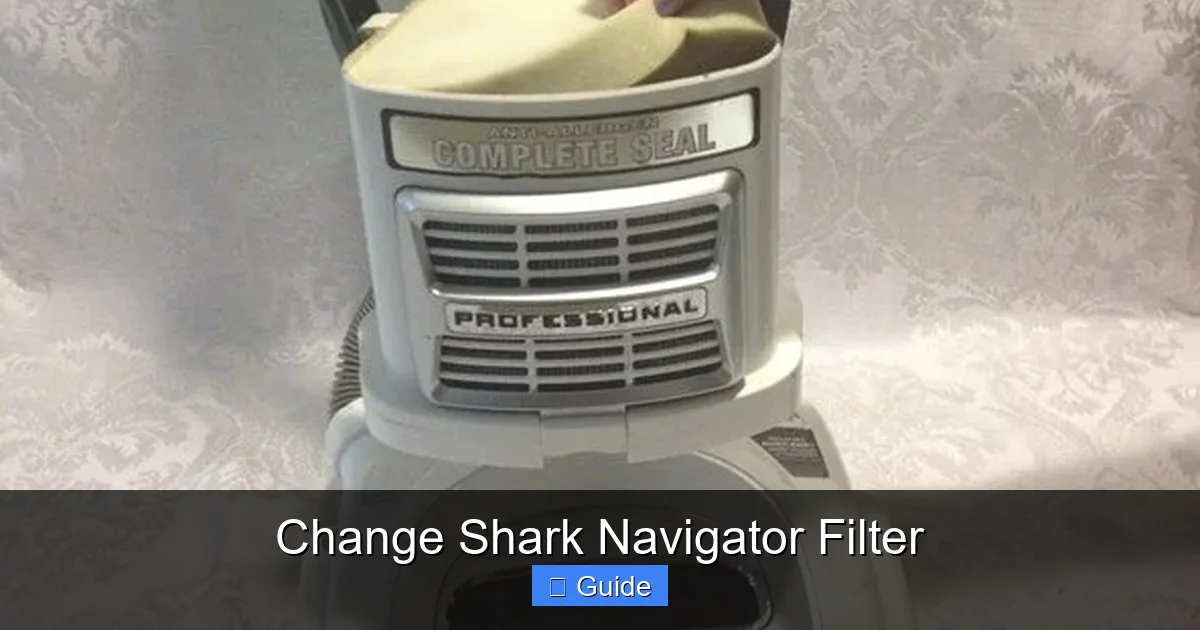
- Install the New Filter: Take your new, genuine Shark post-motor filter and place it into the frame exactly as the old one was oriented. Ensure it sits flat and is fully seated in the grooves. The pleats must not be compressed or bent.
- Reinstall the Housing: Place the entire cartridge back into its slot in the vacuum body, securing the latch, twist-lock, or screws. It should fit snugly with no gaps.
Critical Check: Before closing everything up, visually inspect the seals around the filter housings. Any dust residue or damage here can cause air leaks. Wipe the areas clean with a dry microfiber cloth.
Reassembly and Final Steps
- Reinstall the Pre-Motor Filter: Place your clean, dry foam filter back into its compartment, ensuring it’s oriented correctly. Snap or screw the filter cover back on securely.
- Reattach the Dust Cup: Align the dust cup with its housing on the vacuum body and push it on until you hear a definitive click. For Lift-Away models, place the pod back onto the floor head until it locks into place.
- Reset the Filter Indicator: This is a step many forget. Locate the small filter reset button. On most Navigators, it’s on the back of the vacuum near the power cord wrap, or inside the filter compartment on the housing itself. It’s usually a tiny red button. Press and hold it for 2-3 seconds until you hear a beep or see the maintenance light blink and go off. This tells your vacuum’s computer that you’ve performed the maintenance.
- Final Test: Plug the vacuum in, turn it on, and listen. The sound should be the familiar, strong whir of a healthy machine. Check for any unusual whistling (which indicates an air leak from a misaligned filter or housing). Run it for a few seconds and feel the exhaust air. It should be relatively clean and not dusty.
Maintenance Schedule and Best Practices for Longevity
Knowing how to change the filter is only half the battle. Knowing *when* and establishing a routine is what keeps your Shark Navigator performing like new for years. Shark provides guidelines, but your home’s environment is the ultimate variable.
Visual guide about Change Shark Navigator Filter
Image source: d3nevzfk7ii3be.cloudfront.net
The Official Schedule vs. Your Reality
Shark generally recommends checking the pre-motor foam filter every 3 months and replacing the post-motor pleated filter every 6 to 12 months, depending on usage. However, this is a baseline. If you have pets that shed, children with allergies, live in a dusty area, or vacuum daily, your filters will clog much faster. Many modern Shark Navigators have a clever filter maintenance indicator light on the power button or body. This isn’t a random timer; it’s a sensor that monitors airflow restriction. When the light turns red, it’s a definitive, machine-generated signal that your filter(s) need immediate attention. Never ignore this light. Reset it only after you have physically cleaned or replaced the filters.
Creating a Personalized Maintenance Calendar
The best approach is to combine the indicator with a proactive calendar.
- Weekly: After every few uses, tap out the dust cup over the trash and wipe the exterior clean. Check the clear window to see if it’s full.
- Monthly: Visually inspect the foam filter through the access panel. If it looks gray and densely packed, wash it immediately, regardless of the 3-month guideline.
- Quarterly (Every 3 Months): Make it a habit to wash the foam filter, even if it looks okay. Prevention is key. While you’re there, check the pleated filter. Unroll a corner and look at the pleats. If they are visibly gray or discolored, it’s time to replace it.
- Bi-Annually (Every 6 Months): Plan to replace the post-motor filter as a standard practice, especially in high-use or high-allergen homes. Stock up on filters during sales.
Keep a small log on your fridge or in your phone notes with the date of your last filter service. This simple habit eliminates guesswork.
Troubleshooting: What to Do When Things Don’t Go as Planned
Even with careful steps, you might encounter a hiccup. Here’s how to diagnose and fix the most common post-filter-change issues.
Problem: Loss of Suction Immediately After Reassembly
Solution: This is almost always an installation error. Turn off and unplug the vacuum. Reopen all filter compartments. The most common culprits are:
- A damp foam filter. It must be 100% bone dry.
- A misoriented pleated filter. The pleats must face the correct direction (usually towards the motor/exhaust). Check for an airflow arrow on the filter frame.
- An improperly seated filter cover or housing. A small gap will cause a massive air leak. Press and snap all covers until you hear/feel them lock.
- A forgotten dust cup. Did you reattach it fully?
- Debris in the airway. A large hairball or object could be blocking the path between the cup and filter. Check the hose and wand for clogs too.
Problem: A Strange Smell (Burning or Musty) After Changing Filters
Solution: A burning smell is serious. Unplug immediately. It could indicate:
- A piece of the old filter or debris was left inside the housing and is being burned by the hot motor.
- The new filter is defective or not a genuine Shark filter, shedding particles or having incorrect media.
- An unrelated motor issue. Re-inspect the entire filter pathway meticulously. If the smell persists after a thorough check and a new genuine filter, contact Shark customer service.
A musty smell usually means the foam filter was not dried completely, leading to mildew growth inside the vacuum. You must remove it, wash it again, and dry it for a full 48 hours in a warm, airy spot.
Problem: The Filter Maintenance Light Won’t Reset
Solution: First, ensure you have actually installed new, clean filters. The sensor is pretty accurate. If you have, the reset button location varies. Consult your model’s manual. Common locations are:
- A small recessed button on the back of the canister, near the power cord.
- A button inside the filter compartment on the main housing.
- On some models, you must press and hold the power button for 5-10 seconds with the vacuum on and no attachments attached.
If you’ve tried the correct location and it still won’t reset, the sensor itself may be faulty, requiring a service call.
The Real Benefits: What You Gain by Staying on Top of Filter Changes
Let’s connect the dots from the chore to the tangible rewards. Changing your filter isn’t just about avoiding problems; it’s about actively enhancing your cleaning experience and home environment.
Restored Power and Efficiency
The most immediate benefit is the return of that “wow” suction you felt when you first unboxed your Shark. A clean filter allows the motor to operate at its designed airflow rate (often measured in Air Watts). This means deeper carpet cleaning, easier pickup of pet hair, and less time spent going over areas. Your vacuum becomes efficient again, completing jobs faster and with less physical strain on you. You’ll also notice it’s quieter, as the motor isn’t straining against a restrictive filter.
Extended Vacuum Lifespan and Cost Savings
The motor is the heart and the most expensive part of your vacuum. Keeping it cool and unstressed by maintaining proper airflow is the single best thing you can do to extend its life from 5 years to 10 or more. The cost of a $15-$30 filter every six months pales in comparison to a $150+ motor replacement or the cost of a new vacuum. It’s the ultimate in preventative maintenance.
Superior Indoor Air Quality (IAQ)
This is the hidden, health-centric benefit. A properly functioning filtration system doesn’t just clean your floors; it cleans your air. The post-motor HEPA filter (on applicable models) traps 99.97% of dust mites, pollen, mold spores, and other allergens as small as 0.3 microns. This is crucial for asthma and allergy sufferers. By replacing this filter on schedule, you ensure that the air exhausted from your vacuum is cleaner than the air it intake, actively reducing airborne irritants in your home. You’re not just moving dirt around; you’re removing it from your living space entirely.
Preserving Your Shark’s Resale Value
If you ever plan to sell or trade-in your vacuum, a well-maintained machine with a documented history of filter changes and clean airways will fetch a significantly higher price. A buyer can tell by the suction power and lack of odor whether a vacuum has been cared for. It’s a small effort that pays dividends down the line.
Frequently Asked Questions
How often should I change the filter in my Shark Navigator?
Shark recommends replacing the post-motor pleated filter every 6-12 months and washing the pre-motor foam filter every 3 months. However, this depends heavily on usage. If you have pets, allergies, or vacuum daily, check filters monthly and replace the pleated filter every 6 months. Always heed the red filter maintenance indicator light on your machine.
Can I wash the post-motor pleated filter in my Shark Navigator?
No. The post-motor pleated filter is a “replace-only” component. It is made of delicate paper-like media that will disintegrate and lose its electrostatic charge if washed. Washing it will destroy its ability to capture fine dust and allergens and can cause it to shed particles into your motor. Only the pre-motor black foam filter is designed to be washed and reused.
What are the signs that my Shark Navigator filter needs changing?
Key signs include: a noticeable drop in suction power, a musty or dusty odor coming from the exhaust, the filter maintenance light turning red, visible dust and debris caked on the filter media, and the vacuum feeling hotter than usual during operation. If you experience any of these, inspect and service your filters immediately.
Where can I buy the correct replacement filter for my Shark Navigator?
Always buy from authorized retailers or directly from Shark’s website using your exact model number. Look for the filter part number printed on your old filter (e.g., “HF40” for foam, “HP40” for pleated). You can find these on Amazon, Walmart, Target, and specialty appliance parts sites, but ensure the seller is reputable to avoid counterfeit filters that can damage your vacuum.
After changing the filter, my Shark Navigator still shows the maintenance light. What do I do?
First, double-check that the new filter is installed correctly and is the right model. Then, locate the small filter reset button. On most Navigators, it’s on the back of the canister near the power cord or inside the filter compartment. Press and hold it for 2-3 seconds until the light blinks off. If it won’t reset, consult your manual for model-specific instructions or contact Shark customer support.
Can using a non-genuine filter damage my Shark Navigator?
Yes, it can. Third-party filters often use inferior materials that don’t fit the housing precisely, creating gaps that allow dust to bypass the filter and enter the motor. They may also have incorrect media that restricts airflow unnecessarily, causing the motor to overheat. For guaranteed performance, motor protection, and warranty compliance, always use genuine Shark OEM filters designed for your specific model.