Changing the brush on your Shark robot vacuum is a simple, critical maintenance task that restores suction power and cleaning efficiency. Whether you have an iQ, ION, or older model, the process is straightforward with the right tools and a clear guide. Regularly inspecting and replacing worn brushes prevents hair wrap, reduces strain on the motor, and ensures your vacuum operates at peak performance. This guide walks you through every step, from identifying the correct brush to resetting your Shark after replacement.
Has your trusty Shark robot vacuum suddenly started sounding like it’s struggling, leaving more debris behind, or flashing a frustrating brush error light? Before you panic or call customer support, the most likely culprit is also the most common and easiest to fix: a worn-out or hair-wrapped main brush roller. Knowing how to properly change brush on Shark robot vacuum is an essential skill for any owner. It’s a simple piece of maintenance that takes less than five minutes but has a monumental impact on your vacuum’s cleaning power, longevity, and your overall satisfaction. This comprehensive guide will transform you from a frustrated user into a confident at-home technician, covering every model, every step, and every pro tip you need to know.
Think of the main brush roller—that cylindrical brush with bristles or rubber fins—as the heart of your Shark’s cleaning system. It agitates carpet fibers, lifts debris, and sweeps it into the suction path. When its bristles are splayed, missing, or clogged with hair and fibers, it can’t do its job. The motor works harder, suction drops, and your floors suffer. The good news is that Shark designs these systems for easy user maintenance. Whether you have a modern Shark AI Ultra, a reliable ION Robot, or an older model, the process follows a logical pattern. By the end of this article, you’ll know exactly how to change brush on Shark robot vacuum for your specific machine, restoring it to like-new cleaning performance.
Key Takeaways
- Regular brush changes are non-negotiable for performance: Worn, tangled, or broken bristles are the #1 cause of reduced suction and cleaning inefficiency in Shark robot vacuums.
- Identify your exact Shark model first: Brush types and removal mechanisms differ significantly between iQ, ION, and older Shark robot series. Always verify your model number before purchasing a replacement.
- The job requires only basic tools: Typically, you’ll need just a small Phillips-head screwdriver and a cleaning brush. No special expertise is necessary.
- Always power down and remove the battery: For safety and to prevent accidental startup, disconnect the vacuum from power and remove the battery if your model has a removable one before beginning.
- Cleaning is as important as replacing: Thoroughly clean the brush housing, bearings, and surrounding area every time you replace the brush to prevent immediate re-wrapping and ensure smooth operation.
- Post-replacement reset is often required: Many Shark robots need a brush reset via the app or a button combination to clear error codes and recognize the new component.
- Use genuine Shark parts when possible: OEM (Original Equipment Manufacturer) brushes are engineered for your specific model’s motor and housing, ensuring perfect fit, optimal performance, and warranty protection.
📑 Table of Contents
- Why Your Shark Robot Vacuum’s Brush Needs Regular Attention
- Essential Tools and Preparation Before You Begin
- Step-by-Step Guide: How to Change Brush on Shark Robot Vacuum
- Troubleshooting: What to Do After Changing the Brush
- Establishing a Proactive Maintenance Schedule
- Common Mistakes to Avoid When Changing Your Shark Brush
- Conclusion: A Simple Task for a Happier Home
Why Your Shark Robot Vacuum’s Brush Needs Regular Attention
Understanding the “why” behind this maintenance makes the “how” even more meaningful. The main brush roller operates in a brutal environment: it’s constantly battering against carpet fibers, scraping along hard floors, and, most notoriously, acting as a magnet for human and pet hair. This constant wear and tear leads to several predictable failure points.
The Enemy: Hair Wrap and Fiber Buildup
This is public enemy number one. Long hair, string, and carpet fibers wrap tightly around the brush core and get caught in the bristles or between the rubber fins of tangle-free rollers. This creates a dense, felt-like mat that restricts the brush’s rotation. The vacuum’s motor then strains against this resistance, triggering a “brush obstruction” error or, worse, burning out the motor over time. Even if it doesn’t trigger an error, a partially wrapped brush spins slower and less effectively, dramatically reducing cleaning performance. Regular change brush on Shark robot vacuum intervals often stem from simply managing this hair wrap.
Bristle Wear and Tear
Over months and years of use, the bristles themselves wear down. They become splayed, bent, or outright missing. Stiff bristles can even become brittle and snap off. When this happens, the brush loses its ability to “scrub” carpet piles and agitate debris. On hard floors, worn bristles can’t sweep debris as effectively into the suction path. Visually inspecting your brush is the easiest way to spot this; if bristles look significantly shorter, frayed, or sparse compared to a new brush, it’s time for a replacement.
The Domino Effect on Other Components
A struggling main brush doesn’t just affect itself. The increased drag on the motor can lead to premature wear on the motor bearings and belts (in models that use them). It can also cause excessive vibration that stresses other internal components. Furthermore, a clogged brush housing means less air can be pulled through the system, reducing overall suction power even if the main fan motor is fine. By proactively changing the brush, you protect the entire cleaning system of your Shark robot.
Essential Tools and Preparation Before You Begin
One of the best things about Shark’s design philosophy is that they minimize the need for specialized tools. However, proper preparation ensures the process is smooth and scratch-free.
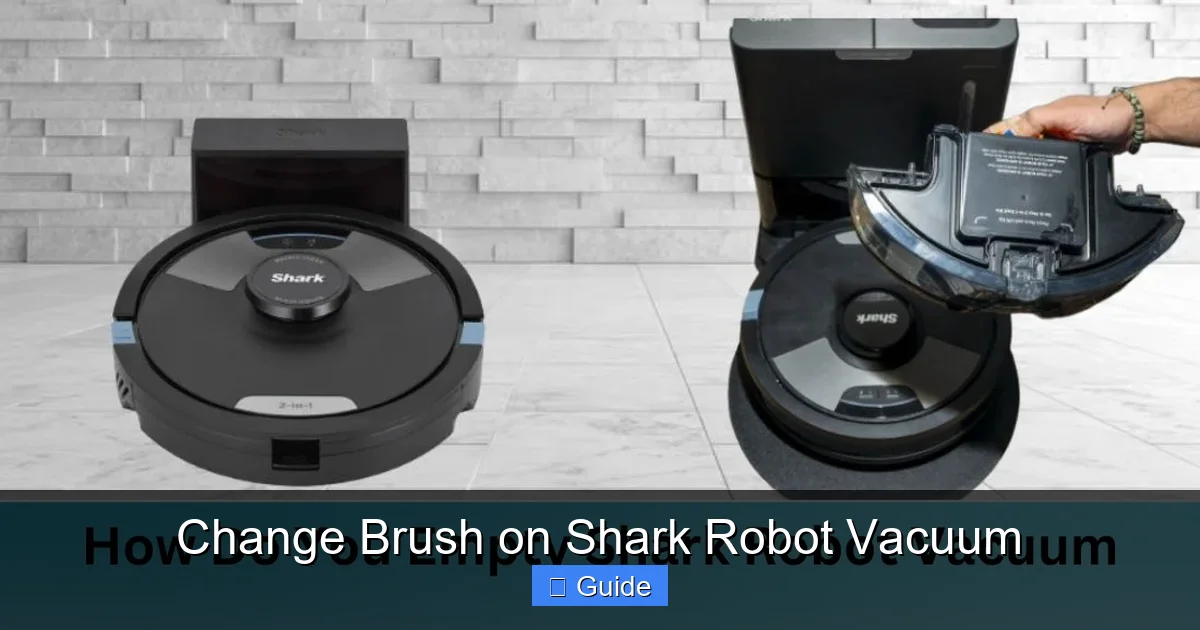
Visual guide about Change Brush on Shark Robot Vacuum
Image source: sharkvacuum.blog
Tools You’ll Need (The Minimalist Kit)
- A Small Phillips-Head Screwdriver: This is the most common tool required. Shark typically uses small, standard Phillips screws to secure the brush housing cover. A precision screwdriver set (like those for eyeglasses or electronics) is often ideal. In some newer models, like certain Shark ION robots, the cover may be tool-free and simply clip off.
- Your Replacement Brush Roller: Obviously! Ensure you have the correct part. The best way is to search by your specific Shark robot model number (found on a sticker on the bottom or back). Using the Shark website or an authorized parts distributor is the safest way to get the exact OEM part.
- A Small Cleaning Brush (Optional but Highly Recommended): An old toothbrush, a small parts cleaning brush, or even a compressed air canister. You’ll need this to clean out the brush housing, motor shaft, and bearings of all the accumulated hair, dust, and gunk before installing the new brush.
- A Well-Lit, Flat Surface: A kitchen table or countertop with a soft towel laid down works perfectly. It provides good visibility and prevents small parts from rolling away.
Safety First: Power Down Completely
This cannot be stressed enough. Before you touch any internal components:
- Place the robot on its charging base and let it dock completely, or manually power it off using the physical power button on the unit.
- For models with a removable battery (like many Shark ION Robots), REMOVE THE BATTERY. This is a critical safety step to prevent any accidental startup while your fingers are near moving parts.
- Unplug the charging base from the wall outlet. This ensures zero power is going to the robot.
Identifying Your Shark Robot Model & Brush Type
Shark has iterated on its robot vacuum line several times. The brush design is one of the most significant changes between generations. Here’s a quick guide:
- Shark ION Robot Series (R, RV, etc.): Typically features a rubber tangle-free brush roller with two rubber fins. The housing cover is often a single piece secured by 2-4 screws or, in some models, a tool-free clip system. The brush itself usually has a square drive socket that slides onto a metal shaft.
- Shark AI Ultra & ION 2-in-1 Series: These newer models often have a “self-cleaning brushroll” with a combination of bristles and rubber. The housing might be more integrated. They frequently use a tool-free release tab for the brush housing cover. The brush roller itself may have a unique locking mechanism.
- Older Shark Robot Models (like the 750 series): These more commonly use a traditional bristle brush roller. The housing is almost always screw-secured. The brush usually has two rubber end caps that fit into bearings inside the housing.
Pro Tip: The absolute best way to be sure is to look up your model number on the Shark Official Parts & Accessories website. Enter your model, and it will show you the exact replacement brush part number and often an exploded diagram of how to remove it.
Step-by-Step Guide: How to Change Brush on Shark Robot Vacuum
Now, the core of the operation. While specific steps vary slightly by model, the fundamental sequence is universal. We’ll outline the general process first, then note key variations for specific model families.
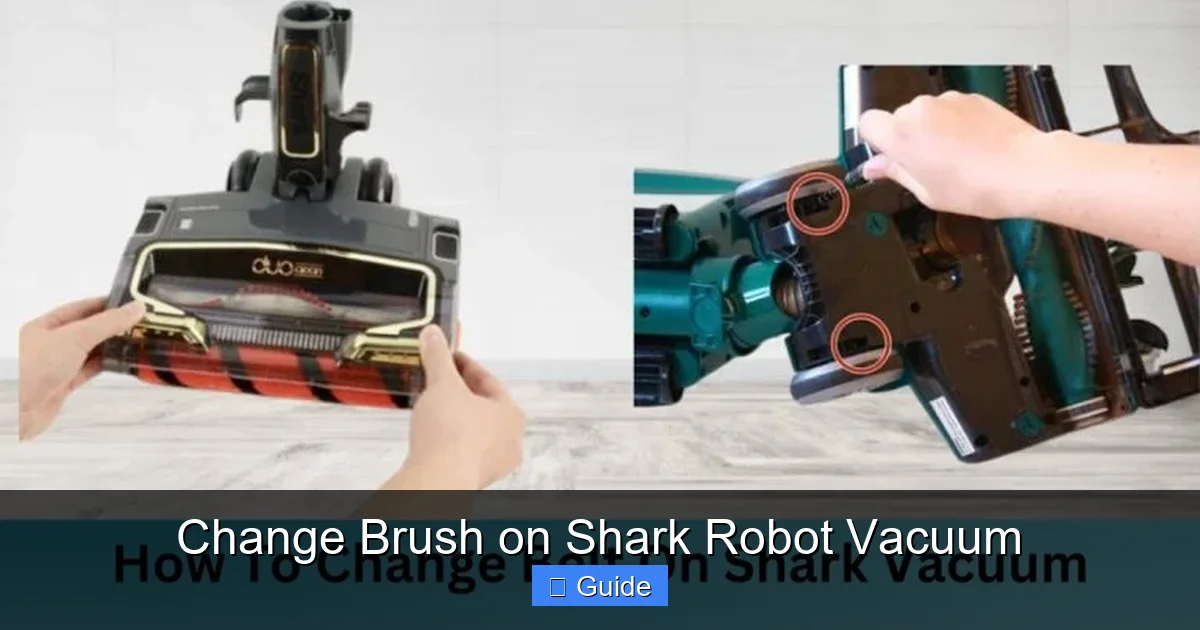
Visual guide about Change Brush on Shark Robot Vacuum
Image source: sharkvacuum.blog
General Step-by-Step for Most Screw-Held Models
- Access the Brush Housing: Flip the robot over onto your prepared soft towel. Locate the large, rectangular or oval brush housing cover on the underside. It’s held in place by several small Phillips-head screws (usually 2-4). Using your screwdriver, carefully remove all screws. Keep them in a small cup so they don’t get lost. Some models have a plastic tab you press to release a tool-free cover—in that case, simply pry it open gently with your fingernail or a plastic spudger.
- Remove the Old Brush Roller: Once the cover is off, you’ll see the brush roller assembly. It’s a long cylindrical piece spanning the width of the housing. Gently pull it straight out. It may have rubber seals or gaskets on the ends—be careful not to lose these. If it feels stuck, check for hair wrapped tightly around the core or in the end caps. Cut away any visible hair with scissors before attempting to pull it out.
- Clean the Housing and Shaft (The Most Important Step!): With the old brush out, you have prime access. Use your cleaning brush to vigorously scrub out the entire housing cavity. Pay special attention to the two circular bearing housings at each end where the brush axles spin. Remove all hair, carpet fibers, and dust bunnies. Also, wipe down the metal drive shaft that the brush slides onto. A clean housing ensures your new brush spins freely from day one and doesn’t get immediately clogged.
- Install the New Brush Roller: Take your new, correct-model brush. Note its orientation—there is usually a “front” and “back” or the bristles/rubber fins are angled in one direction for optimal sweeping. Align the square drive socket on the brush with the square metal drive shaft on the robot. Slide the brush in firmly and evenly until it clicks or seats fully. The rubber end caps should fit snugly into the bearing housings. Give it a gentle spin by hand—it should rotate smoothly and freely with no gritty feeling or binding.
- Reattach the Housing Cover: Place the cover back over the housing, ensuring any gaskets or seals are properly seated. Hand-tighten all the screws you removed. Do not overtighten, as you can crack the plastic housing. Tighten them just until snug and flush.
- Final Check and Reset: Give the brush one last spin by hand through the housing. It should be smooth. Flip the robot over. If your model has a removable battery, reinsert it now. Place the robot on its charging base or press the power button to turn it on.
Model-Specific Nuances: Shark ION vs. Shark AI Ultra
For Shark ION Robots (R40, R50, RV750, etc.): The process above is 95% accurate. The key identifier is the two-screw or four-screw housing cover and the black rubber tangle-free brush with two long fins. The brush slides on and off the metal shaft easily. After replacement, you may need to perform a “brush reset” through the Shark app: go to Settings > Robot Settings > Reset Brush Motor.
For Shark AI Ultra & ION 2-in-1 (AV752, AV2502, etc.): These often feature a tool-free cover. Look for a small plastic tab or latch on the side of the brush housing. Press it and pry the cover upward. The brush roller in these models sometimes has a small locking clip or tab on one end that must be depressed or slid to release it from the housing. Consult your specific model’s manual online if the brush doesn’t pull out freely. The reset procedure is similar—often a button combination on the robot itself (e.g., holding the “Home” and “Clean” buttons) or via the app.
What About the Side Brushes?
Don’t forget the smaller, rotating side brushes on the corners! These also wear out, bend, and get hairy. They are typically held on by a simple plastic cap that screws off or a pull tab. Replacing them is even easier than the main brush. Check them during your main brush maintenance and replace if the bristles are significantly bent or missing. A fresh side brush improves corner cleaning.
Troubleshooting: What to Do After Changing the Brush
You’ve followed all the steps, but your Shark is still acting up. Don’t worry; this is common and usually has a simple fix.
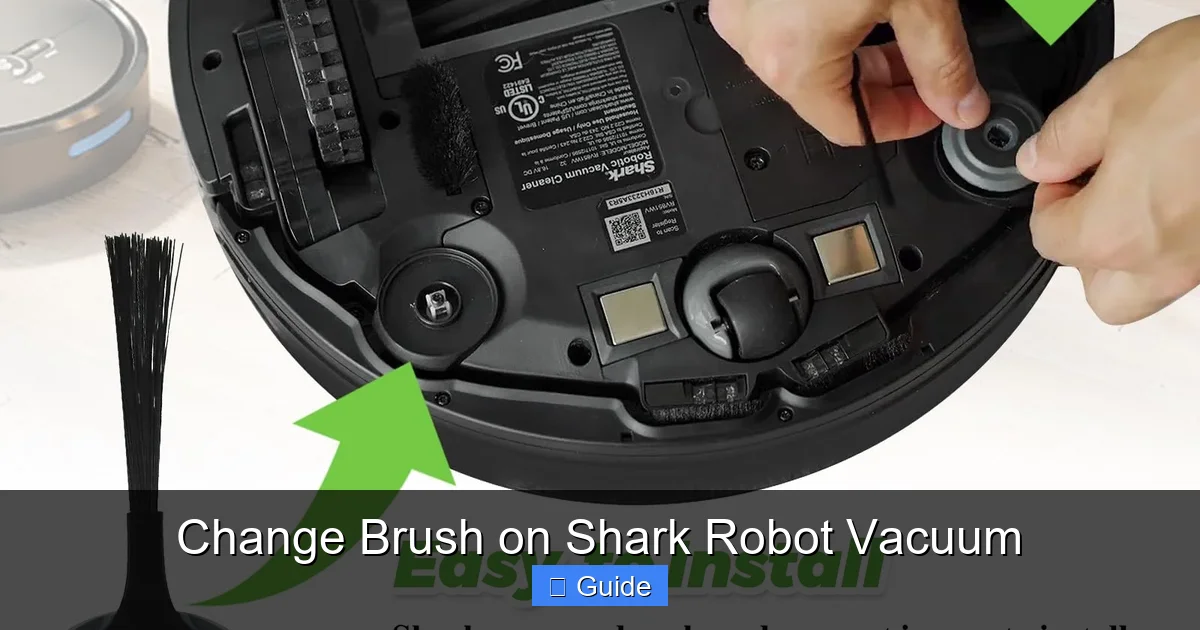
Visual guide about Change Brush on Shark Robot Vacuum
Image source: m.media-amazon.com
The Brush Error Light is Still Flashing
This is the most frequent post-replacement issue. The vacuum’s internal computer has a memory of the brush’s rotational resistance. If the new brush is slightly different (even a genuine OEM part from a new batch) or the housing wasn’t perfectly clean, it might register as an obstruction.
- Perform a Hard Reset: Power the robot off, remove the battery (if applicable), and let it sit for 60 seconds. Reinsert the battery, place it on the dock, and power on.
- Use the Official Reset Procedure: This is crucial. Open the Shark app, navigate to your robot’s settings, and look for “Reset Brush Motor” or “Calibrate Sensors.” For models without app reset, the manual will specify a button combination (often holding the “Dock” and “Spot Clean” buttons for 5-10 seconds until you hear a tone).
- Double-Check Installation: Remove the brush again. Is it perfectly aligned? Does it spin freely by hand without any wobble? Are the end caps fully seated? Re-clean the housing one more time. A single rogue hair stuck in a bearing will cause an error.
Unusual Noises or Vibration After Replacement
If your Shark sounds like it’s grinding, clicking, or vibrating excessively:
- The new brush may be defective or the wrong model. Double-check the part number against your model’s requirements.
- The brush might be installed backward. Some brushes have a directional sweep; installing it backwards can cause improper engagement with the housing or motor.
- A piece of the old brush (like a broken bristle or plastic cap) could be lodged in the housing. Remove the new brush and thoroughly inspect and clean the housing cavity and bearings again with a flashlight.
No Improvement in Cleaning Performance
If suction seems weak and debris pickup hasn’t improved after a brush change:
- The issue may not be the brush at all. Check and empty the dustbin thoroughly. A clogged filter is a prime suspect. Remove the filter and tap it out over a trash can. If it’s washable (most Shark filters are), rinse it with cold water and let it dry completely for 24 hours before reinstalling.
- Inspect the entire suction path: from the brush housing, up the intake hose, into the dustbin. Any clog here will strangle performance.
- The main vacuum motor or fan could be failing, but this is rare. Usually, a fresh brush + clean filter solves 90% of performance issues.
Establishing a Proactive Maintenance Schedule
Don’t wait for an error code to change your brush. Proactive maintenance saves you time, money, and frustration in the long run.
Visual Inspection: Your Monthly Habit
Once a month, do a quick 60-second check. Flip the robot over. Look at the brush through the housing. Can you see hair wrapped around the core? Are the bristles visibly bent, frayed, or missing? Is there a dust bunny conglomerate in the housing? If you answer “yes” to any, it’s time for a full clean and likely a brush replacement. For pet owners, this monthly check might become bi-weekly.
The “Touch Test” for Tangle-Free Rollers
For rubber fin rollers, run your finger along the length of the brush. You should feel the distinct rubber fins. If you feel a solid, hairy core instead, it’s wrapped. Even if it still spins, the wrapping will worsen and eventually bind. Clean it immediately or replace the brush if the fins are damaged.
Replacement Frequency Guidelines
There’s no universal timeline because usage varies so much. However, here are realistic guidelines:
- Average Home (No Pets, Hard Floors & Low-Pile Carpet): Every 6-9 months.
- Typical Home with Some Carpet: Every 4-6 months.
- Homes with Pets (Especially Dogs/Cats that Shed) or High-Pile Carpet: Every 3-4 months, or even more frequently. Be prepared for this.
- Signs It’s Time (Regardless of Time): Noticeable loss of suction, brush error lights, visible heavy wear, or the brush feels stiff when you try to spin it manually.
Beyond the Brush: Full System Cleaning
The change brush on Shark robot vacuum ritual is the perfect time for a full tune-up:
- Clean the Filters: Tap out the pre-motor filter. If it’s washable, rinse and dry it completely. Replace the filter annually or as recommended by Shark.
- Wipe Sensors: Use a microfiber cloth to gently clean the cliff sensors (on the underside) and the charging contacts on the robot and base.
- Clean Wheels and Charging Contacts: Remove any hair from the drive wheels. Wipe the metal charging pins on both the robot and base with a dry cloth to ensure a solid connection.
- Empty the Dustbin Thoroughly: Take it apart if your model allows. Wash it with mild soap and water (no harsh chemicals), dry completely.
Common Mistakes to Avoid When Changing Your Shark Brush
Even with the best intentions, a few missteps can turn a simple fix into a headache. Here’s what to watch out for.
Using the Wrong Replacement Part
This is the #1 mistake. A brush from a Shark ION R40 will not fit a Shark AI Ultra. It might look similar, but the shaft diameter, length, or end cap design will be different. Forcing it will break components. Always, always, verify your model number and cross-reference the part number on Shark’s official site or with an authorized dealer. When in doubt, contact Shark support with your model number before buying.
Skipping the Housing Cleaning
You just spent $20-$30 on a new brush. Don’t sabotage it by installing it into a filthy housing full of hair and grit. That debris will immediately start wearing the new brush’s bearings and cause it to wrap again within days. Spend the extra 60 seconds with a toothbrush. It makes all the difference.
Forgetting the Reset
After physically replacing the brush, your Shark’s computer still “thinks” the old, potentially faulty brush is installed. It will continue to show errors or limit performance until you explicitly tell it the component is new. Never skip the app-based or button-press reset procedure outlined in your manual.
Over-Tightening Screws
The plastic housing on your robot is durable but not indestructible. Cranking down on the Phillips screws until they strip the plastic holes is a common error. Tighten them firmly until the cover is flush and secure, with no gaps, but you should feel natural resistance. You do not need to torque them like you’re building engine components.
Ignoring Other Wear Items
You’re down there with the tools anyway! While you have the brush housing open, quickly inspect the two rubber seals or gaskets that the brush ends sit in. If they are cracked, shredded, or missing, order replacements. Also, look at the drive shaft itself—if it’s corroded or bent, that’s a bigger problem. Catching these small issues during a brush change prevents future disassembly.
Conclusion: A Simple Task for a Happier Home
Mastering the change brush on Shark robot vacuum process is one of the most empowering pieces of home maintenance you can learn. It transforms your relationship with your cleaning device from one of occasional frustration to one of reliable partnership. You are no longer at the mercy of error codes and declining performance. You are in control, armed with a screwdriver and the knowledge to restore your Shark’s suction power in minutes.
Remember the golden rules: always start by identifying your exact model and getting the correct OEM brush. Always power down and remove the battery. Always clean the housing meticulously before installation. And always, always perform the post-replacement reset. Incorporate a quick monthly visual inspection into your routine, and you’ll never be caught off guard by a tangled brush again.
Your Shark robot vacuum is a significant investment in a cleaner, more convenient home. By committing to this simple, periodic maintenance, you protect that investment, extend the life of your machine, and ensure it continues to glide silently and effectively across your floors, picking up every speck of dust and every pet hair with consistent, powerful efficiency. Now, go forth, flip that robot over, and give it the brush change it deserves. Your floors will thank you.
Frequently Asked Questions
How often should I change the brush on my Shark robot vacuum?
The frequency depends heavily on your home. For an average home without pets, every 6-9 months is typical. With pets, high-pile carpet, or lots of hair, you may need to change it every 3-4 months. Always perform a monthly visual inspection for heavy wear or hair wrap.
What are the clear signs that my Shark robot’s brush needs replacing?
Look for visible signs like bent, splayed, or missing bristles, heavy hair wrap that can’t be easily cut away, a stiff or gritty feeling when you spin the brush manually, or persistent “brush error” or “obstruction” lights on the device or in the app. A noticeable drop in cleaning performance, especially on carpets, is also a key indicator.
Can I use a generic or third-party brush instead of a genuine Shark part?
While generic brushes are often cheaper, we strongly recommend using genuine Shark OEM parts. They are engineered to exact specifications for your model’s motor torque, shaft diameter, and housing clearance. Generic brushes can have poor fit, cause excessive noise, damage bearings, and may not trigger the proper sensor readings, leading to constant errors.
Do I need to clean the brush housing when I replace the brush?
Yes, absolutely. This is the most critical step for long-term success. A new brush installed into a dirty, hair-filled housing will immediately begin to wrap and wear prematurely. Always use a small brush to remove all debris, hair, and dust from the housing, bearings, and drive shaft before installing the new roller.
What tools are required to change the brush on a Shark robot vacuum?
For most models, you only need a small Phillips-head screwdriver (size #0 or #1 is usually perfect). Some newer models have a tool-free clip system. Always have a small cleaning brush (like an old toothbrush) on hand for cleaning the housing. No other special tools are necessary.
My Shark still shows a brush error after I replaced the brush. What now?
First, power off the robot and remove the battery. Re-check that the new brush is installed perfectly straight and spins freely by hand. Clean the housing again thoroughly. Then, perform the official brush reset: either through the Shark app (Settings > Robot Settings > Reset Brush Motor) or by holding specific buttons on the robot (consult your manual, often “Home” + “Clean” for 5-10 seconds).