Changing the belt on your Shark vacuum is a simple, cost-effective repair that restores powerful suction and extends your machine’s life. This guide provides clear, model-agnostic instructions, essential safety tips, and troubleshooting advice to help you complete the job in under 30 minutes with basic tools. We walk you through every step, from identifying a worn belt to proper reassembly, ensuring your vacuum performs like new.
Key Takeaways
- Belts are critical for agitation: The drive belt connects the motor shaft to the brush roll, spinning it at high speed to agitate carpet fibers and lift embedded dirt.
- Signs of failure are obvious: A broken or slipping belt causes immediate loss of suction on carpets, a burning smell, or the brush roll not spinning when the vacuum is on.
- Always unplug first: Safety is paramount. Always disconnect your Shark vacuum from the wall outlet before beginning any repair or inspection.
- Model numbers are key: Your vacuum’s model number (usually on the back or underside) ensures you purchase the correct, compatible replacement belt.
- Clean during the change: Use this opportunity to thoroughly clean the brush roll housing, bearings, and any clogged airways for optimal performance.
- Proper tension matters: The new belt must be seated correctly on both the motor shaft and brush roll pulley, with no twists, to function silently and efficiently.
- It’s a beginner-friendly fix: With basic tools and our guide, changing a Shark vacuum belt is an easy DIY task that saves you $50-$100 on service calls.
[FEATURED_IMAGE_PLACEHOLDER]
📑 Table of Contents
- Why Changing Your Shark Vacuum Belt is Essential
- Understanding Your Shark Vacuum’s Belt System
- Essential Tools and Finding the Right Replacement Belt
- Step-by-Step Guide: How to Change the Belt on Your Shark Vacuum
- Troubleshooting Common Post-Repair Issues
- Pro Tips to Extend Your Belt’s Life and Avoid Future Breakdowns
- Conclusion: Empowering Your DIY Repair
Why Changing Your Shark Vacuum Belt is Essential
Imagine pushing your Shark vacuum across the carpet and feeling… nothing. No deep-down pull, no vigorous agitation. Just a quiet glide that leaves the dirt behind. This frustrating scenario is often the classic sign of a failed drive belt. That humble rubber loop is the mechanical heart of your vacuum’s cleaning power on carpets. It’s the vital link that transfers the motor’s raw torque to the brush roll, making it spin and agitate debris loose. When it breaks, stretches, or slips off, your vacuum’s primary cleaning function—on carpets—ceases instantly. While it still might pick up some surface debris on hard floors thanks to suction alone, you’re losing 80% of your vacuum’s intended cleaning capability.
Replacing this belt is one of the most common and rewarding maintenance tasks for any Shark owner. It’s a straightforward mechanical fix that costs a few dollars and takes minutes, yet it completely revitalizes your machine. Neglecting a worn belt doesn’t just mean poor cleaning; it can cause secondary damage. A broken belt can flail inside the housing, potentially damaging hoses or wiring. A slipping belt creates excess friction and heat, which can scorch the belt further or even stress the motor. By learning to change a belt on a Shark vacuum, you take control of your appliance’s health, save significant money on professional repairs, and gain a deeper understanding of how your cleaning tool works. This guide is designed for every Shark owner, from the Navigator to the Vertex, the Rotator to the IZ. The core principles are universal, even if a few screw locations vary.
Understanding Your Shark Vacuum’s Belt System
Before you reach for a screwdriver, it helps to know what you’re looking at. The belt system is elegantly simple but critically important. It consists of three main components working in concert: the drive belt itself, the brush roll (the cylinder with bristles), and the motor pulley (a small wheel attached to the motor shaft).
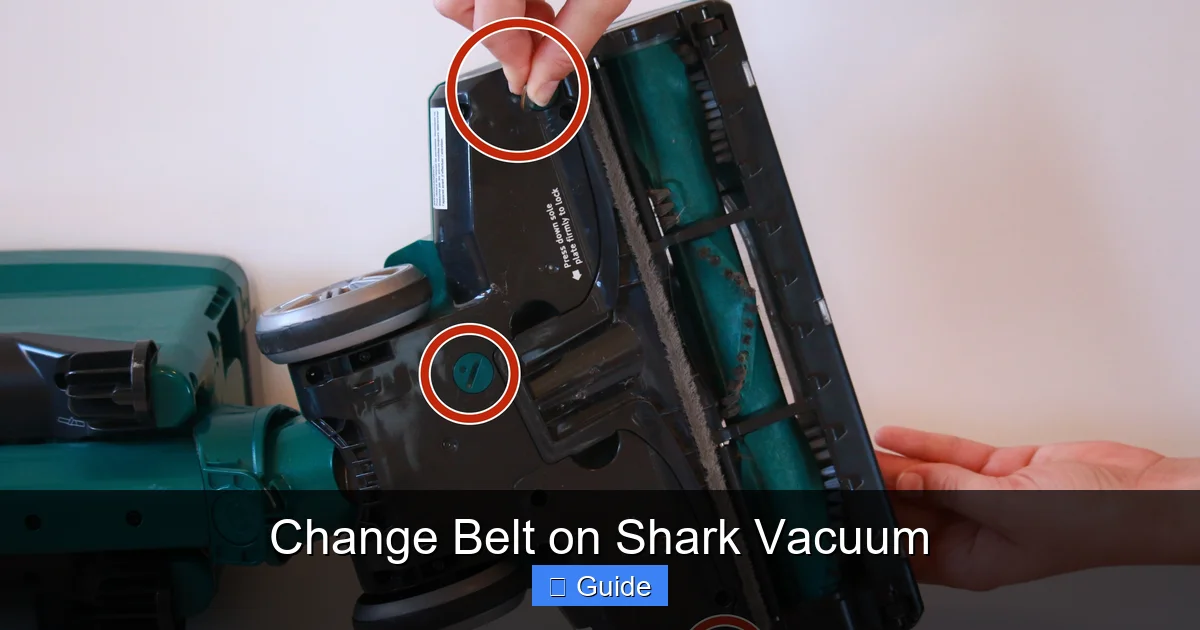
Visual guide about Change Belt on Shark Vacuum
Image source: guide-images.cdn.ifixit.com
The Role of the Drive Belt
The belt is typically a continuous, flat rubber loop, about the size of a large rubber band. Its job is to create a friction-based connection. One side of the belt hugs the motor pulley, which is spinning at thousands of RPMs. The other side grips the rubber-rimmed pulley on one end of the brush roll. As the motor turns, it literally drags the belt, which in turn spins the brush roll. This belt must be tight enough to not slip under load (when bristles hit dense carpet) but not so tight as to strain the motor bearings. Over time, rubber degrades. It stretches, develops glazed or shiny spots (reducing friction), cracks, or finally snaps. This degradation is accelerated by heat, friction, and the occasional ingestion of carpet fibers or hair that gets wrapped around the brush roll and pulley.
Brush Roll and Pulley Anatomy
The brush roll is a long cylinder, usually plastic or metal, with rows of stiff bristles. At each end, it has a metal axle that spins in bearings. One end of this axle has a molded rubber pulley. This is the belt’s destination. It’s crucial this pulley is clean. A buildup of melted plastic, hair, and carpet fibers can act like a brake, preventing the belt from gripping properly even if it’s new. The other end of the brush roll often has a smooth bearing or a simple cap. When inspecting, always spin the brush roll by hand. It should rotate smoothly and freely on both bearings. If it’s gritty, stiff, or doesn’t spin, you’ll need to clean or possibly replace the bearings along with the belt.
Motor Pulley Location
This small wheel is mounted directly on the output shaft of your vacuum’s motor. You won’t usually see it until you remove the brush roll housing. It’s located at the rear of the floor head, where the main suction hose connects. The belt stretches from this motor pulley, through a channel in the housing, and onto the brush roll pulley. Understanding this path is key to proper reassembly.
Essential Tools and Finding the Right Replacement Belt
One of the best aspects of this repair is its minimal tool requirement. You likely have everything you need already. Preparation is half the battle, and having the correct part on hand prevents frustration.
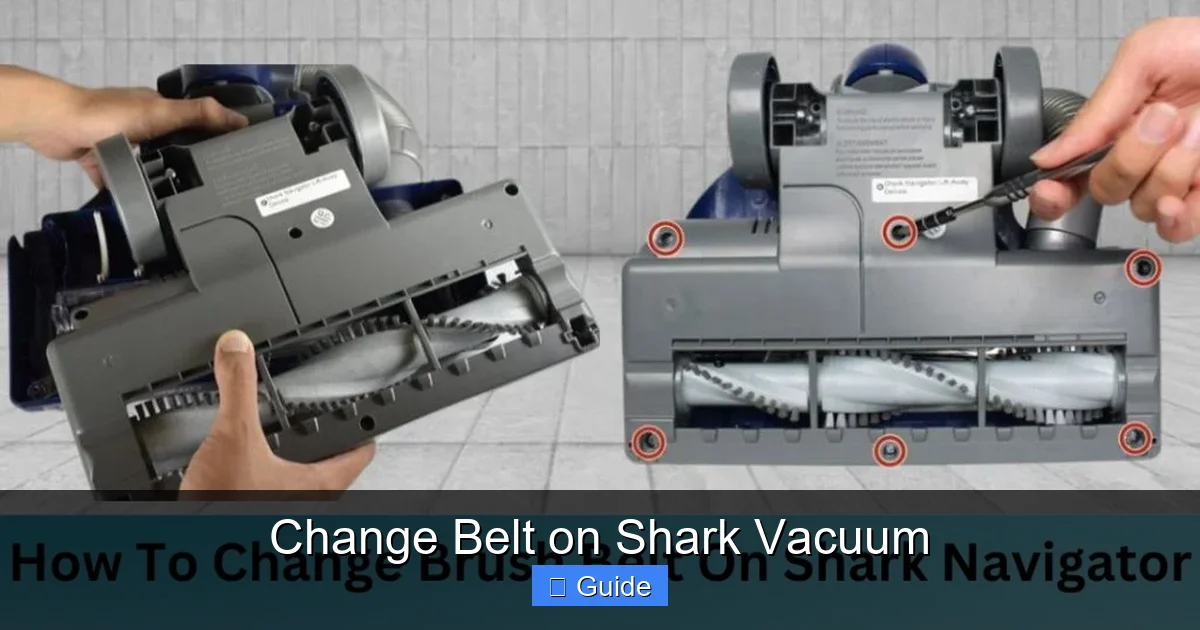
Visual guide about Change Belt on Shark Vacuum
Image source: sharkvacuum.blog
Your Basic Toolkit
For almost every Shark upright or canister model, you will need:
- A Phillips-head screwdriver: This is the workhorse. Most screws securing the bottom plate and brush roll housing are Phillips #2. Having a long, thin shaft can help reach awkward screws.
- Flathead screwdriver (optional but helpful): Useful for prying off stubborn plastic clips or gently lifting the brush roll out if it’s stuck.
- Needle-nose pliers: Excellent for removing hair and debris from the brush roll bearings and pulley grooves. They also help grip small parts.
- A clean, damp cloth: For wiping down the housing, pulleys, and brush roll after you’ve removed all the gunk.
- A flashlight or work light: The underside of your vacuum can be dark. A light makes it easier to see belt paths, screw locations, and trapped debris.
Some newer Shark models with “Zero-M” or self-cleaning brush rolls might use Torx screws (star-shaped). Check your specific screws before you start. A basic multi-bit screwdriver set covers all possibilities.
Identifying Your Model & Sourcing the Correct Belt
This is the most important step. Using the wrong belt—even one that looks similar—will lead to immediate failure. The belt must be the exact length, width, and thickness specified for your model. Here’s how to get it right:
- Locate the model number: Flip your Shark vacuum over. Look for a silver or white sticker on the back, near the wheels, or on the underside of the main body. The model number is a combination of letters and numbers, like “NV356,” “NV352,” “HV322,” or “AZ6002.” Write it down exactly.
- Use the official Shark website: Go to sharkclean.com/support. Navigate to “Find Parts” or “Accessories.” Enter your model number. It will list all compatible parts, including the exact drive belt part number (often starting with “XHF,” “XHFU,” or similar). This is the most reliable method.
- Reputable third-party sellers: Once you have the official part number, you can search for it on Amazon, eBay, or appliance part sites like PartSelect or RepairClinic. Generic “Shark vacuum belts” are often incorrectly sized. Using the specific part number eliminates guesswork.
- Physical stores: Some big-box retailers or local vacuum repair shops may stock common Shark belts. Always verify the part number matches your research.
Shark part numbers are model-specific. A belt for a Navigator NV352 will not fit a Rotator NV500. When in doubt, compare your old belt to the new one side-by-side before installing. They must be identical in length and width.
Step-by-Step Guide: How to Change the Belt on Your Shark Vacuum
Now, let’s get our hands dirty. This process is 90% the same across the vast majority of Shark upright models. We’ll cover the general procedure, noting where variations might occur. The core sequence is: access the brush roll, remove the old belt, install the new one, and reassemble. Always work methodically.
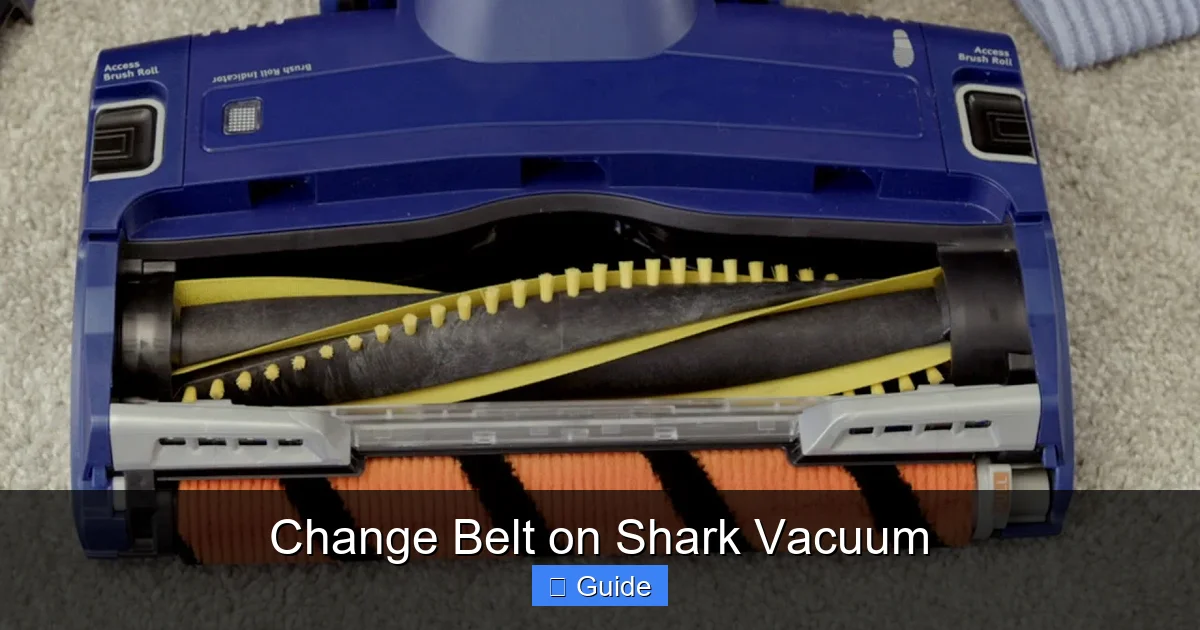
Visual guide about Change Belt on Shark Vacuum
Image source: i.ytimg.com
Step 1: Safety First and Initial Access
Place your Shark vacuum on its back on a clear, flat surface. A kitchen table or workbench covered with a towel is ideal. This gives you comfortable access to the underside. Unplug the vacuum from the wall outlet. This is non-negotiable. The motor could start unexpectedly, or you could short something with a tool. Locate the screws that secure the plastic bottom plate (the large cover over the brush roll housing). On most models, there are 4-6 screws, often with a central screw that also holds the wheel or a brush roll height adjustment knob. Use your Phillips screwdriver to remove all of them. Place the screws in a small cup or magnetic tray so they don’t get lost. Once all screws are out, gently lift the bottom plate away. You’ll now see the brush roll, the belt (if it’s intact, it might be broken or missing), and the motor pulley at the back.
Step 2: Removing the Old Belt and Brush Roll
Before you touch the belt, observe its routing. It should loop from the motor pulley, around the back of the housing, and onto the brush roll pulley. If it’s broken, just note the path. To remove it, simply stretch it off the motor pulley first. It should slip off easily. Then, slide it off the brush roll pulley. If the brush roll is in the way, you may need to remove it. Note how it sits in the housing—it usually just rests in bearings. Gently pull the brush roll straight up and out. Some models have a clip or a small screw holding one end; remove that first. As you pull the brush roll, be mindful of any end caps. Set the brush roll aside on a towel.
Step 3: The Critical Cleaning Phase
You now have unrestricted access to the brush roll housing cavity. This is your goldmine for maintenance. Use your needle-nose pliers and fingers to remove every last bit of hair, carpet fiber, lint, and melted plastic debris. Pay special attention to:
- The brush roll bearings: These are the small plastic or metal wheels at each end of the brush roll axle. Hair wrapped here will prevent smooth spinning and kill your new belt quickly. Clean them meticulously.
- The brush roll pulley: The rubber rim must be perfectly clean and free of glazing or debris for the new belt to grip.
- The motor pulley: Wipe this metal wheel clean. Any gunk here will cause immediate slippage.
- The housing channel: Run your cloth along the channel where the belt rides to remove any accumulated dust.
Also, spin the brush roll bearings by hand. They should rotate silently and freely. If they are gritty or stiff, consider replacing the brush roll or its bearings (some are replaceable). A clean, smooth-running brush roll is just as important as a new belt.
Step 4: Installing the New Belt
This is the moment of truth. Take your new, correct belt. Before you stretch it, give it a quick visual inspection. It should be uniform, with no cracks or deformities. The installation is the reverse of removal, but must be done carefully.
- Stretch and loop: Place the belt over the motor pulley first. You will need to stretch it slightly to reach the brush roll pulley. This is normal. Do not twist the belt. The flat, smooth side of the belt should face inward, towards the motor pulley and brush roll pulley. The textured or “cogged” side (if present) should face outward, away from the pulleys.
- Seat it on the brush roll pulley: Stretch the belt and work it over the rubber pulley on the brush roll. Ensure it sits fully and squarely in the groove. There should be no part of the belt pinched or sitting on the plastic part of the pulley.
- Check tension and alignment: The belt should have firm tension. You should be able to twist it about 90 degrees (a quarter turn) but not so loose that it flaps around. Visually confirm the belt is running parallel to the housing floor and is not twisted.
Step 5: Reassembling the Vacuum
Now, carefully lift the brush roll and lower it back into its housing. Ensure both ends seat properly in their bearing slots. It should spin freely. Rotate the brush roll by hand a full turn to ensure the new belt is tracking correctly and not rubbing against any plastic guides. Once it spins smoothly, lower the bottom plate back into position. Align all the screw holes. Insert all screws and tighten them securely in a star pattern (tighten one screw a little, then move to the opposite screw) to ensure the plate is seated evenly and won’t rattle. Don’t overtighten and crack the plastic.
Step 6: The Test Run
Plug your Shark vacuum back into the wall. Turn it on. Immediately look at the brush roll through the bottom opening or by gently tilting the vacuum. You should see it spinning vigorously. Listen—there should be no squealing, grinding, or burning smells. The sound should be the familiar aggressive whirl of the brush roll. Run the vacuum on a carpet for 30 seconds. You should feel and hear the deep agitation. Check for proper suction at the hose/wand as well. If the brush roll doesn’t spin, unplug it immediately. The most common cause is a twisted belt or a belt that didn’t fully seat on one pulley. Reopen it and check.
Troubleshooting Common Post-Repair Issues
Even with careful work, sometimes things don’t go perfectly on the first try. Don’t panic. Most post-belt-change problems have simple, quick fixes.
The Brush Roll Isn’t Spinning
This is the most frequent issue. First, unplug the vacuum. The most likely culprit is a twisted belt. A twisted belt will lock up. Open the bottom plate and check the belt’s orientation. The smooth side must contact the pulleys. Re-seat it, ensuring it’s not twisted. Second, the belt may not be stretched enough onto the brush roll pulley. Pull it further over the pulley until it sits deep in the groove. Third, the brush roll itself may be jammed. Remove it and spin each bearing by hand. If one is seized, the brush roll won’t turn, and the belt will just slip or burn. Clean or replace the stuck bearing/brush roll.
Squealing, Screeching, or Burning Smell
This indicates extreme belt slippage or friction. Causes include: 1) A belt that is too old/new and has a glazed surface (rare with a new belt). 2) A dirty pulley. Re-clean the motor and brush roll pulleys with isopropyl alcohol on a rag to remove any oily residue. 3) A belt that is the wrong size—too long and loose. 4) A brush roll bearing is seized, creating drag. Re-check that the brush roll spins freely without the belt. 5) The belt is rubbing against a plastic housing guide. Ensure it’s seated only on the pulleys, not touching the side walls.
Loss of Suction After Reassembly
If suction is weak but the brush roll spins fine, the issue is likely unrelated to the belt. You may have accidentally dislodged a hose or filter during the repair. Check that the main suction hose is firmly connected to the vacuum body and the wand. Ensure the post-motor filter (usually a foam or HEPA filter near the exhaust) is clean and properly seated. A clogged hose or filter will kill suction regardless of the brush roll’s condition.
Excessive Vibration or Noise
A properly installed belt should run quietly. Rattling or vibration can mean the bottom plate isn’t screwed on evenly and is contacting the brush roll. Re-tighten all screws. It can also mean a broken piece of the old belt is still trapped in the housing. Inspect the cavity thoroughly. Finally, a severely worn brush roll bearing can cause a rumbling noise. If the brush roll wobbles side-to-side when you hold it, its bearings are shot and it needs replacement.
Pro Tips to Extend Your Belt’s Life and Avoid Future Breakdowns
Changing a belt is a fix, but preventing the need is even better. A little proactive care can add years to your belt’s life and keep your Shark vacuum performing at its peak.
Make Cleaning the Brush Roll a Monthly Habit
The #1 killer of belts is debris buildup. Hair, string, and carpet fibers wrap around the brush roll axles and pulleys, creating drag that burns out belts. Once a month, or after cleaning a particularly hairy area, flip your Shark over and use a seam ripper or a dedicated brush roll cleaning tool to slice through and remove all wrapped material from the brush roll itself and the bearings. This 60-second habit is the single most effective maintenance task you can perform.
Mind What You Vacuum
Your Shark is powerful, but it has limits. Avoid vacuuming large, hard objects (coins, LEGO, screws), which can instantly damage bristles and jam the roll. Be especially cautious with long, stringy items like extension cords, curtain pulls, or Christmas tree tinsel. These can wrap tightly around the axles and stop the brush roll dead, often snapping the belt in the process. If you must vacuum an area with such debris, do it slowly and be prepared to stop and untangle immediately.
Inspect and Replace Filters Regularly
clogged filters reduce overall suction power. This puts a greater load on the motor and can indirectly stress the belt system because the vacuum has to work harder to achieve the same airflow. Follow Shark’s guidelines: pre-motor foam filters should be washed monthly with water and dried completely for 24 hours. Post-motor HEPA filters should be replaced every 6-12 months depending on use. A vacuum with clean filters runs cooler and more efficiently.
Store Your Vacuum Correctly
Don’t leave your Shark leaning against a wall, especially if the brush roll is resting on the floor. This can cause the brush roll to bend slightly over time, creating a wobble that stresses the belt. Store it upright on its base or hang it on a wall mount. If storing long-term, consider unplugging and leaving the brush roll area clear to prevent the belt from taking a permanent set.
Listen and Feel
You are your vacuum’s best diagnostician. Get to know its normal operating sound and feel. A change in pitch—a higher-pitched whine from the motor or a change in the aggressive “whoosh” of the brush roll—is your earliest warning sign. If suction on carpets starts to diminish while suction on hard floors remains strong, that’s a classic brush roll/belt issue. Catching a slipping belt early (you might smell a faint hot rubber odor) can save you from a sudden snap and a mess of rubber shards in the housing.
Conclusion: Empowering Your DIY Repair
Learning to change a belt on a Shark vacuum transforms you from a passive user into an empowered caretaker of your home’s most important cleaning tool. That moment when you reinstall the bottom plate, plug in the vacuum, and hear and feel that familiar, powerful carpet agitation return is immensely satisfying. It’s a tangible victory of knowledge over obsolescence. This repair demystifies a core component of your machine, proving that many common issues are not failures but rather predictable wear-and-tear events with simple solutions.
By following this guide—taking the time to source the exact part, committing to a thorough cleaning during the swap, and performing a careful reassembly—you’ve not only fixed a problem but invested in the long-term health of your Shark. You’ve saved money, reduced waste, and gained confidence. The next time you feel that loss of carpet cleaning power, you’ll know exactly what to do. You’ll open it up, find the likely stretched or broken rubber loop, and in under half an hour, have your vacuum performing as it did the day you bought it. That’s the real power of understanding your appliances. Now, go enjoy that deep-clean feeling on your carpets, knowing you made it happen yourself.
Frequently Asked Questions
How often should I change the belt on my Shark vacuum?
There’s no fixed schedule, as it depends on use and the surfaces you clean. On average, a belt lasts 6-12 months with regular use on carpets. Inspect it every 3 months for cracks, stretching, or glazing. If you notice reduced carpet cleaning power, that’s the truest indicator it needs replacement.
What are the clear signs my Shark vacuum belt is broken?
The primary signs are: 1) Complete loss of suction/agitation on carpets while suction on hard floors remains. 2) The brush roll does not spin when the vacuum is turned on (you can feel by placing a foot on the floor head). 3) A distinct burning rubber smell during operation. 4) Visible breaks or severe stretching in the belt upon inspection.
Are Shark vacuum belts universal or model-specific?
They are absolutely model-specific. A belt for a Shark Navigator NV352 will not fit a Shark Rotator NV501. You must use the exact belt part number listed for your specific model number. Using the wrong size belt will cause immediate slippage or failure.
Where can I buy a genuine Shark vacuum belt?
The most reliable sources are the official Shark website (sharkclean.com/support) by entering your model number, or authorized retailers like Best Buy, Target, or Walmart who carry Shark accessories. You can also use the specific part number on reputable online parts retailers like Amazon, RepairClinic, or PartSelect.
Is changing a Shark vacuum belt difficult for a beginner?
Not at all. It is rated as one of the easiest DIY vacuum repairs. It requires only a Phillips screwdriver, about 20 minutes, and involves removing a few screws, swapping the belt, and reassembling. If you can use a screwdriver, you can do this. The key is taking your time during disassembly to note screw locations and belt routing.
Should I replace anything else when I change the belt?
It’s highly recommended to thoroughly clean the brush roll housing, pulleys, and bearings every time you change the belt. Also, inspect the brush roll bristles for wear and the bearings for smoothness. If the brush roll bearings are gritty or stiff, replace the brush roll assembly. Finally, check and clean/replace your vacuum’s filters to ensure optimal overall performance after the repair.