Cleaning your Shark Rocket vacuum roller is a quick, essential task that dramatically improves suction and extends your vacuum’s life. It involves safely removing the roller brush, cutting away entangled hair and fibers, washing the roller and bearings, and thoroughly drying everything before reassembly. Regular monthly maintenance prevents clogs, protects your floors, and ensures your vacuum works as efficiently as the day you bought it.
Key Takeaways
- Unplug First: Always disconnect your Shark Rocket from power before attempting any cleaning or removal of the roller brush for safety.
- Hair is the Main Enemy: The primary cause of roller jams and performance loss is wrapped hair and carpet fibers, which must be meticulously cut away.
- Wash with Care: Use only mild soap and water to clean the roller; never use harsh chemicals, and ensure it is 100% dry before reinstalling to prevent mold and motor damage.
- Clean the Housing: The roller’s housing and end caps accumulate dust and debris; cleaning these areas is just as important as cleaning the roller itself.
- Check the Bearings: Clean the roller’s bearings (if accessible) to ensure smooth spinning and prevent premature wear on the belt and motor.
- Reassemble Correctly: Ensure the roller is seated properly and the belt is correctly aligned on its motor spindle before snapping the housing back into place.
- Preventative Maintenance: A quick monthly check and cleaning takes less than 10 minutes but saves you from major clogs and loss of suction later.
📑 Table of Contents
- Why Cleaning Your Shark Rocket Roller is Non-Negotiable
- Gathering Your Tools: What You’ll Need
- Step-by-Step: Removing the Roller Brush Assembly
- The Deep Clean: De-hairing, Washing, and Drying
- Cleaning the Housing and Surrounding Components
- Reassembly and Final Checks
- Establishing a Maintenance Routine & Troubleshooting
- The Tangible Benefits of a Clean Roller
Why Cleaning Your Shark Rocket Roller is Non-Negotiable
Let’s be honest. Your Shark Rocket vacuum is a workhorse. It’s designed to tackle pet hair, deep carpet debris, and everyday messes with powerful suction. But that same powerful suction has a dark side: it’s a magnet for hair, string, carpet fibers, and tiny bits of debris that wrap themselves around the roller brush with terrifying efficiency. Over time, this isn’t just a minor annoyance—it’s a performance killer. A clogged roller can’t spin freely, which means it can’t agitate carpet fibers to lift dirt. Your vacuum’s suction feels weak, it might struggle to push, and you’ll notice it leaving more debris behind than it picks up. Furthermore, that tangled mess creates friction, generating heat that can wear out the drive belt faster and even stress the motor. Regularly cleaning your Shark Rocket vacuum roller isn’t about being tidy; it’s about preserving the core function and longevity of your investment. It’s the single most important piece of maintenance you can do.
The Signs Your Roller Needs Immediate Attention
You don’t have to wait for a complete breakdown. Your vacuum gives you subtle (and sometimes not-so-subtle) clues. Listen for a high-pitched squealing or grinding noise—that’s the belt struggling to turn a jammed roller. Feel for the vacuum becoming unusually hard to push or pull on carpet. Visually inspect the roller periodically; if you see a thick mat of hair wrapped around the bristles and axle, it’s past time. Finally, if you notice a distinct burning smell (like hot rubber), shut it off immediately. This is often a belt slipping due to roller obstruction and can lead to a broken belt or motor overheating. Catching the issue early with a simple clean-out prevents costly part replacements.
Gathering Your Tools: What You’ll Need
The beauty of this maintenance task is its simplicity. You likely have everything you need already in a kitchen drawer. A proper toolset makes the job faster, easier, and safer for your vacuum’s components.
Visual guide about How to Clean Shark Rocket Vacuum Roller
Image source: i.ytimg.com
Essential Tools for the Job
- A Standard or Phillips Screwdriver: This is your primary tool for removing the roller brush housing. Most Shark Rocket models use one or two screws. Check your specific model’s manual if unsure.
- Scissors or a Sharp Utility Knife: For slicing through the toughest, most compacted hair and fiber wraps. A small, sharp pair of scissors offers great control.
- An Old Toothbrush or Small Soft Brush: Perfect for dislodging dust and debris from the roller bristles, the housing, and the end caps without scratching plastic parts.
- Microfiber Cloths: For wiping down all components. They’re lint-free and absorbent.
- Mild Dish Soap: A few drops in warm water is the perfect, safe cleaning solution for plastic and rubber parts. Avoid harsh cleaners, bleach, or degreasers.
- A Bowl or Sink: For the washing step.
- Compressed Air (Optional but Helpful):strong> Great for blasting dust out of the housing and motor intake ports.
What NOT to Use
Never use a metal tool like a butter knife aggressively on the roller bristles, as you can bend or break them. Avoid soaking the entire roller assembly if it contains bearings that aren’t sealed; water can penetrate and cause rust. And under no circumstances should you submerge the motorized body or the power head’s electrical components in water.
Step-by-Step: Removing the Roller Brush Assembly
This is the foundational step. Getting the roller out safely and completely is half the battle. The process is remarkably similar across most Shark Rocket models, but always consult your user manual for model-specific diagrams.
Visual guide about How to Clean Shark Rocket Vacuum Roller
Image source: i.ytimg.com
1. Power Down and Position
First and foremost, unplug your Shark Rocket from the wall outlet. This is a critical safety step to prevent the vacuum from accidentally turning on while you’re working near moving parts. Lay the vacuum on its side or back on a flat, protected surface like a towel or large piece of cardboard. This gives you stable access to the underside of the power head.
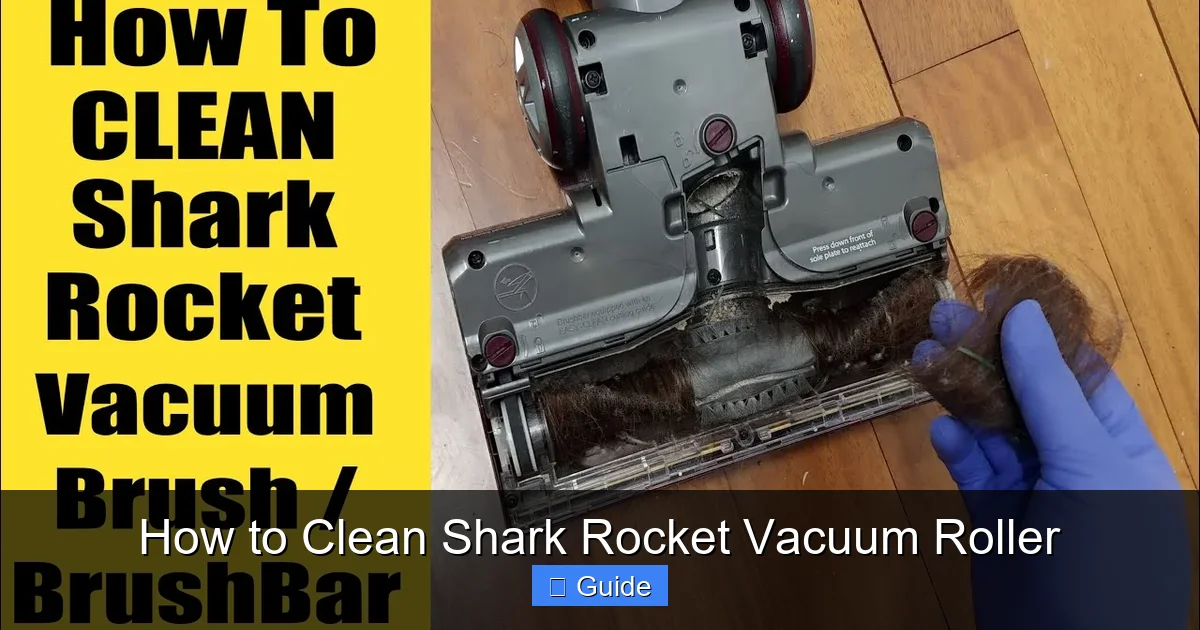
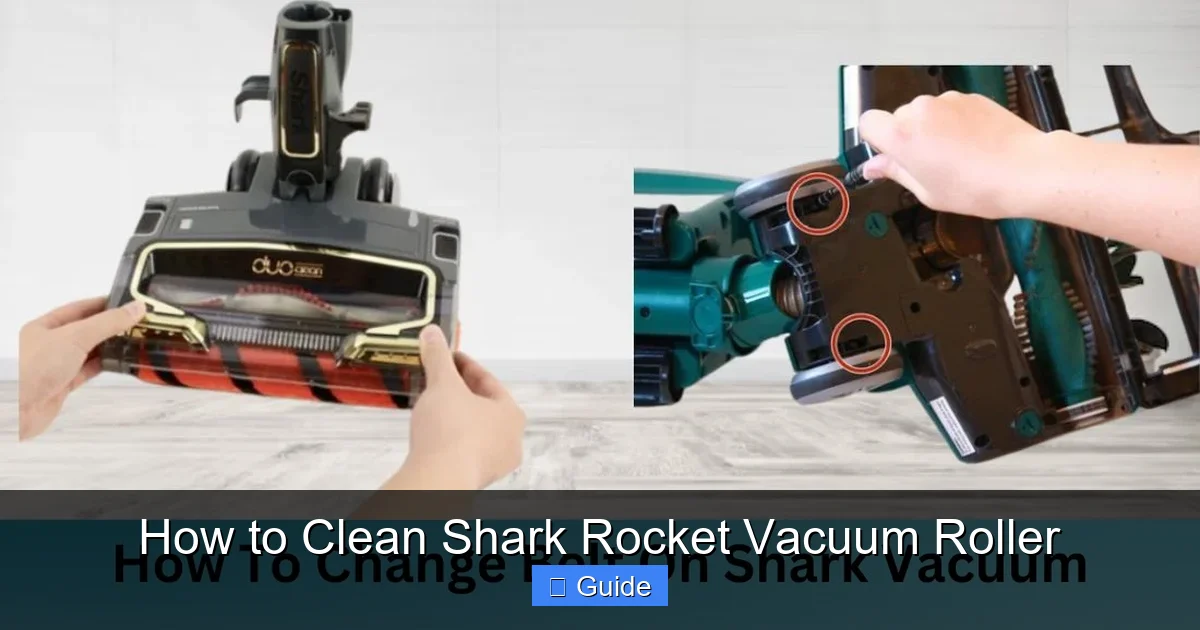
2. Access the Roller Housing
Flip the vacuum over to locate the roller brush housing on the underside of the brush roll head. You will see either one or two release latches or screws. On many models, there are two small plastic tabs on either side of the housing. Press these inward and pull the housing down. On other models, you’ll find one or two Phillips head screws securing the housing. Remove these screws and set them aside in a safe spot.
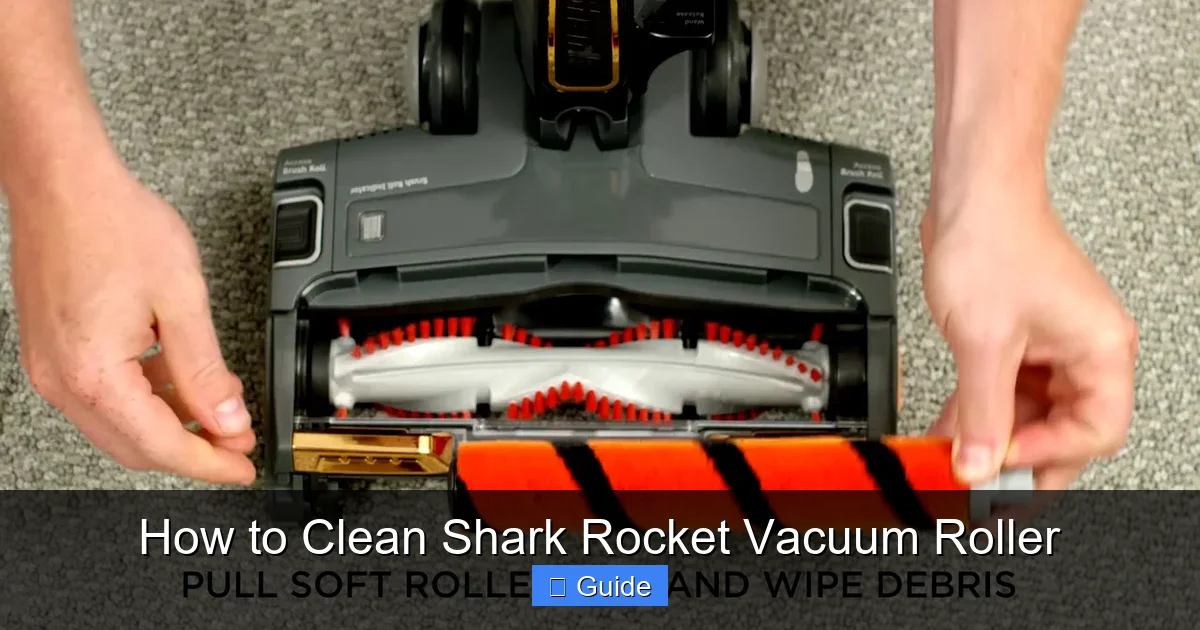
3. Extract the Roller
With the housing open or removed, you should see the entire roller brush assembly—a cylinder of bristles with plastic end caps and a rubber drive belt looped around it. Gently pull the roller straight out. You may need to slightly lift or tilt it to disengage it from the belt. Be mindful of the belt; don’t stretch or twist it excessively. Once free, you have the main component in hand.
Pro Tip: Belt Check
While you have the housing open, this is the perfect time to inspect the drive belt. Look for cracks, fraying, or a loss of elasticity. A worn belt will slip, reducing cleaning power and making noise. Replacing a Shark Rocket belt is inexpensive and easy, so don’t wait for it to break.
The Deep Clean: De-hairing, Washing, and Drying
Now you have the culprit in your hands. This is where you restore its spinning freedom. The process has three key phases: removal, washing, and drying. Rushing the drying phase is the most common mistake and can lead to mold or rust.
Visual guide about How to Clean Shark Rocket Vacuum Roller
Image source: sharkvacuum.blog
Phase 1: Surgical Hair and Fiber Removal
This is the most satisfying (and sometimes gross) part. Lay the roller on a flat surface. You’ll see a dense, felt-like mat of hair wrapped around the bristles and the metal axle in the center. Take your scissors and carefully start cutting. Don’t just try to pull it off; you’ll just make it tighter. Make multiple cuts around the circumference, slicing the hair wrap into smaller, manageable sections. Use your fingers or the end of the scissors to pry these sections off. Pay special attention to the ends of the roller where hair compacts against the end caps. A bent paperclip or the tip of your utility knife can help tease out fibers from the bearing housings. Be thorough; even small bits left behind will attract more hair quickly.
Phase 2: The Soapy Bath
Fill your bowl or sink with warm water and add a drop of mild dish soap. Submerge the roller and agitate it gently. Use your old toothbrush to scrub along the length of the bristles, getting into the base where dust and fine particles collect. The bristles on a Shark Rocket are often stiff nylon; a firm but careful scrubbing is fine. Also, scrub the plastic end caps and the rubber surface. If your model has exposed ball bearings in the end caps (some do, some have sealed bearings), gently scrub around them. Do not soak the entire assembly for more than 5-10 minutes. You want it damp and clean, not waterlogged. Rinse thoroughly under a gentle stream of lukewarm water until all soap residue is gone.
Phase 3: The Critical Dry
This is the most important step. Water inside the roller’s axle or bearings will cause rust, which seizes the roller and damages the belt. Shake off excess water. Then, take your clean, dry microfiber cloth and thoroughly wipe down every surface of the roller. Pay extra attention to spinning the roller and drying the central axle hole and the bearing areas. For maximum assurance, stand the roller upright on one end cap and let it air-dry for at least 2-3 hours in a well-ventilated area, or overnight. You can also use a low, cool setting on a hair dryer to speed up the process, ensuring you move it around to dry all internal parts. The roller must be completely bone-dry to the touch before reassembly.
Cleaning the Housing and Surrounding Components
You’ve got a sparkling roller, but if you put it back into a dirty housing, you’ve only done half the job. The housing is a trap for the fine dust and hair that escapes the roller.
Housing Deep Dive
With the housing separate, take it to a trash can or outside. Use your compressed air (or just a strong puff of breath) to blow out all the accumulated dust, hair, and grit from the interior cavity, the belt channel, and the wheel wells. You’ll be amazed at what comes out. Follow this with your dry toothbrush to dislodge any packed debris from corners and the belt path. Wipe the entire housing inside and out with a dry microfiber cloth. If there’s sticky grime, use a cloth dampened with a drop of soapy water, then immediately wipe it dry. Never let water pool in the housing.
End Caps and Brush Head
Don’t forget the brush head itself. Check the suction intake at the front of the power head. Remove any large debris caught there. Wipe the wheels that allow the vacuum to glide smoothly. Clean the exterior of the power head with a damp cloth. This prevents tracked-in dirt from re-entering your clean system.
Clearing the Intake and Hose
While you’re in a cleaning mood, detach the wand and hose. Look into the hose connection point on the vacuum. A quick check with a flashlight might reveal a clog right at the entrance. Use a long, flexible brush (like a clothes dryer vent brush) to gently clean the inside of the hose if you suspect a blockage. This ensures the restored suction from your clean roller can flow freely to the dust cup.
Reassembly and Final Checks
Time to put Humpty Dumpty back together again. This step is straightforward but requires a moment of attention to detail.
1. Belt Positioning
First, ensure the drive belt is correctly positioned on the motor spindle (the small rubber peg inside the housing) and is not twisted. The belt should sit in its channel cleanly. If the belt came off during disassembly, loop it around the roller’s axle groove first, then stretch it slightly to fit onto the motor spindle.
2. Inserting the Roller
Align the roller’s axle with the slots or guides on either side of the housing. Slide the roller straight in until it sits flush and both end caps are securely in their housings. It should spin freely by hand with no resistance.
3. Securing the Housing
If your model uses latches, snap the housing back into place until you hear it click. If it uses screws, replace and tighten them securely, but do not overtighten and crack the plastic. Give the roller a final spin by hand to confirm it rotates smoothly and the belt is tracking straight.
4. The Test Run
Plug your Shark Rocket back in. Turn it on for a few seconds on a bare floor (not carpet) to listen. The sound should be a consistent whirring, not a squeal or grinding. The roller should spin immediately. Place it on a carpet and observe—the roller should be rotating vigorously and the vacuum should feel powerful and easy to push. If it’s still noisy or not spinning, unplug it and double-check the belt installation and roller seating.
Establishing a Maintenance Routine & Troubleshooting
With your vacuum performing like new, the goal is to keep it that way. A little prevention goes a long way.
A Simple Maintenance Schedule
- After Every 3-5 Uses: Do a visual check. Look at the roller through the housing (some models have a clear window) or quickly pop the housing to see if hair is starting to wrap. A quick 30-second snip now prevents a 20-minute ordeal later.
- Monthly Deep Clean: Perform the full removal and washing process described above. This is non-negotiable for homes with pets or long-haired individuals.
- Every 6 Months: Inspect the drive belt for wear and the brush bristles for damage. Worn bristles reduce agitation. Replace the belt if it shows any signs of wear.
- Seasonally: Clean the dust cup and filters according to your manual. A clogged filter reduces overall suction, making the roller work harder.
Troubleshooting Common Issues
Problem: Roller still won’t spin after cleaning and reassembly.
Solution: The belt is likely not seated correctly on the motor spindle. Unplug, remove the housing, and re-route the belt. Ensure it’s not pinched or twisted.
Problem: A persistent burnt rubber smell.
Solution: You likely have a worn, glazed, or incorrectly sized belt. Replace it with a genuine Shark belt. Also, ensure the roller is completely dry; moisture can cause belt slippage and smell.
Problem: Roller spins but vacuum has no suction.
Solution: The issue is likely a clog downstream—check the hose, wand, and dust cup. The roller may be clean, but a blockage elsewhere is starving the system of airflow.
Problem: Bristles are broken, melted, or severely bent.
Solution: The roller brush itself is worn out. Shark Rocket rollers are replaceable. Purchase a new roller assembly; it’s a simple “pop-out, pop-in” replacement that restores optimal carpet agitation.
The Tangible Benefits of a Clean Roller
Let’s connect the dots on why this chore is so worthwhile. When your roller spins freely and agitates effectively:
- Suction Power is Restored: The vacuum can now lift embedded dirt from carpet pile instead of just skimming the surface. You’ll see and feel the difference.
- <
- Your Floors and Carpets are Cleaner: Effective agitation means a deeper clean, removing allergens and ground-in dirt that a clogged roller leaves behind.
- The Vacuum is Easier to Push: A free-spinning roller offers minimal resistance, making cleaning less of a workout, especially on thick carpets.
- You Prevent Costly Repairs: By eliminating strain on the drive belt and motor, you dramatically extend the life of these wear items and the vacuum itself.
- It’s More Hygienic: A damp, dirty roller brush is a breeding ground for bacteria, mold, and mildew, especially in pet homes. Regular cleaning keeps your vacuum from becoming a source of odors and microbes.
- It Saves Time and Money: A well-maintained vacuum cleans faster and more effectively, meaning you spend less time cleaning. It also avoids the expense of prematurely replacing belts, motors, or the entire vacuum.
Conclusion: Cleaning your Shark Rocket vacuum roller is a simple, empowering act of maintenance. It takes less than 20 minutes once you know the steps, and the payoff is immense: a vacuum that performs at its peak, protects your home’s flooring, and serves you reliably for years. By incorporating this quick monthly ritual into your home care routine, you ensure your cleaning tool is always ready to tackle the mess, not become part of it. Grab your screwdriver and scissors today—your floors (and your vacuum) will thank you.
Frequently Asked Questions
How often should I clean my Shark Rocket vacuum roller?
For best performance, perform a full removal and deep clean every month. For homes with pets or long hair, do it every 2-3 weeks. A quick visual check and hair trim every few uses can prevent major jams.
Can I use water to wash the entire roller assembly?
No. Only the plastic and rubber parts of the roller brush itself should be washed with soapy water. Never submerge the end caps if they contain non-sealed bearings, and never get water near the motor or electrical components. The roller must be completely dry before reassembly.
What if the drive belt breaks during cleaning?
Don’t panic. Drive belts for Shark Rocket vacuums are inexpensive and easy to replace. Simply note the belt model number (usually on the old belt or in your manual) and order a replacement. Installation involves stretching the new belt over the motor spindle and into the roller’s groove.
My roller still smells bad after cleaning. Why?
Odors typically come from dampness trapped inside the roller’s axle or bearings. Ensure you have thoroughly dried the roller, especially the central hole. You can also wipe the axle with a cotton swab dipped in rubbing alcohol to disinfect and remove residue, then let it air dry completely.
Is it normal for the roller to have some play or wobble?
A very slight amount of side-to-side play is normal as the roller spins in its housing. However, excessive wobbling, clicking, or grinding noises indicate the end caps may be worn, the bearings are damaged, or the roller is not seated correctly. Recheck the installation first.
When should I just replace the roller brush instead of cleaning it?
Replace the roller if the bristles are significantly broken, melted (from contact with a hot surface), or severely bent and splayed. Also, if the axle or bearing housings are corroded or damaged from repeated moisture exposure, a new roller assembly is the safest and most effective solution.