Cliff sensors are your Shark Ion robot vacuum’s critical safety and navigation system. Keeping them clean is a simple, five-minute monthly task that prevents drops, gets-stuck errors, and erratic cleaning patterns. This guide provides the exact tools, locations, and gentle techniques to safely clean these infrared sensors, ensuring your robot reliably maps your home and stays safe on all floor types.
Has your trusty Shark Ion robot vacuum suddenly developed a habit of getting inexplicably stuck in the middle of a room, or perhaps it’s become overly cautious, refusing to cross from a hardwood floor onto a low-pile rug? Before you assume a major mechanical failure or start shopping for a replacement, take a deep breath. The solution is likely simpler, quicker, and less expensive than you think. The culprit is often something as small and seemingly insignificant as a few specks of dust. We’re talking about the cliff sensors—your robot’s vital safety and navigation system. Learning how to clean cliff sensors on Shark Ion models is a fundamental piece of maintenance that every owner should master. It’s not just about preventing falls; it’s about ensuring your robot vacuum can see the world clearly, map efficiently, and clean without constant interruptions. This comprehensive guide will walk you through everything you need to know, from understanding what these sensors are to performing a perfect, damage-free clean.
Key Takeaways
- Cliff sensors prevent falls: These infrared “eyes” detect drops like stairs and ledges. Dirty sensors can cause false “cliff” warnings or fail to detect real drops, leading to get-stuck errors or dangerous falls.
- Clean monthly for reliability: Incorporate a quick sensor wipe into your regular maintenance routine (e.g., when you empty the dustbin) to maintain consistent performance.
- Use only gentle tools: Always use a dry, lint-free microfiber cloth and dry cotton swabs. Never use liquids, sprays, or abrasive materials that can damage the sensor lenses.
- Locate sensors correctly: On Shark Ion models, cliff sensors are typically small, dark windows on the robot’s front-bottom perimeter, not the large central bumper.
- Check for debris, not scratches: Focus on removing dust, hair, and sticky film. If a lens is visibly scratched, the sensor itself may need professional replacement.
- Re-calibrate after cleaning: Place the robot on a flat surface and run a test cleaning cycle to allow it to re-establish its environmental mapping.
- Address other issues if cleaning fails: If problems persist after cleaning, check for dirty wheels, tangled brushes, or outdated firmware as the next troubleshooting steps.
📑 Table of Contents
- Understanding Your Shark Ion’s Cliff Sensors: The Robot’s “Eyes”
- Essential Tools for the Job: What You Need (and What to Avoid)
- Step-by-Step: How to Locate and Access the Cliff Sensors
- The Gentle Cleaning Process: A Detailed Walkthrough
- Troubleshooting: What If Cleaning Doesn’t Fix the Problem?
- Establishing a Proactive Maintenance Schedule
- The High Cost of Neglect: Long-Term Consequences
- Conclusion: Your Robot’s Vision is in Your Hands
Understanding Your Shark Ion’s Cliff Sensors: The Robot’s “Eyes”
To properly care for something, you first need to understand what it is and why it matters. The cliff sensors on your Shark Ion are not just random holes or plastic pieces; they are sophisticated pieces of technology. They are infrared (IR) emitters and receivers working in tandem. The sensor emits a tiny, invisible beam of infrared light downward. That light bounces off your floor and returns to the receiver. The robot’s computer constantly monitors this signal. If the signal suddenly disappears or changes dramatically—which happens when there’s a drop like a stair, a step, or a gap between floors—the robot instantly registers a “cliff” and reverses direction to avoid a potentially catastrophic fall.
Why Cleanliness is Non-Negotiable for Sensor Function
Think about trying to see through a dirty window. If it’s smudged with fingerprints, dust, and pollen, your view is obscured, distorted, or completely blocked. The same principle applies to your Shark Ion’s cliff sensors. A layer of dust, a hair, or a sticky spill residue forms a barrier between the sensor lens and the floor. This barrier can do one of two destructive things:
- Cause False Positives: The grime might block or scatter the IR beam erratically. The robot’s computer interprets this as an unstable surface or a cliff, causing it to stop, turn around, and announce “Cliff Sensor Error” or simply refuse to move over what should be a safe transition.
- Cause False Negatives: More dangerously, a dirty sensor might fail to detect a real drop. If the beam is too weak to return properly from the edge of a stair, the robot may blindly drive off the edge.
Beyond the cliff sensors, many Shark Ion models also use similar optical sensors for wall following and obstacle detection. A general cleaning of the sensor array at the front of the robot often improves overall navigation and edge cleaning performance.
Essential Tools for the Job: What You Need (and What to Avoid)
The beauty of this maintenance task is its simplicity. You don’t need special tools, expensive kits, or mechanical skills. However, using the wrong tools can cause permanent damage. Here’s your essential checklist:
Visual guide about How to Clean Cliff Sensors on Shark Ion
Image source: i.ytimg.com
- Dry, Lint-Free Microfiber Cloth: This is your primary weapon. Microfiber is soft, non-abrasive, and excellent at grabbing dust and static. Avoid paper towels, which can leave lint.
- Dry Cotton Swabs (Q-Tips): Perfect for gently reaching into the small recesses around the sensor windows without touching the lens surface directly with your fingers.
- Can of Compressed Air (Optional but Helpful): Use short, gentle bursts to dislodge loose hair and dust from the sensor housing and surrounding wheel wells. Hold the can upright to avoid liquid spray.
- Soft-Bristled Toothbrush (Optional): A clean, dry, very soft toothbrush can help agitate debris from textured surfaces around the sensors.
What to NEVER Use:
- Liquids of Any Kind: This includes water, window cleaner, rubbing alcohol, or soap solutions. Liquids can seep into the sensor housing, fog the internal lens, or cause electrical shorts.
- Abrasive Materials: No scrub pads, rough cloths, or your fingernails. You will scratch the sensor lens, rendering it useless.
- Canned Air Held Sideways: As mentioned, this propels liquid coolant, which is a disaster for electronics.
For most routine cleanings, the microfiber cloth and cotton swabs are all you’ll ever need.
Step-by-Step: How to Locate and Access the Cliff Sensors
Before you clean, you must know what you’re looking at. While designs vary slightly between Shark Ion models (e.g., the RV50, RV60, RV1001 series), the cliff sensor placement is consistent.
Visual guide about How to Clean Cliff Sensors on Shark Ion
Image source: res.cloudinary.com
Identifying the Sensor Array
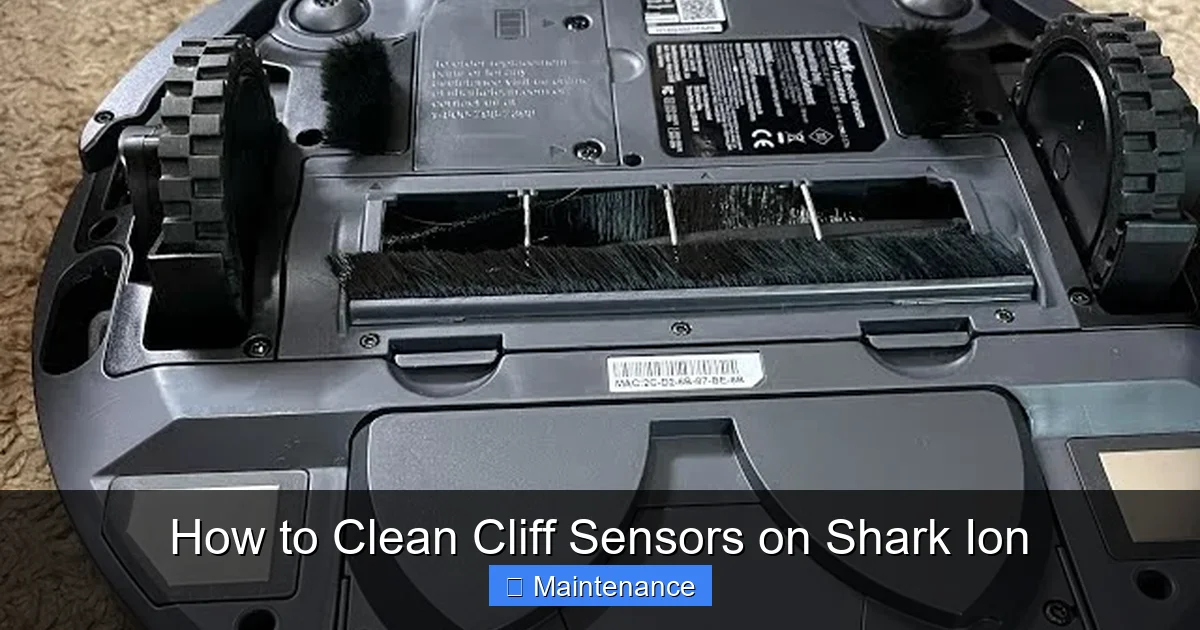
Place your Shark Ion upside down on a soft towel or large, clean surface. Look at the front, bottom edge of the robot—the part that leads as it moves forward. You will see several distinct components:
- The Main Rolling Brush: The large, cylindrical brush in the center.
- The Side Brushes: The rotating brush(es) on the sides.
- The Drive Wheels: The two large rubber wheels on either side.
- The Cliff Sensor Array: This is your target. It’s usually a strip of 3-5 small, dark, rectangular or square “windows” set into a black plastic housing just above the front bumper and between the side brushes. They are not the large central bumper itself, but the small sensors embedded in the plastic right above it.
On some models, there may also be a single, larger circular sensor in the center of this array used for additional drop detection.
Pre-Cleaning Safety Protocol
Always power down your robot completely before beginning. Press the power button on the unit to turn it off. For absolute safety, especially if you plan to handle it extensively, flip the robot over and remove the battery (if your model has a removable battery). This prevents any accidental activation of the wheels or brushes while you’re working near them.
The Gentle Cleaning Process: A Detailed Walkthrough
Now for the core task. Patience and gentleness are your most important tools. Rushing or being aggressive can cause more harm than good.
Visual guide about How to Clean Cliff Sensors on Shark Ion
Image source: images-na.ssl-images-amazon.com
1. Initial Debris Removal
With the robot upside down, use your hands or the soft toothbrush to gently remove any large, obvious debris: strands of hair wrapped around the wheels, big carpet fibers, or bits of paper stuck in the wheel wells or near the sensor housing. This prevents you from pushing this debris into the sensor area during the wipe-down.
2. Dry Wipe the Sensor Lenses
Take your dry microfiber cloth. Fold it into a small, neat square to create a clean, firm edge. Gently but firmly wipe across the surface of each small sensor window. Use a clean part of the cloth for each sensor to avoid transferring dirt. You are not scrubbing; you are lightly polishing. The goal is to remove the thin film of dust and static that attracts more dirt. You should see the cloth pick up a faint gray smudge after wiping a dirty sensor.
3. Detail with Cotton Swabs
Now, take a dry cotton swab. Gently insert it into the tiny gaps and crevices around each sensor window. Roll it softly against the edges of the plastic housing to dislodge any compacted dust or hair that the cloth couldn’t reach. Do not rub the swab directly across the sensor lens itself. The lens is delicate, and the cotton can leave fibers. Use the swab only on the surrounding plastic frame. If a swab gets visibly dirty, discard it and use a new one.
4. The Compressed Air Finishing Touch (Optional)
Hold your can of compressed air upright. Give short, controlled bursts of air across the entire sensor array from different angles. This will blow away any last microscopic particles the cloth and swabs may have loosened. Keep the nozzle at least 2-3 inches away to avoid any risk of moisture or force damage.
5. Final Inspection and Reassembly
Hold the robot up to a light source and look directly at each sensor lens. They should be completely clear, with no visible smudges, streaks, or debris. If you see any residue, repeat the dry microfiber wipe. Once satisfied, if you removed the battery, reinstall it. Flip the robot right-side up. Place it on a flat, clear section of floor and press the power button to run a test cleaning cycle. Watch it carefully for the first minute to ensure it navigates normally and doesn’t immediately report a cliff error.
Troubleshooting: What If Cleaning Doesn’t Fix the Problem?
You’ve meticulously cleaned the sensors, but your Shark Ion is still acting up—stopping at transitions, getting stuck, or still reporting cliff errors. Don’t panic. The sensors might not be the only issue. Here’s your systematic diagnostic plan:
Step 1: Rule Out Other Common Culprits
- Dirty or Stuck Wheels: Hair wrapped tightly around the axles of the drive wheels or side caster wheel can cause the robot to tilt slightly, triggering the cliff sensors. Clean all wheels thoroughly.
- Tangled Brushes: A brush roll jammed with hair can create drag and cause uneven movement, confusing the sensors. Remove and clean the brush roll and its bearings.
- Obstructed Bumpers: Ensure the main plastic bumper around the front can move freely. If it’s jammed with gunk, the robot may think it’s hitting an obstacle constantly.
- Very Dark or Reflective Floors: Some very dark carpets or highly reflective surfaces (like polished marble) can sometimes confuse optical sensors. Try a different room or surface to test.
Step 2: Software and Environmental Checks
- Firmware Update: Open the Shark app and check for any available firmware updates for your robot. Updates often include sensor calibration improvements.
- Re-Locate the Home Base: Ensure your charging dock is on a hard, flat surface against a wall, with at least 1.5 feet of clearance on either side and 4 feet in front. A poorly placed dock can disrupt navigation patterns.
- Perform a Re-Map: If your model supports it, use the app to delete the current map and have the robot perform a full, fresh mapping run of your home.
Step 3: When to Suspect a Faulty Sensor
If you’ve completed a thorough cleaning, checked all mechanical parts, updated software, and the robot still exhibits the same specific error (e.g., always reporting a cliff in the exact same spot on a safe floor), the sensor itself may be faulty or damaged. In this case, contact Shark Customer Support. They can run diagnostics and, if under warranty, may replace the sensor module or the entire robot. Do not attempt to disassemble the sensor housing yourself; it is not designed for user repair and can be easily broken.
Establishing a Proactive Maintenance Schedule
The key to avoiding most navigation issues is consistency. Don’t wait for an error to strike. Integrate sensor cleaning into your regular routine.
Weekly Quick Check (During Bin Emptying)
Every time you empty the dustbin (which should be after every few cleaning cycles), take an extra 10 seconds. While the robot is upside down, visually inspect the cliff sensor array through the clear plastic windows. If you see any visible dust, hair, or smudges, do a quick dry wipe with your microfiber cloth. This prevents buildup.
Monthly Deep Clean
Once a month, perform the full detailed cleaning procedure outlined above, including the cotton swabs and compressed air. This monthly deep clean should coincide with your other monthly maintenance tasks, like:
- Cleaning the filter (or replacing if washable filter is worn)
- Inspecting and cleaning the brush roll and bearings
- Checking and cleaning the wheels
- Wiping down the exterior and sensor contacts on the charging dock
Setting a recurring calendar reminder on your phone is a great way to build this habit.
The High Cost of Neglect: Long-Term Consequences
Why is this 5-minute task so important? Because neglect leads to a cascade of problems that degrade your entire ownership experience.
Inefficient Cleaning and Wasted Time
A robot with compromised sensors doesn’t clean in straight, logical lines. It zig-zags erratically, misses large areas, and gets stuck frequently, requiring you to rescue it multiple times per cycle. What was meant to save you time ends up consuming more of it.
Increased Wear and Tear
Constant stopping, starting, and turning places extra stress on the motors, wheels, and battery. The robot works harder and less efficiently, potentially shortening its overall lifespan.
Safety Hazards
The most serious risk is a fall. While Shark Ion robots are designed with multiple safety redundancies, a completely blinded cliff sensor removes a critical layer of protection. A fall down a flight of stairs can destroy the robot and potentially cause injury if it lands on a person or pet.
Costly Replacements
Severe damage from a fall often means a total loss. Even if the sensor fails due to grime and requires replacement, it’s an avoidable service cost. Regular cleaning is the ultimate cost-saving measure for your robot vacuum.
Conclusion: Your Robot’s Vision is in Your Hands
Your Shark Ion robot vacuum is a marvel of autonomous technology, but it relies on you for its most basic upkeep. Cleaning the cliff sensors is not a chore; it’s an act of stewardship that ensures your investment continues to deliver on its promise of effortless, reliable cleaning. It takes less time than making a cup of coffee and requires no special skills—just a soft cloth and a mindful touch. By understanding the role of these tiny infrared windows, locating them on your specific model, and following the gentle, dry-cleaning method we’ve outlined, you take control of your robot’s performance. You prevent the frustration of errors, safeguard against damage, and extend the useful life of your helpful little companion. So, flip that Shark Ion over, give those sensors some love, and watch it return to its old, efficient self, navigating your home with confidence and clarity. A clear view for your robot means a clean home for you.
Frequently Asked Questions
How often should I clean the cliff sensors on my Shark Ion?
We recommend a quick visual check and dry wipe with a microfiber cloth every time you empty the dustbin (every 2-3 cleaning cycles). Perform the full detailed cleaning with cotton swabs and compressed air at least once a month for optimal performance.
What are the clear signs that my cliff sensors are dirty?
Look for the robot repeatedly stopping and turning around on flat surfaces, displaying “Cliff Sensor Error” messages, refusing to cross from hard floors to low-pile rugs, or getting stuck in open areas of a room where there are no actual obstacles or drops.
Can I use water, alcohol, or cleaning wipes on the sensors?
No. Never use any liquids, sprays, or abrasive wipes on the sensor lenses. These can damage the delicate infrared coating, cause fogging, or lead to electrical issues. Always use a dry, lint-free microfiber cloth and dry cotton swabs.
Are cliff sensors in the same place on all Shark Ion models?
Yes, the location is consistent. On all Shark Ion robot vacuums, the cliff sensors are the small, dark rectangular windows located on the front-bottom edge of the robot, typically in a row above the main bumper and between the side brushes. They are not the large central bumper itself.
I cleaned the sensors but the robot is still acting up. Now what?
If cleaning doesn’t resolve the issue, systematically check for other problems: clean hair and debris from the drive wheels and casters, ensure the brush roll spins freely, update your robot’s firmware via the Shark app, and try deleting and remapping your home. If problems persist, the sensor may be faulty and require professional service.
Can I damage the sensors by cleaning them?
Yes, if you use the wrong tools or techniques. Scrubbing with an abrasive cloth, using liquids, or poking the lens with a sharp object can scratch or cloud the sensor permanently. Always use gentle, dry wiping motions with soft materials and never apply pressure directly to the lens surface.