Master your Shark handheld steam cleaner with our essential guide. This versatile tool uses only water to sanitize and clean countless surfaces, from kitchens to cars. Proper preparation, technique, and maintenance are key to unlocking its full potential while ensuring safety and longevity. Follow our step-by-step instructions to transform your cleaning routine.
Key Takeaways
- Always Use Distilled Water: Prevent mineral buildup and internal damage by using only distilled or demineralized water in your Shark steam cleaner.
- Safety First: The device produces extremely hot steam; always test on a small, inconspicuous area first and wear protective gloves to avoid burns.
- Surface Awareness is Crucial: Never use steam on sealed surfaces, electronics, delicate woods, or anything that can be damaged by moisture.
- The “Wipe, Don’t Soak” Technique: Hold the nozzle a few inches from the surface and use slow, sweeping motions to allow steam to penetrate grime without oversaturating materials.
- Clean & Store Promptly: After each use, flush the system with clean water, empty all water, and store the unit upright with attachments detached to prevent odors and mold.
- Attachments are Your Best Friend: Utilize the various nozzle and brush attachments for different tasks—brushes for scrubbing grout, nozzles for tight corners, and microfiber pads for wiping.
- Patience Yields Perfection: For tough, baked-on grime, hold the steam on the spot for 5-10 seconds to loosen it before wiping; multiple light passes are better than one heavy, wet pass.
📑 Table of Contents
- Unlocking the Power of Steam: Your Introduction to the Shark Handheld Cleaner
- Getting Started: Unboxing, Setup, and Your First Fill
- Safety First: Essential Precautions Before You Press “On”
- The Main Event: Step-by-Step Cleaning Technique
- Surface-Specific Strategies: From Grout to Grease
- Beyond Floors: Unexpected Places to Use Your Shark Steam Cleaner
- Care and Maintenance: Ensuring a Long Life for Your Shark
- Troubleshooting: When Things Go Wrong
- Conclusion: Embrace a Cleaner, Healthier Home
Unlocking the Power of Steam: Your Introduction to the Shark Handheld Cleaner
Congratulations on joining the steam cleaning revolution! Your Shark handheld steam cleaner isn’t just another gadget; it’s a chemical-free powerhouse that transforms the way you tackle dirt, grease, and germs. Imagine sanitizing your kitchen counters without a single spray of cleaner, or blasting through soap scum in the shower without harsh fumes. That’s the promise of steam. But to truly harness this power, you need to move beyond just pointing and shooting. This guide will walk you through every step, from unboxing to mastering, ensuring you use your Shark cleaner safely, effectively, and confidently on a vast array of surfaces. Think of this as your personal masterclass in practical, powerful cleaning.
The core principle is beautifully simple: heat water to a high temperature (often above 200°F/93°C) to create a dry, penetrating steam. This steam loosens bonded dirt, dissolves grease, and kills 99.9% of common household bacteria and dust mites on contact. The “handheld” design gives you the control and agility to get into places a mop or bulky cleaner never could. However, that same power requires respect and the right technique. Using it incorrectly can lead to ineffective cleaning or, worse, damage to your belongings. So, let’s start at the very beginning.
Getting Started: Unboxing, Setup, and Your First Fill
Before you dive into cleaning, a proper setup ensures everything runs smoothly. Rushing this stage is a common mistake for new users. Take 10 minutes now to save hours of frustration later.
Visual guide about How to Use Shark Handheld Steam Cleaner
Image source: sharkvacuum.blog
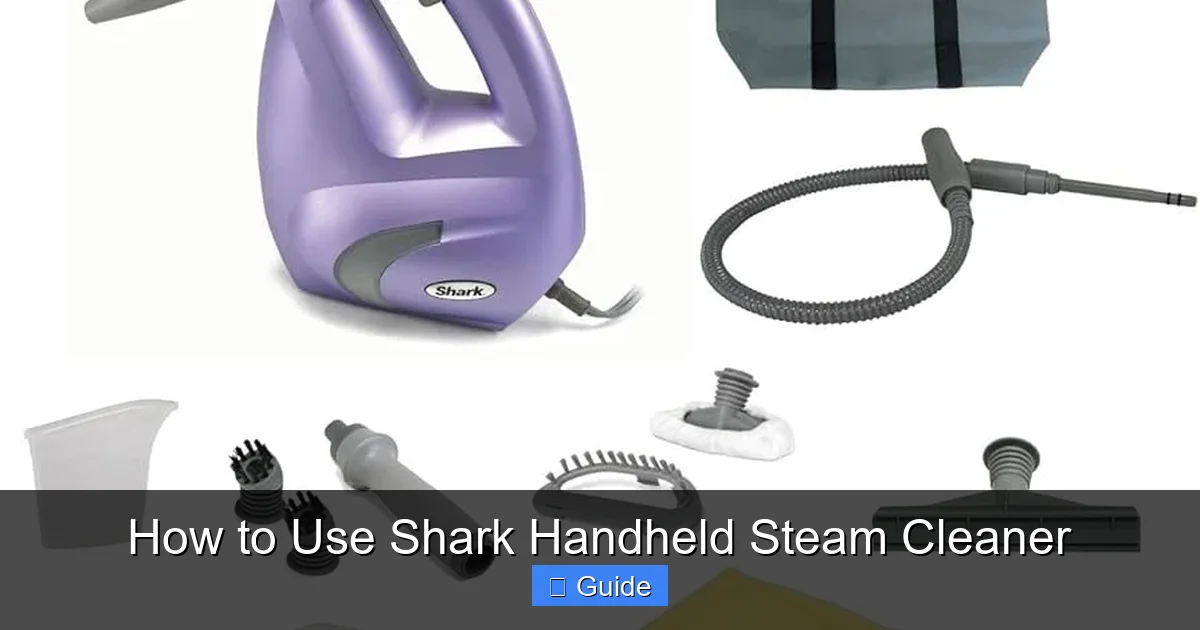
What’s in the Box? Identifying Your Tools
Open that box with purpose. You should find the main handheld unit with its built-in water tank, a power cord, and a set of attachments. Common Shark attachments include a triangular floor head (often with a removable microfiber pad), a precision jet nozzle for tight spots, a scrubbing brush (sometimes with removable bristle heads), and a squeegee for windows and mirrors. Lay everything out. Familiarize yourself with how each piece clicks or twists onto the main unit’s accessory port. This simple act of recognition will make your cleaning sessions fluid and fast.
The Golden Rule: Water, Water, Water—But the Right Kind
This is the single most important rule for the longevity of your Shark steam cleaner: ALWAYS USE DISTILLED OR DEMINERALIZED WATER. Tap water contains minerals like calcium and lime. When the water heats up, these minerals precipitate out, forming a stubborn, chalky scale inside the boiler, heating element, and steam vents. This scale reduces heating efficiency, clogs the system, and eventually leads to permanent damage and poor performance. Distilled water is inexpensive and widely available. Keep a jug dedicated solely to your steam cleaner. Never, ever add any type of cleaning solution, detergent, vinegar, or essential oils to the tank unless the manufacturer’s instructions explicitly state your model is compatible. Doing so can void your warranty and clog the system irreparably.
Filling the Tank: A Step-by-Step
Locate the water tank cap, usually on the back or top of the unit. It will have a clear “fill” line. Never overfill. Fill your distilled water jug and slowly pour water into the tank’s opening, using a funnel if provided. Stop before you reach the max line. Hot water expands, and overfilling can cause leakage from the cap or pressure relief valve. Once filled, securely tighten the cap until you hear a click or feel it lock. A loose cap will prevent the unit from building proper pressure.
Safety First: Essential Precautions Before You Press “On”
Your Shark steam cleaner is a tool that produces scalding hot steam under pressure. Treating it with respect is non-negotiable. These precautions are not suggestions; they are requirements for safe operation.
Visual guide about How to Use Shark Handheld Steam Cleaner
Image source: m.media-amazon.com
The Universal Pre-Clean Test
Before you ever aim the steam at a visible stain, you must perform a spot test. Choose a small, hidden area of the surface you intend to clean—the back of a couch cushion, an inconspicuous corner of a tile floor, the inside hem of a curtain. Steam the area for 5-10 seconds and then wipe it with a clean microfiber cloth. Let it dry completely (this may take 15-30 minutes). Check for any discoloration, warping, or finish damage. This test tells you if the material is steam-compatible. Some surfaces, like unsealed wood, certain wallpapers, or delicate fabrics, will fail this test. For them, you must find an alternative cleaning method.
Personal Protective Equipment (PPE)
While not always mandatory, wearing a pair of simple kitchen gloves or heat-resistant gloves is highly recommended. Accidental contact with the steam nozzle or hot surfaces can cause a serious burn in a split second. Gloves provide a vital barrier. Also, consider wearing closed-toe shoes to protect your feet from any drips. Never clean barefoot.
Environmental Safety
Always operate the cleaner in a well-ventilated area. While steam itself is just water vapor, it can temporarily raise humidity and dislodge dust or allergens from surfaces. Open a window if possible. Keep children and pets out of the room during cleaning and for a few minutes after while surfaces dry. The unit’s cord is a tripping hazard; be mindful of where you place it. Never yank the cord to unplug; always grasp the plug itself.
The Main Event: Step-by-Step Cleaning Technique
Now for the fun part. The technique is less about brute force and more about smart, controlled application. The goal is to use the steam’s heat and agitation to loosen grime, then immediately wipe it away with a clean cloth.
Visual guide about How to Use Shark Handheld Steam Cleaner
Image source: sharkvacuum.blog
Powering Up and Pressure Building
Plug your Shark into a standard 120V outlet. The unit will begin to heat up. Most models have an indicator light that shows when it’s heating and when it’s ready (often a steady light or a change from red to green). This usually takes 3-5 minutes. Do not attempt to depress the steam trigger or use any attachments until the unit signals it’s ready. Trying to force steam before the boiler is at temperature will just spit out hot water, which is ineffective and can cause water damage.
The Fundamental Motion: Wipe, Don’t Soak
This is the cardinal rule of handheld steam cleaning. Hold the nozzle 2-4 inches away from the surface. Depress the trigger to release a steady stream of steam. Do not press the nozzle directly against the surface unless you are using a specific scrubbing brush attachment designed for that purpose. Use slow, overlapping, sweeping motions—think of painting a wall. The steam needs a moment to penetrate and loosen the dirt. A common mistake is to hold the trigger down in one spot until the surface is dripping wet. This saturates the material, which can be damaging and leaves a lot of water to dry. A few seconds of steam, then move on. You will wipe the loosened grime away with your cloth (more on that next). For vertical surfaces like tiles or glass, start at the top and work your way down so dirty water and residue run downward onto uncleaned areas.
The Wipe: Your Cloth is Half the Team
You cannot steam clean without a wiping cloth. Keep a stack of clean, absorbent microfiber cloths handy. As you steam a section, immediately follow behind with a dry or slightly damp microfiber cloth, wiping in the same direction. This removes the now-loosened dirt and excess moisture. For heavily soiled areas, you may need to steam and wipe the same spot 2-3 times. Rotate to a clean section of your cloth frequently to avoid simply smearing dirt around. For glass and mirrors, a dedicated clean microfiber cloth will yield a streak-free shine. For floors, the triangular head with its attached pad often combines the steaming and wiping action, but you may still need to go over it with a dry pad for final drying.
Surface-Specific Strategies: From Grout to Grease
Now let’s apply the core technique to real-world messes. Different surfaces require slight adjustments in approach and attachment choice.
Kitchen Conqueror: Greasy Stovetops & Oven Doors
The kitchen is where steam truly shines. For a glass or ceramic stovetop, first, remove any loose debris. Attach the triangular floor head with a clean microfiber pad or use the precision jet nozzle. Heat the surface for 30 seconds with steam, then wipe immediately. For baked-on grease splatters, hold the steam on the spot for 5-10 seconds to soften it before wiping. For the interior of an oven door, the scrubbing brush attachment (if your model has one) is perfect. Apply steam with the brush, agitate gently, then wipe with a cloth. The steam will dissolve the polymerized grease without the fumes of aerosol oven cleaners.
Bathroom Blitz: Soap Scum, Mold, and Mildew
Tile, grout, and shower surrounds are steam cleaning dream surfaces. For soap scum on glass doors or tiles, use the squeegee attachment. Steam the area and immediately pull the squeegee down to remove the loosened film and water in one motion—it’s incredibly satisfying. For mold and mildew in grout lines, switch to the narrow jet nozzle or the bristle scrub brush. Aim the steam directly into the grout lines, hold for a few seconds to kill the spores and loosen the stain, then scrub with the brush while still applying steam. Wipe clean with a cloth. This method is far more effective and less toxic than bleach-based cleaners.
Living Room & Upholstery: Refreshing Fabrics
This is where extreme caution is needed. You can only steam clean fabrics labeled as “water-safe” or “steam cleanable”—this includes many synthetic microfiber sofas, some cotton canvases, and car interiors. Always spot test first. Use the fabric/upholstery attachment (a small brush head) if available. Hold the nozzle 3-4 inches above the fabric and use brief, intermittent bursts of steam, moving constantly. Never soak a cushion. The goal is to refresh and sanitize, not to wet it through. After steaming, use a dry microfiber cloth to blot any moisture and help it dry faster. For car interiors, the same technique works wonders on cloth seats, dashboards (plastic/vinyl only), and floor mats. Avoid leather unless you have a specific leather attachment and conditioner, as steam can dry it out.
Beyond Floors: Unexpected Places to Use Your Shark Steam Cleaner
Don’t limit your Shark to the bathroom and kitchen. Its handheld nature makes it perfect for dozens of other tasks.
- Refrigerator Interior: Remove shelves and drawers. Use a cloth attached to the floor head or a microfiber pad to steam and wipe the interior walls, seals, and plastic bins. It cuts through sticky spills and eliminates odors without chemical residue near your food.
- Windows and Mirrors: The squeegee attachment is a game-changer. For a streak-free finish, steam the glass and immediately squeegee it dry. You’ll never go back to spray cleaners and paper towels.
- Toilet Bowls: A hygienic dream. Aim the jet nozzle around the entire bowl, under the rim, and into the siphon jet. The steam will blast away mineral rings and biofilm. Follow with your regular toilet brush if needed.
- Garbage Cans: Inside and out. The hot steam sanitizes and deodorizes the plastic bin, killing bacteria that cause smells.
- Kids’ Toys (Plastic Only): A chemical-free way to sanitize non-electronic plastic toys. A quick once-over with steam is more effective than a wipe with a cleaner.
- Pet Areas: Clean and sanitize plastic food/water bowls (let cool first!), litter box exteriors, and dog beds (only if fabric is steam-safe). It removes odors and germs without harsh scents that can bother sensitive pet noses.
Care and Maintenance: Ensuring a Long Life for Your Shark
Your steam cleaner is a workhorse, but it needs regular TLC to perform at its peak and last for years. A neglected unit will lose pressure, sputter, and eventually fail.
The Post-Cleaning Ritual
1. Flush the System: After every cleaning session, fill the tank with fresh distilled water. Turn the unit on and let it heat. Without any attachment on, press the trigger and let steam run into a sink or bucket for 30-60 seconds. This flushes out any residual debris or loosened scale from the boiler and hose.
2. Empty Completely: Once flushed, turn off and unplug the unit. Allow it to cool for at least 30 minutes. Then, carefully open the tank cap and pour out any remaining water. Never store the unit with water in the tank. Let the tank air dry completely upside down on a towel.
3. Clean Attachments: Remove all attachments. Rinse the microfiber pads in cool water with a mild detergent, squeeze out excess water, and let them air dry completely. The plastic and metal attachments can be rinsed under warm water. Ensure all threads and connection points are clean and dry to prevent mineral bonding.
Weekly & Monthly Deep Maintenance
Every 1-2 months, perform a deeper flush. Fill the tank with a 50/50 solution of distilled water and white vinegar. Run the steam as described in the flush step above for 2-3 minutes. This mild acidic solution helps dissolve any minor scale buildup. Follow this with at least two more flushes using plain distilled water to remove all vinegar residue. If your model has a removable water tank, take it off and wipe the interior with a soft cloth. Check the steam vents on the main unit and attachments for any blockages; clear them gently with a toothpick or soft brush if needed.
Proper Storage
Store your Shark in a cool, dry place, like a closet or under a sink. Always store it upright. Coil the power cord loosely—don’t kink it. Keep all attachments together in a bag or box. This prevents damage and ensures you can find everything for your next clean.
Troubleshooting: When Things Go Wrong
Even with perfect care, you might encounter issues. Here’s how to diagnose common problems.
“My unit is heating but no steam comes out.”
This is almost always a blockage. First, ensure you used distilled water. The most common blockage point is the steam trigger mechanism itself. With the unit unplugged and cool, press and release the trigger multiple times. You might hear a slight click. Sometimes mineral particles jam it. You can try gently tapping the trigger area. If that fails, the blockage may be deeper in the hose or nozzle. Soak the attachment you were using in a vinegar-water solution, then flush the system with the vinegar solution as described in the maintenance section.
“Steam is sputtering and coming out in bursts, not a steady stream.”
This indicates the water level is too low, or you have a significant scale buildup. Refill with fresh distilled water to the proper level. If the problem persists after a vinegar flush, the heating element may be scaled over, reducing its efficiency. This may require professional servicing or, in severe cases, replacement of the unit.
“Water is leaking from the bottom or cap.”
Check that the tank cap is screwed on tightly and the gasket is clean and undamaged. Also, ensure you did not overfill the tank. If leaking persists, the tank seal or internal components may be faulty. Contact Shark customer support with your model number.
“The unit smells bad when I use it.”
This usually means mold or mildew has started to grow inside the system from storing it with residual moisture. Immediately perform a deep cleaning: flush with the vinegar-water solution, then flush multiple times with fresh distilled water. Let everything dry completely in a well-ventilated area before storing. If the smell remains, the internal hose may be contaminated, and you may need to contact the manufacturer.
Conclusion: Embrace a Cleaner, Healthier Home
You are now equipped with the knowledge to be a true Shark steam cleaner expert. You understand that its power lies not just in the heat of the steam, but in your technique, preparation, and respect for the surfaces you clean. By committing to using only distilled water, performing diligent pre-cleaning tests, mastering the “wipe, don’t soak” motion, and following a strict maintenance regimen, you will protect your investment and enjoy years of effective, chemical-free cleaning. Start with a small, easy project like your microwave interior or a bathroom mirror to build confidence. Then, move on to bigger jobs. The satisfaction of seeing grime vanish with nothing but hot water is unparalleled. You’ve not just bought a cleaner; you’ve adopted a smarter, healthier, and more sustainable cleaning philosophy. Now go forth and steam!
Frequently Asked Questions
Can I use tap water in my Shark handheld steam cleaner?
No, you should never use tap water. Tap water contains minerals that cause scale buildup inside the boiler and steam vents, leading to clogs, reduced performance, and permanent damage. Always use distilled or demineralized water for optimal function and longevity.
What surfaces should I absolutely avoid steam cleaning?
Avoid steam on any sealed, waxed, or delicate surfaces. This includes unsealed wood floors, laminate flooring, silk, wool, suede, leather (unless you have a specific attachment), painted walls, electrical panels, electronics, and any surface with peeling adhesive or wallpaper. When in doubt, perform a spot test on a hidden area first.
How long does it take for the Shark steam cleaner to heat up?
>Most Shark handheld models take between 3 to 5 minutes to fully heat up and produce steady steam. You will know it’s ready when the indicator light on the unit changes (e.g., from blinking to solid) or turns a specific color as indicated in your user manual. Never attempt to force steam before this signal.
Can the steam remove hard water stains from glass shower doors?
Yes, steam is excellent for hard water stains. Use the squeegee attachment. Apply steam to a section of the stained glass and immediately pull the squeegee down to remove the loosened mineral deposits and water. For very thick buildup, you may need to repeat the process 2-3 times. It works best when stains are not too heavily calcified.
Is it safe to steam clean my car’s cloth seats and carpet?
Yes, it is generally safe and effective for most automotive fabrics, but with caution. Use the fabric/upholstery brush attachment if available. Hold the nozzle 3-4 inches away and use short bursts of steam while moving constantly to avoid soaking the padding underneath. Always do a spot test on an inconspicuous area first, such as under the seat or near the seatbelt anchor.
What should I do if my steam cleaner starts sputtering or spitting water?
This usually indicates a scale blockage or that the unit is not fully heated. First, ensure you are using distilled water and the tank is not overfilled. Allow the unit to heat completely. If sputtering continues, perform a maintenance flush: fill the tank with a 50/50 white vinegar and distilled water solution, run steam for a few minutes, then flush the system 2-3 times with fresh distilled water until the water runs clear.