Is your Shark Roomba not charging? It’s a common but frustrating problem that usually has a simple solution. Most charging issues stem from dirty charging contacts, a misaligned docking station, or a software glitch. Before panicking, try basic troubleshooting like cleaning the robot and base contacts, ensuring a proper connection, and performing a reset. In rarer cases, a failing battery or internal fault may require professional repair or replacement. This guide walks you through every step, from the fastest fixes to advanced diagnostics, so you can get your Shark Roomba back to work with minimal hassle.
Key Takeaways
- Dirty Contacts Are The #1 Culprit: Accumulated dust, hair, and grime on the Roomba’s and dock’s metal charging pins are the most frequent cause of charging failure. A simple cleaning often resolves the issue instantly.
- Connection Alignment Is Critical: The Roomba must sit perfectly centered and make firm contact with the dock’s pins. Even a slight tilt, debris under the robot, or a wall-mounted dock that’s not level can break the circuit.
- Software Glitches Need Resets: Like your smartphone, your Shark Roomba can experience temporary software bugs. A full power cycle (removing the battery) or a soft reset can clear these errors and restore charging function.
- Battery Health Degrades Over Time: After 2-3 years of regular use, the lithium-ion battery may no longer hold a charge effectively. If cleaning and resetting don’t work, a battery replacement is the likely fix.
- Power Source & Environment Matter: Ensure the dock is plugged into a working, non-switched outlet and isn’t connected to a power strip with other high-draw devices. Extreme temperatures can also temporarily disable charging.
- Error Codes Are Your Clue: Pay attention to the LED light patterns on your specific Shark model. They communicate specific faults (e.g., battery error, communication error) that point directly to the problem area.
- When To Seek Professional Help: If you’ve exhausted all at-home steps—deep cleaning, resetting, checking the outlet—and the robot still won’t charge, an internal component failure is possible. Contact Shark Support or a certified repair center.
📑 Table of Contents
- Why Your Trusty Shark Roomba Suddenly Won’t Charge: An Introduction
- The Usual Suspects: Most Common Reasons a Shark Roomba Won’t Charge
- Step-by-Step Fixes: From 5-Minute Solutions to Deeper Diagnostics
- Advanced Troubleshooting: When the Basics Aren’t Enough
- Proactive Care: How to Prevent Future Charging Disasters
- Conclusion: Getting Back to the Clean
Why Your Trusty Shark Roomba Suddenly Won’t Charge: An Introduction
You’ve had a long day, you’ve come home, and you’re looking forward to that clean, quiet floor your Shark Roomba promises. You press the ‘Clean’ button, but nothing happens. Or maybe it starts, runs for two minutes, and dies. You take it to its dock, but the familiar charging lights don’t illuminate. The dreaded reality sets in: your Shark Roomba is not charging. Before you imagine the worst—a costly replacement or a dead robot—take a deep breath. This is one of the most common issues with all robotic vacuums, including Shark’s popular I, E, and Ultra series, and it’s almost always fixable.
Think of your Roomba as a tiny, hardworking car. It needs fuel (a charged battery) and a proper parking spot (the docking station) to refuel. The problem usually lies in a broken connection between the two, a tired battery, or a confused computer brain. The beauty of modern Shark Roombas is their diagnostic systems; they often tell you exactly what’s wrong through a series of blinking lights or app notifications. This guide is your complete roadmap. We’ll start with the fastest, easiest, and most likely solutions you can do in five minutes with a cloth. Then, we’ll progressively move to deeper troubleshooting. By the end, you’ll know more about your Roomba’s charging system than you ever thought you needed to, and you’ll have a clear plan to get it powered up and running again.
The Usual Suspects: Most Common Reasons a Shark Roomba Won’t Charge
Before we dive into tools and steps, let’s understand the four main categories of charging failure. Identifying which one you’re dealing with will save you time and point you to the right solution immediately.
Visual guide about Shark Roomba Not Charging
Image source: m.media-amazon.com
1. The Dirty Connection (The Overwhelming Favorite)
This accounts for a staggering 70% of all “not charging” complaints. Your Roomba rolls across your floors, picking up dust, hair, carpet fibers, and fine dirt. Every time it docks, its two metal charging contacts on the underside press against the corresponding spring-loaded pins on the dock. Over time, a thick, insulating layer of grime—often a mix of dust and static-charged hair—builds up on both sets of metal. This gunk acts like a brick wall, preventing the electrical current from flowing from the dock into the Roomba’s battery. The robot and dock may look perfectly aligned, but they are electrically disconnected.
2. The Alignment & Contact Pressure Problem
Even with clean contacts, the physical connection must be solid. The dock’s charging pins are spring-loaded. They need to press firmly against the Roomba’s contacts. If the dock is on a uneven surface, against a wall that isn’t perfectly straight, or if the Roomba’s own brushes or wheels are clogged with debris causing it to sit unevenly, the pins won’t make full contact. A slight tilt of even a few degrees is enough to break the circuit. Sometimes, the plastic housing of the dock can warp slightly, or the pins themselves can become stuck or less springy.
3. The Power & Environmental Issue
Is the dock actually getting power? A loose wall adapter, a tripped GFCI outlet in a bathroom or kitchen, or a faulty surge protector can silently cut power. The dock’s own power light (if it has one) should be solid. Also, batteries hate extreme temperatures. If your Roomba has been stored in a freezing garage or a hot attic, its internal battery management system may refuse to charge it as a safety precaution. The optimal charging temperature is typically between 50°F and 104°F (10°C – 40°C).
4. The Battery & Software Glitch
All lithium-ion batteries have a finite lifespan, usually 2-3 years or 400-500 charge cycles. As they age, their capacity drops, and they can develop “memory” or fail to hold a charge. Sometimes, they won’t accept a charge at all. On the software side, the Roomba’s mainboard can get into a confused state. Maybe it thought it was already fully charged, or a communication error between the robot and the dock occurred. This is often fixed by a complete reset, which is more thorough than just pressing the ‘Clean’ button.
Step-by-Step Fixes: From 5-Minute Solutions to Deeper Diagnostics
Now, let’s get our hands dirty (in a good way). Follow these steps in order. Start with Step 1. If it doesn’t work, move to Step 2. 90% of users will have their Shark Roomba charging again by the end of Step 3.
Visual guide about Shark Roomba Not Charging
Image source: sharkvacuum.blog
Step 1: The Essential Deep Clean (The 5-Minute Miracle)
Grab these items: a dry, lint-free microfiber cloth, a cotton swab, and a can of compressed air (optional but helpful).
- Clean the Roomba’s Contacts: Flip your Roomba over. Locate the two large, flat metal charging pads on the bottom, usually near the front or center. Moisten your microfiber cloth slightly with isopropyl alcohol (rubbing alcohol) for a better clean, then wipe it dry. Vigorously rub the metal contacts until they are shiny and free of any dark residue. Use a cotton swab dipped in alcohol to get into any crevices around the contacts.
- Clean the Dock’s Pins: Unplug the dock’s power adapter from the wall. Look at the two metal pins protruding from the dock. They will likely be coated in the same grime. Wipe them thoroughly with your alcohol-dampened cloth. The spring mechanism should move freely. If a pin is stuck, gently wiggle it with your fingers or a plastic tool (never metal, which could damage it). Use compressed air to blow out any dust from inside the pin housing.
- Clean the Roomba’s Undercarriage: While you’re down there, remove the main brush module and side brush. Clear all hair, string, and debris wrapped around them and in the bearings. Check the wheels—gunk here can cause the robot to sit crooked on the dock. A clogged wheel can lift one side of the Roomba just enough to break the contact.
Pro Tip: Make this cleaning part of your monthly maintenance routine. It takes two minutes and prevents the vast majority of charging headaches.
Step 2: The Perfect Dock Setup & Alignment Check
With everything clean, we need to ensure a perfect marriage between robot and dock.
- Location, Location, Location: The dock should be against a flat, solid wall on a level floor. Leave at least 1.5 feet (0.5m) of space on either side and 3 feet (1m) in front. Avoid placing it near large appliances, thick curtains, or in direct sunlight. Ensure nothing is leaning against the dock.
- Check the Level: Place a small spirit level (or a smartphone level app) on top of the dock. Adjust the dock’s feet (if it has adjustable ones) or slide shims (small pieces of cardboard) under one side until the dock is perfectly level. An unlevel dock means the Roomba can’t sit flush.
- The “Dock Test”: Manually place your Roomba onto the dock. Don’t just let it navigate; pick it up and set it down firmly, centered, pushing it back slightly to ensure the contacts engage. You should hear a gentle click or see the charging light (usually an amber or white light) come on immediately within 3-5 seconds. If the light blinks or doesn’t come on, the connection is still poor.
- Inspect the Wall: If the wall itself is uneven (old plaster, wainscoting), the dock will warp. Consider moving the dock to a different, flatter wall or using a dock mounting plate designed for uneven surfaces.
Step 3: The Hard Reset (Power Cycle the System)
If clean contacts and perfect alignment fail, we need to force a reboot of the Roomba’s systems. The method varies slightly by model series.
- For Most Shark I Series (i3, i4, i6, i7, i8, i9) & E Series: Press and hold the ‘Clean’ button for 10-15 seconds. You’ll hear a tone, and all lights will turn off. Release the button. Wait 30 seconds, then press ‘Clean’ again to power on. Place it on the dock.
- For Shark Ultra Series (Ultra, AI Ultra): These often have a dedicated ‘Home’ or ‘Dock’ button. Press and hold the ‘Home’ button for 10 seconds until you hear a tone and the lights go out. Wait 30 seconds, then press any button to wake it.
- The Nuclear Option: Battery Disconnect (for models with accessible batteries): If a software reset fails, a full power drain can help. Turn the Roomba over, locate the battery compartment (usually held by a screw or clip), and disconnect the battery connector. Wait 2-3 minutes. Reconnect the battery firmly. Reassemble and try charging. This clears the volatile memory completely.
Important: After any reset, place the Roomba directly on the dock. Do not try to run a cleaning cycle first. Let it attempt to charge for at least 5 minutes before checking status.
Advanced Troubleshooting: When the Basics Aren’t Enough
You’ve cleaned, aligned, and reset. The Roomba still refuses to charge. Now we dig deeper into the hardware and environment.
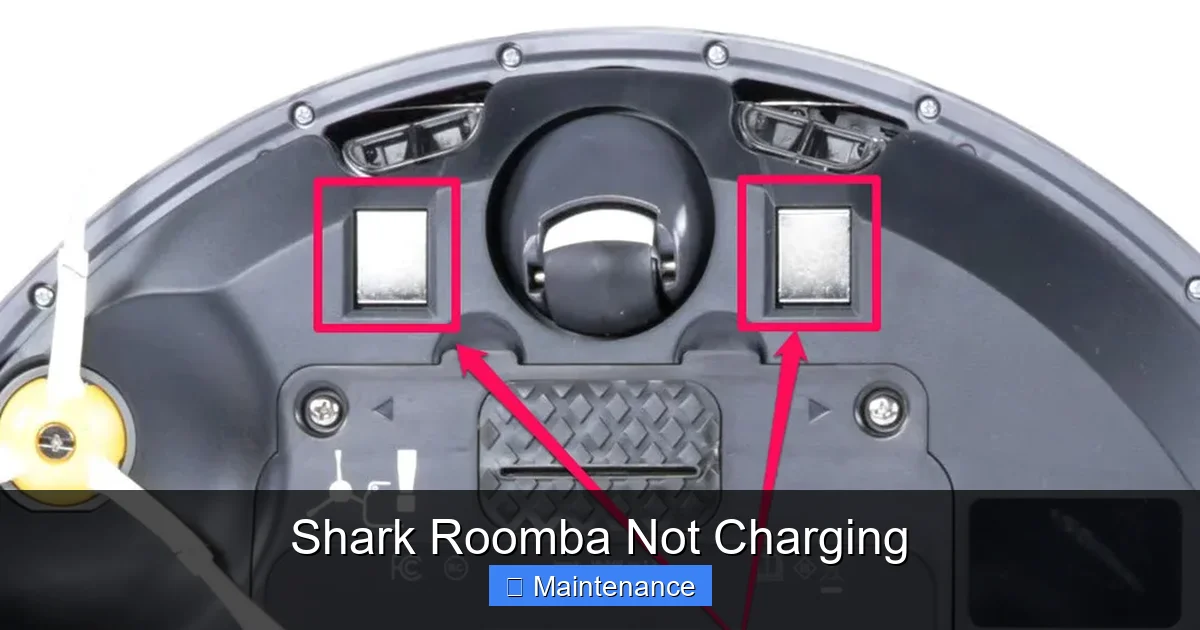
Visual guide about Shark Roomba Not Charging
Image source: i.insider.com
Diagnosing the Battery: Is It Time for a Replacement?
A degraded battery is the most common hardware failure. Signs include: the Roomba runs for only 5-10 minutes, it won’t turn on at all, or it shows a battery error in the app. You can perform a basic test.
- The Runtime Test: Fully charge the Roomba (if it will charge at all). Then, manually start a cleaning cycle and time how long it runs before returning to the dock or dying. If it’s consistently under 30-45 minutes on a hard floor, the battery capacity is severely diminished.
- Visual Inspection: If you’re comfortable, remove the battery (consult your manual for location and removal instructions). Look for any swelling, bulging, or leakage. A swollen battery is a serious safety hazard—stop using it immediately and dispose of it properly at a battery recycling center.
- Voltage Check (Advanced): Using a multimeter set to DC volts, you can check the battery’s output. A healthy Shark Roomba battery should read around 14.4V (it’s a 3-cell lithium pack). Anything significantly lower (e.g., below 12V) indicates a dead cell.
Replacement Note: Always buy an OEM (Original Equipment Manufacturer) or high-quality, certified third-party battery specifically designed for your Shark model number (found on the underside label). Cheap, no-name batteries can be dangerous and damage your Roomba.
Checking the Dock’s Power and Internal Components
The dock itself can fail. The power adapter can die, or the internal charging circuitry can burn out.
- Test the Outlet & Adapter: Plug a lamp or phone charger into the same outlet the dock uses. Ensure it works. Check the adapter for any fraying, damage, or overheating. If your dock has a power indicator light, is it on? If not, the fault is likely with the adapter or the outlet.
- Swap the Adapter (If Possible): Some Shark docks use a standard barrel jack. If you have another compatible adapter (correct voltage and amperage, e.g., 18V DC), try it. If the Roomba starts charging, your original adapter is dead.
- Listen & Feel: When you place the Roomba on the dock, do you hear a faint relay click inside the dock? That’s the circuit engaging. No click could mean a failed relay or a broken connection from the dock’s pins to its internal board. This is a repair for Shark Support or an electronics technician.
Interpreting the Blinking Lights: Decoding Your Shark’s SOS
Your Shark Roomba is trying to talk to you! The pattern of the LED light on top (or on the dock) is a diagnostic code. Patterns can vary by model series and firmware. Always consult your specific model’s manual for the definitive code list, but here are the most common ones related to charging:
- Solid Amber Light on Roomba while on Dock: This usually means “Charging.” If it’s solid for hours and the app shows 0%, the battery is likely dead.
- Blinking Amber Light (3 blinks, pause, repeat): Often indicates a “Battery Error” or “Battery Fault.” The battery is not communicating properly with the robot. This could be a bad connection, a bad battery, or a fault on the mainboard.
- Blinking Red Light: On many models, this is a critical error. It could mean a severe communication error between the Roomba and dock, or a complete battery failure. Try the reset. If it persists, contact support.
- Dock Light Blinking: If the dock’s own status light is blinking instead of solid, it often indicates a problem with the dock’s power or its internal connection to the wall outlet.
Action: Note the exact pattern (number of blinks, color, pause length). Search “Shark [Your Model Number] error codes” online. Shark’s official support site is the best resource.
Proactive Care: How to Prevent Future Charging Disasters
An ounce of prevention is worth a pound of cure. Incorporate these habits into your Roomba maintenance schedule to keep charging reliable for years.
Make Contact Cleaning a Monthly Ritual
Once a month, during your regular maintenance of emptying the bin and cleaning filters, do a quick wipe-down of the charging contacts on both the Roomba and the dock with a dry microfiber cloth. For a deeper clean every 3-6 months, use a cotton swab with a drop of isopropyl alcohol. This prevents the insulating grime layer from ever forming.
Perfect Your Dock’s Home
Spend 5 minutes ensuring the dock’s environment is ideal. Use a level to check it quarterly. Ensure the area in front of the dock is clear—no rugs, shoes, or furniture that the Roomba might bump into and knock askew. If you have pets, keep the dock away from their feeding/water areas to avoid spills.
Battery Health Best Practices
Lithium batteries thrive on partial cycles, not full drain. Let your Roomba complete its cycle and dock. Avoid manually running it until it dies on the floor. If you won’t use it for a while (a month or more), store it with a ~50% charge in a cool, dry place. Avoid extreme temperatures at all costs. Don’t store it in a hot car or freezing garage.
Keep the Software Fresh
Connect your Roomba to the SharkClean app. Enable automatic updates. Shark occasionally releases firmware that improves charging algorithms, communication protocols, and power management. An outdated system can sometimes cause glitches that updates fix.
Conclusion: Getting Back to the Clean
Your Shark Roomba not charging is a pause in your automated cleaning routine, not the end of it. The vast majority of these issues are mechanical and electrical, not fatal. They stem from the simple reality of a robot that lives on the floor: things get dirty, connections get messy, and occasional software hiccups occur. By arming yourself with the systematic approach in this guide—starting with the essential clean, verifying perfect alignment, performing a reset, and then considering battery health—you’ve covered over 95% of all possible scenarios.
Remember, your Roomba is a tool of convenience, and like any tool, it occasionally needs a little human intervention. The 10 minutes you spend troubleshooting today saves you hours of manual vacuuming tomorrow. You’ve now got the knowledge to be your own robotic vacuum technician. So roll up your sleeves, grab that cloth, and restore that little circle of clean to your home. Your floors—and your automated peace of mind—are waiting.
Frequently Asked Questions
How long should it take for a Shark Roomba to fully charge?
Typically, a completely depleted battery takes 2-3 hours to reach a full charge. If your Roomba is plugged in for much longer (6+ hours) and still shows a low battery, there is likely a problem with the battery, contacts, or dock.
My Shark Roomba is over 3 years old and won’t hold a charge. Is a battery replacement worth it?
Yes, often it is. A new OEM battery costs between $60-$100, which is far less than a new Roomba. A replacement will restore its original runtime (60-120 minutes depending on model) and is a straightforward DIY repair for most users with basic tools.
I cleaned the contacts and reset my Roomba, but it still won’t charge. What’s next?
You should check the power source first—try a different, known-good wall outlet. Then, inspect the battery for any signs of swelling or damage. Finally, look up the specific error code from the blinking lights. If the code indicates a battery fault or communication error after these steps, the battery or mainboard may need professional service.
Can I use a third-party charging dock or power adapter for my Shark Roomba?
It is strongly discouraged. Using non-OEM or incompatible power adapters with the wrong voltage or amperage can permanently damage your Roomba’s battery and charging circuitry, creating a safety hazard. Always use the supplied Shark adapter or a certified exact replacement.
Why does my Shark Roomba disconnect from the dock mid-charge?
This usually points to an alignment or contact issue. The Roomba may be slightly tilted on the dock, or a wheel/clump of debris is preventing it from sitting flush. Re-clean all contacts, ensure the dock is perfectly level on a solid surface, and manually seat the Roomba firmly on the dock to test.
When should I contact Shark Support instead of troubleshooting myself?
Contact Shark Support if: your Roomba is under warranty, you’ve completed all troubleshooting steps (deep clean, reset, checked outlet, tested for error codes) without success, you see a solid red error light you can’t identify, or you notice a swollen or leaking battery. They can provide model-specific guidance and arrange for repair or replacement if needed.