Is your Shark Navigator vacuum losing suction and feeling “empty”? This guide breaks down the most common causes—from clogged filters to full dust cups—and provides step-by-step fixes. Learn essential maintenance rituals to keep your vacuum performing at its peak, and discover when it’s time to seek professional help. Don’t replace it yet; troubleshoot like a pro!
Hey there! Have you ever been in the middle of cleaning, your Shark Navigator humming along, only to realize it’s just pushing dirt and dust around instead of actually sucking it up? That frustrating feeling—when the vacuum seems completely “empty” of its usual power—is more common than you think. We’re not talking about a specific Shark model called the “Empty.” Instead, this is a handy term homeowners use to describe that exact symptom: a vacuum that runs but has zero cleaning efficacy. It’s incredibly annoying, but here’s the great news: in most cases, you don’t need a new vacuum. You just need to play detective for a few minutes. This guide will walk you through exactly why your Shark Navigator might feel empty, how to diagnose it step-by-step, and the simple maintenance rituals that will have it working like new again. Let’s get into it!
Key Takeaways
- An “Empty” Shark Navigator means lost suction, not an actual model. The term describes a vacuum that runs but fails to pick up debris effectively.
- 90% of suction loss issues stem from simple maintenance neglect. Clogged filters, a full dust cup, or blocked airways are the usual suspects.
- Always perform the “Suction Test” first. Remove the hose and check suction at the wand to isolate the problem location.
- Filter hygiene is non-negotiable for performance. Washable foam and felt filters must be completely dry before reinsertion to prevent motor damage.
- The brush roll is a common tangle point. Hair and fibers must be removed regularly to maintain agitation and prevent belt wear.
- Air leaks are silent performance killers. Check all connections, the dust cup seal, and hose cracks for gaps that break suction.
- If basic fixes fail, the motor or internal fan may be faulty. This often requires a professional assessment versus a DIY repair.
📑 Table of Contents
- What Does “Empty Shark Navigator Vacuum” Actually Mean?
- Diagnosing the “Empty” Feeling: A Step-by-Step Guide
- Essential Maintenance Rituals to Prevent an “Empty” Vacuum
- Advanced Troubleshooting: When the Basics Don’t Work
- Maximizing Your Shark Navigator’s Performance: Pro Tips
- Conclusion: From “Empty” to Empowered
What Does “Empty Shark Navigator Vacuum” Actually Mean?
First, let’s clear up the terminology. Shark doesn’t sell a model named “Empty Navigator.” The phrase “Empty Shark Navigator Vacuum” has become a popular search query because it perfectly captures the user experience. You press the power button, you hear the motor, the brush roll might even be spinning, but the vacuum leaves behind a trail of debris. It feels like the machine is empty of its core function: suction. This is a classic symptom of a loss of suction issue, and it’s the single most common problem with bagless vacuums like the Shark Navigator series.
Understanding this distinction is crucial. You’re not dealing with a defective product from the start. You’re dealing with a system that has developed a clog, a leak, or a maintenance oversight. The Shark Navigator’s entire cleaning system relies on a perfect seal and clear airways. Think of it like drinking through a straw. If you cover the top hole, liquid won’t flow. If the straw has a crack, you’ll slurp air. Your vacuum works on the same principle. An “empty” feeling means the airflow path has been compromised somewhere between the brush roll and the exhaust port.
The Science of Suction (Made Simple)
Suction isn’t magic; it’s physics. Your Shark Navigator’s motor creates a negative pressure inside the machine—a vacuum, literally. This pressure difference pulls air (and the dirt in it) from the floor, through the brush roll, up the wand, into the dust cup, and finally out the exhaust. If any part of that journey is blocked, leaking, or inefficient, the pressure drops. You get less airflow, measured in CFM (Cubic Feet per Minute), and less dirt removal. The motor might be working at 100%, but the system’s output is 20%. That’s the “empty” feeling. Our goal is to find where the bottleneck or leak is happening.
Diagnosing the “Empty” Feeling: A Step-by-Step Guide
Before you start taking things apart, you need to locate the problem. Is the suction loss happening at the floor head, or is the vacuum itself weak? This quick diagnostic will save you hours of guesswork.
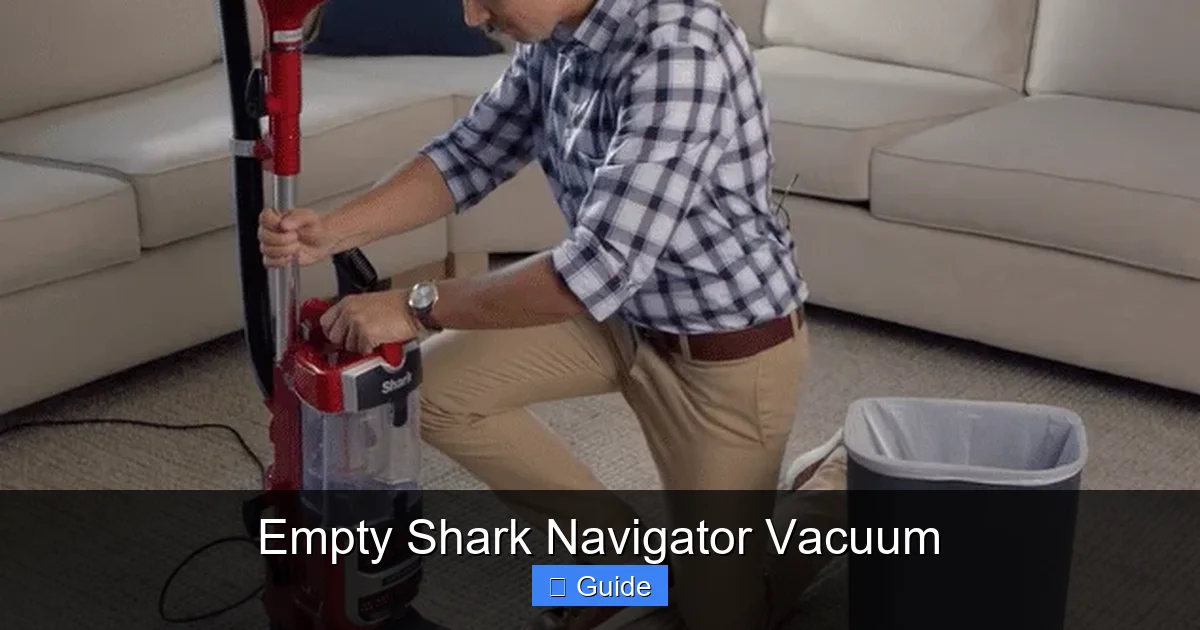
Visual guide about Empty Shark Navigator Vacuum
Image source: cleanersadvisor.com
The Critical Suction Test
This is your first and most important step. It takes 30 seconds and tells you everything. Go ahead and turn your Shark Navigator on. Now, detach the hose from the vacuum’s body. Hold your hand over the exposed hose inlet on the vacuum. Do you feel a strong, steady pull? If yes, the motor and internal fans are generating good suction. The problem is likely in the hose, wand, or floor head. If the suction feels weak or nonexistent at that port, the issue is inside the main body—likely the filters, dust cup, or a major internal clog.
Let’s say you felt strong suction at the vacuum body. Now, reattach the hose and remove the floor head (the part with the brush roll). Place your hand over the wand’s handle end. Is the suction strong there? If it’s strong at the wand but weak at the floor head, the blockage is in the hose or the floor head itself. If it’s weak at the wand, the clog is somewhere in the hose. This logical isolation is the key to efficient troubleshooting.
Visual Inspection Checklist
Once you have a hypothesis, do a quick visual sweep. Look for the obvious:
- The Dust Cup: Is it completely full? Even if it looks half-full, a packed filter mesh inside the cup can choke airflow. Is the cup sealed properly? A misaligned or cracked rubber gasket around the cup’s lid will create a massive air leak.
- The Filters: Your Navigator has at least two: a foam pre-motor filter and a felt post-motor filter (sometimes a third pleated filter). Are they visibly dirty, gray, and clogged with dust? Have they been washed recently? A filter caked with debris is the #1 cause of an “empty” vacuum.
- The Hoses and Wand: Disconnect them and look through. Can you see light through the entire length? Use a long, flexible brush or even a straightened wire coat hanger (gently!) to feel for obstructions. Common blockages are pet hair balls, small toys, or long fibers that have wrapped and compacted.
- The Brush Roll: Flip the vacuum over. Is the brush roll spinning freely, or is it jammed with hair? A tangled brush roll can’t agitate carpet, and if it’s completely stopped, it can also strain the belt and reduce suction at the floor. Also, check the rubber seals around the brush roll housing for tears.
Essential Maintenance Rituals to Prevent an “Empty” Vacuum
Prevention is always better than cure. These aren’t one-off fixes; they’re habits. Incorporate them into your cleaning routine, and you’ll rarely experience that dreaded “empty” feeling.
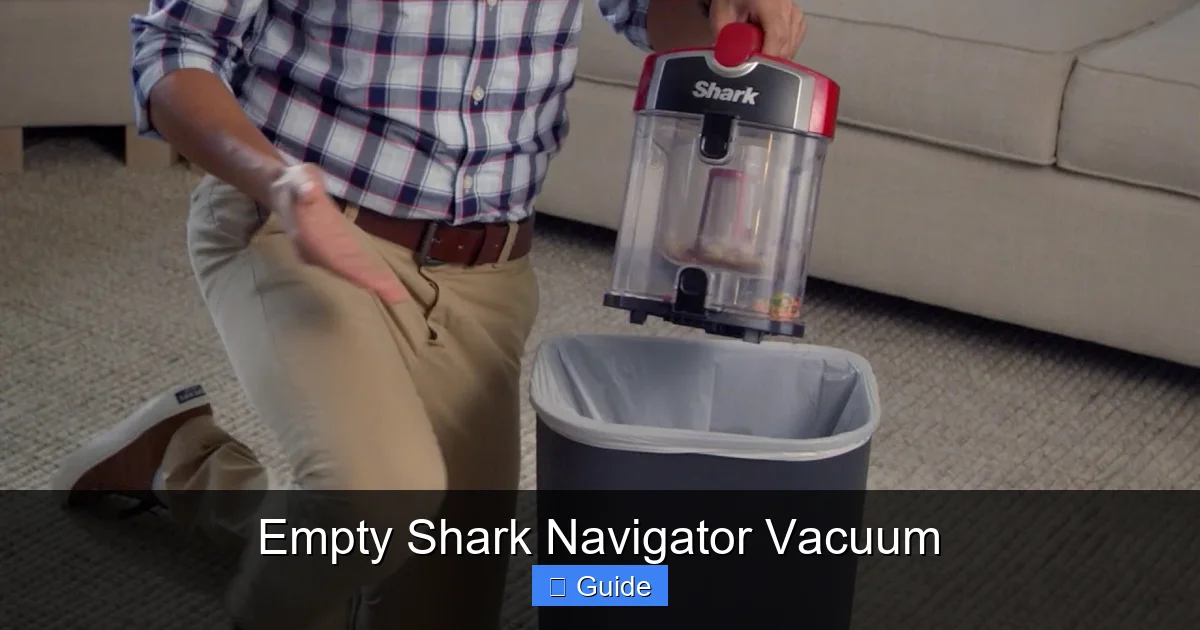
Visual guide about Empty Shark Navigator Vacuum
Image source: i.ytimg.com
Filter Care: The Heart of the Matter
Your filters are the vacuum’s lungs. They trap fine dust to protect the motor, but they get dirty fast. For Shark Navigators with washable filters (most are), here is the gospel:
- Frequency: Clean the foam pre-motor filter every 3 months with light use, and monthly if you have pets or allergies. The post-motor felt filter can be tapped out every few months but only washed once a year, if at all (check your manual).
- Method: Use only cold water and mild soap. Gently squeeze and rinse. Never wring or twist the foam, as it can tear. Rinse until water runs clear.
- Drying: This is the #1 mistake. The filter must be 100% bone-dry for at least 24 hours before reinserting. Any moisture will travel to the motor, causing corrosion and failure. Place it in a warm, airy spot, not on a radiator.
- Replacement: Filters degrade. Even with washing, they become less effective over 1-2 years. Keep spare filters on hand. A clogged, old filter is as bad as a dirty one.
Dust Cup Deep Cleaning
Emptying the dust cup is just step one. Once a month, do a deep clean:
- Remove the dust cup and take it to the sink.
- Disassemble it if your model allows (usually a latch separates the top from the bottom).
- You’ll see a mesh screen or filter inside. This is the cup’s internal filter. Scrub it with a soft brush under running water. This mesh gets clogged with fine dust that the main filters miss.
- Wipe down the entire interior and exterior of the cup. Ensure the rubber seal on the lid is clean and supple; wipe it with a dry cloth.
- Let every part dry completely before reassembly. A wet dust cup will promote mold and mildew.
Brush Roll & Agitator Maintenance
The brush roll (agitator) is where the action happens, but it’s a magnet for hair.
- Weekly Check: Flip the vacuum over. Use a seam ripper or scissors to cut and remove any hair wrapped around the bristles and end caps. Don’t pull with your fingers; you’ll damage the bristles.
- Belt Inspection: If the brush roll isn’t spinning, the belt might be broken or slipped off. Turn the vacuum over and look at the brush roll. Can you see a rubber belt connecting it to the motor shaft? If it’s missing or loose, it needs replacement. Belts are inexpensive and easy to swap.
- Lubrication: Some models have bearings on the brush roll ends that need occasional lubrication. A drop of light machine oil (not WD-40) once a year keeps it spinning freely.
Advanced Troubleshooting: When the Basics Don’t Work
Okay, you’ve cleaned all the filters, cleared every hose, and the dust cup is spotless. The suction test from Step 1 showed weak power at the vacuum body itself. Now what? It’s time to look deeper.
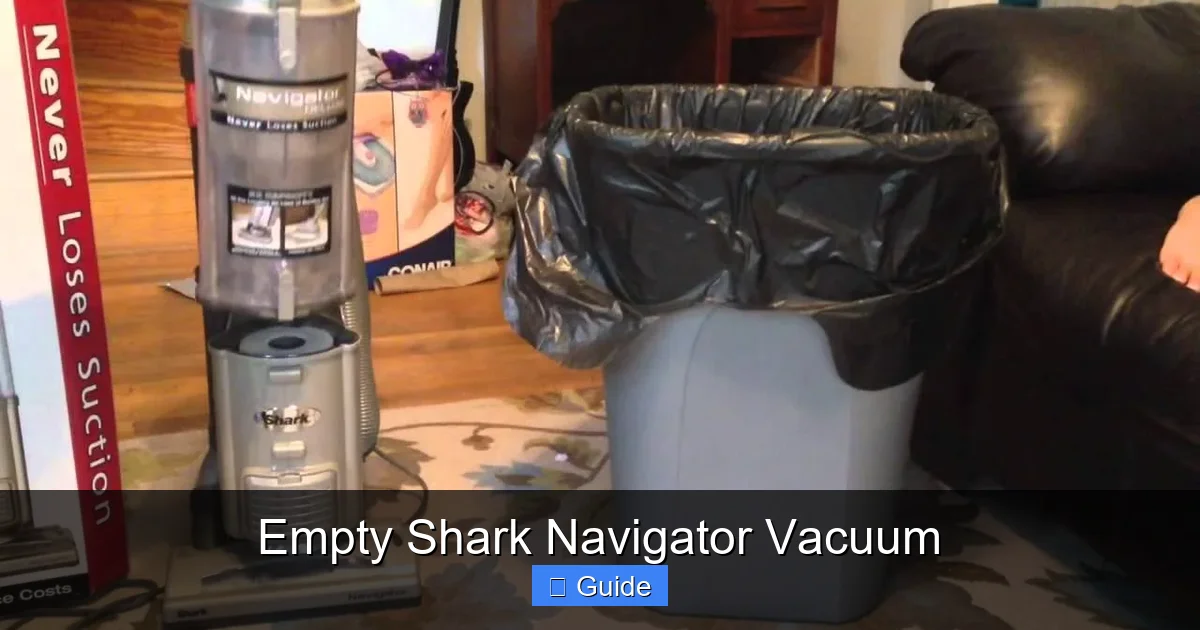
Visual guide about Empty Shark Navigator Vacuum
Image source: i.ytimg.com
Checking for Internal Clogs
The most stubborn blockages hide inside the vacuum’s body, between the dust cup and the motor fan. Shark Navigators have a straight-through air path, but debris can still compact in the bends.
- The “Blow-Out” Method: With the dust cup removed, take the vacuum outside. Using a long, narrow tool like a straightened wire coat hanger (wrapped in duct tape to avoid scratches), gently probe the inlet where the dust cup connects. You might feel a compacted plug of dirt. Carefully break it up and pull it out.
- Reverse Airflow: Some users have success using a leaf blower or the exhaust of another vacuum to blast air back through the system from the exhaust port. Caution: This can force debris further in if not done carefully. It’s a last-resort technique.
Identifying Air Leaks
An “empty” vacuum can also be caused by a leak that’s breaking the suction seal. You have to be a detective here.
- Dust Cup Gasket: That black rubber ring on the cup’s lid is critical. If it’s cracked, flattened, or missing, air is sneaking in. Replace the entire dust cup lid assembly if the seal is bad.
- Hose Connections: The points where the hose clicks into the vacuum body and the wand are sealed with internal O-rings. If these are missing or damaged, you’ll hear a hissing sound and feel reduced suction. Check and replace these tiny O-rings.
- Cracked Hoses: Inspect the entire length of the hose, especially near the ends where it bends. A small crack or split will kill suction. Shine a light inside the hose while flexing it to spot flaws.
Maximizing Your Shark Navigator’s Performance: Pro Tips
Getting your vacuum working again is one thing. Keeping it performing at its absolute best is another. These tips will extend its life and cleaning power.
Surface-Specific Settings
Your Navigator likely has a suction control or brush roll on/off switch. Using the wrong setting is inefficient and can cause the “empty” feeling.
- Hard Floors (Hardwood, Tile, Laminate): Turn the brush roll OFF. The bristles can scatter debris on smooth surfaces. Use the suction-only mode or a bare-floor tool. This also prevents scratching delicate floors.
- Low-Pile Rugs & Area Rugs: Use the brush roll ON with standard suction. The agitation is needed to pull debris from the weave.
- High-Pile Carpets & Shag: Use the highest suction setting. The deep pile needs maximum pull to extract dirt. Ensure the brush roll is clean; tangled hair will cause it to stall on thick carpet.
Tool & Accessory Strategy
Don’t just use the main floor head for everything. The “empty” feeling might just be you using the wrong tool for the job.
- Crevice Tool: For tight spaces between cushions and baseboards. Its narrow design creates higher velocity suction.
- Dusting Brush: The soft bristles are for surfaces like blinds, lampshades, and furniture. Using the floor head here would just blow dust around.
- Upholstery Tool: Its wider opening and stiffer bristles are perfect for sofas and car interiors. It provides better contact and suction on fabric.
Using the correct tool ensures all the vacuum’s power is directed where it’s needed, preventing the perception of being “empty.”
Conclusion: From “Empty” to Empowered
That feeling of helplessness when your Shark Navigator seems empty of power is incredibly frustrating, but it’s almost always a solvable puzzle. Remember the core principle: your vacuum is a sealed airflow system. An “Empty Shark Navigator Vacuum” is simply a system with a leak or a blockage. By methodically performing the Suction Test, you can pinpoint the issue to the main body, the hose, or the floor head. Then, armed with your maintenance tools—soap, water, a seam ripper, and a bit of patience—you can address the most common culprits: filthy filters, a packed dust cup mesh, a hair-tangled brush roll, or a cracked hose seal.
Embrace these maintenance rituals not as chores, but as empowerment. A clean filter and a clear hose mean your vacuum works harder so you don’t have to. You’ll extend the life of your machine, save money on replacements or repairs, and most importantly, enjoy a truly clean home where the vacuum actually picks up the dirt. So next time you get that “empty” feeling, don’t panic. Put on your detective hat, follow this guide, and get your Shark Navigator back to its powerful, efficient self. You’ve got this!
Frequently Asked Questions
Why is my Shark Navigator making a loud noise but not picking up dirt?
This usually indicates a severe clog or a completely blocked filter. The motor is straining because it can’t pull air. Immediately turn it off and check the filters and dust cup first. A loud, high-pitched squeal can also mean a broken brush roll belt.
How often should I really wash the filters on my Shark Navigator?
For optimal performance, wash the foam pre-motor filter every 1-3 months depending on use. If you have pets, allergies, or vacuum frequently, lean toward monthly. The post-motor felt filter should only be washed if visibly soiled, typically once a year, and must dry for 48 hours.
Can I use my Shark Navigator without the dust cup installed?
Never. The dust cup is a critical part of the sealed system. Running the vacuum without it will cause dirt and dust to blow directly out the exhaust, creating a mess and potentially damaging the motor by allowing large debris to enter.
What does the “empty” indicator light on some Shark models mean?
If your Navigator has an “Empty” or “Check” LED, it typically means the dust cup is full and needs emptying, or the cup isn’t seated properly. It’s a reminder, not an error code. Empty the cup and ensure it clicks securely into place.
How do I unclog a stubborn hose on my Shark Navigator?
Disconnect the hose from both ends. Use a long, flexible brush designed for vacuum hoses. For solid blockages, try carefully feeding a thin, flexible rod (like a plumbing snake) through while rotating. As a last resort, use low-pressure water from a hose to flush it out from one end, then let it dry completely for 24+ hours.
When should I stop troubleshooting and call a professional?
If you’ve verified strong suction at the vacuum body with the hose detached, and you’ve replaced all filters with new ones, the problem is likely internal—a failed motor, broken fan blade, or a severely clogged internal duct. At this point, professional repair is often more cost-effective than replacing the entire unit.