Your Shark Navigator’s beater bar (brush roll) is its cleaning heart. When clogged with hair, fibers, and debris, suction plummets and motor strain increases. The Clean Beater Bar Shark Navigator isn’t a gimmick—it’s a specialized maintenance tool designed to safely and thoroughly clear this critical component. Regular use prevents costly repairs, restores deep-cleaning power, and keeps your vacuum running like new for years.
Let’s have a real talk about your Shark Navigator vacuum. You bought it for its powerful suction and reputation for tackling pet hair and ground-in dirt. But lately, you’ve noticed it’s not pulling like it used to. It might even sound different—a high-pitched whine instead of that deep, satisfying roar. You’ve checked the hose for clogs, emptied the bin, and maybe even changed the filter. But the problem persists. I’m here to tell you, with near certainty, the culprit is hiding in plain sight: your beater bar is choked. And the solution isn’t a complicated repair; it’s a simple, proactive habit using a tool specifically designed for the job: the Clean Beater Bar Shark Navigator.
This isn’t about selling you another gadget. This is about understanding the single most important maintenance task for your Shark vacuum. The beater bar, also called a brush roll, is the hard-working engine of your carpet cleaning. It’s the spinning cylinder with bristles that literally beats dirt out of your carpets. When it gets bound up with hair, string, carpet fibers, and bits of debris, it can’t spin freely. Your vacuum’s motor has to work harder, suction drops dramatically, belts snap, and eventually, the motor itself can burn out. The “Clean Beater Bar Shark Navigator” tool is your first line of defense against this cascade of failure. Let’s dive deep into exactly why this little tool is a game-changer for any Shark Navigator owner.
Key Takeaways
- The beater bar is the primary cleaning mechanism: It agitates carpet fibers to lift embedded dirt. If it’s jammed, your vacuum’s main job fails.
- Neglect leads to a chain reaction of problems: Clogs cause suction loss, motor overheating, belt breakage, and premature wear on the entire machine.
- The Clean Beater Bar Shark Navigator is a purpose-built tool: Its unique design fits Shark’s brush roll cavities and safely removes wrapped debris without damaging bristles.
- Prevention is cheaper than repair: A 5-minute monthly clean with this tool saves you from $50+ belt replacements or $200+ motor repairs.
- Compatibility is key: This tool is engineered for specific Shark Navigator models (mostly Rotator and Professional series). Always verify your model number first.
- Hygiene matters: A clean beater bar eliminates trapped dust, allergens, and bacteria, improving your home’s air quality during cleaning.
- It empowers you as the owner: You no longer need a service call for a simple, common jam—you can fix it instantly yourself.
📑 Table of Contents
- Understanding the Heart of Your Shark: The Beater Bar
- Why “Just Suction” Isn’t Enough: The Domino Effect of a Dirty Beater Bar
- The Clean Beater Bar Shark Navigator: Your Specialized Maintenance Tool
- Step-by-Step: Mastering Your Clean Beater Bar Maintenance Routine
- Troubleshooting: What to Do When Cleaning Isn’t Enough
- Compatibility and Model-Specific Considerations for Shark Navigator
- The Long-Term Payoff: More Than Just a Clean Vacuum
- Conclusion: Embrace Proactive Ownership
Understanding the Heart of Your Shark: The Beater Bar
Before we talk cleaning, we need to understand what we’re cleaning. The beater bar (or brush roll) is a long, cylindrical roller, usually made of plastic or metal, covered in rows of stiff bristles. It sits at the suction head’s base, powered by a belt connected to the vacuum’s motor. When engaged (usually via a switch on the handle or head for hard floors), it spins rapidly—often several hundred RPMs.
The Dual-Action Cleaning System
Your Shark Navigator’s power comes from a one-two punch:
- Agitation: The spinning bristles scrub and “beat” the carpet pile, loosening dirt, dust, and allergens that are trapped deep within the fibers. This is the mechanical action that a suction-only vacuum can’t replicate.
- Suction: Once dislodged, the powerful suction from your motor lifts that debris off the carpet and into the vacuum’s bin or bag.
If the beater bar can’t spin freely due to a clog, the agitation stops. You’re left with just suction, which is great for hard floors but largely ineffective on carpets for deep cleaning. You’re essentially using a $300+ vacuum as a $50 suction-only model.
What Exactly Jams the Beater Bar?
It’s not just dust. The main culprits are long, stringy materials that wrap around the axle and bristles:
- Human & Pet Hair: The #1 offender. It wraps tightly and compacts with each rotation.
- Carpet Fibers: Especially from low-pile or berber-style carpets that shed.
- String, Yarn, Ribbon: Anything with a filament-like structure will seek out that central axle and wind itself into a tight knot.
- Small Objects: Socks, hair ties, bits of paper, or plastic can jam between the bristles or block the end caps.
Over time, this wrapped material creates a dense, felt-like jacket around the brush roll. It stops spinning, puts immense strain on the rubber drive belt (causing it to slip, heat up, and break), and forces the motor to labor under extreme load.
Why “Just Suction” Isn’t Enough: The Domino Effect of a Dirty Beater Bar
You might be tempted to just switch your Navigator to “suction-only” mode (if it has one) and avoid the problem. But this is a temporary workaround with significant downsides. A neglected beater bar starts a costly domino effect in your vacuum’s mechanics.
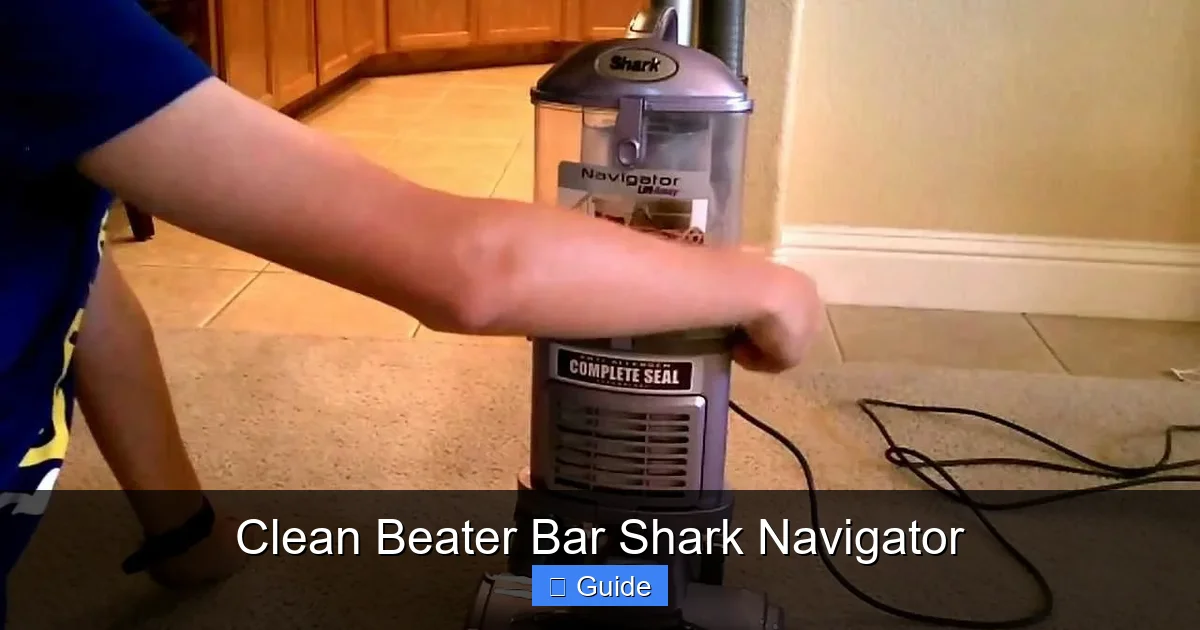
Visual guide about Clean Beater Bar Shark Navigator
Image source: i.ytimg.com
1. Immediate Loss of Cleaning Performance
The most obvious effect. Your carpets will look visibly duller and feel less refreshed after vacuuming. The deep-down grit that causes carpet wear and allergen buildup remains. You’re not getting what you paid for.
2. Belt Failure: The First Mechanical Casualty
The rubber drive belt connects the motor shaft to the beater bar. A jammed bar prevents the belt from moving freely. This causes the belt to slip, overheat, stretch, and eventually snap. You’ll hear a distinct “squealing” or “burning” smell, and the brush roll will stop entirely. Replacing a belt is a $15-$30 part and a 10-minute DIY job, but it’s a symptom of the larger problem.
3. Motor Overload and Premature Failure
The motor is designed to turn the belt and brush roll under normal resistance. A seized brush roll creates massive resistance. The motor draws more electrical current (amperage) to try to turn, overheating the windings. This can lead to premature motor failure—a repair that often costs more than half the price of a new vacuum.
4. Bearing and End Cap Damage
The brush roll spins on bearings inside plastic end caps. When jammed, these bearings can crack or melt from friction and heat. Replacing these requires a new brush roll assembly, which is a more expensive part.
5. Hygiene and Air Quality Hazard
That dense mat of hair, skin cells, dust mites, and carpet fibers becomes a breeding ground for bacteria and allergens. Every time you run the vacuum, you’re potentially recirculating these particles if the seal is compromised. A clean beater bar is part of a healthy cleaning system.
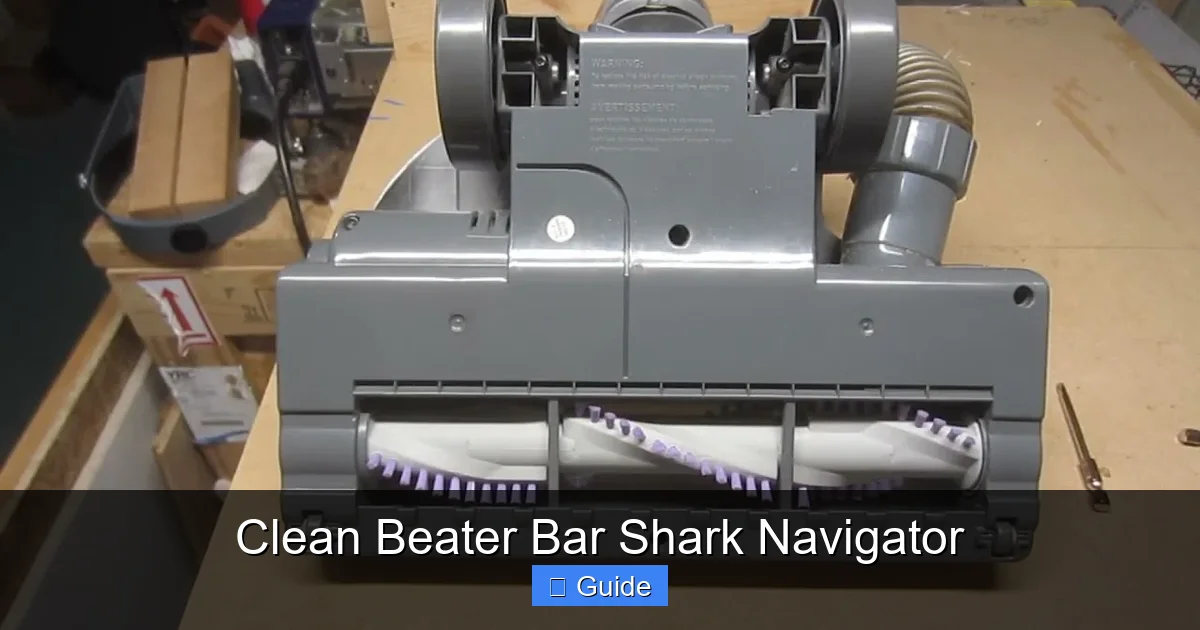
The Clean Beater Bar Shark Navigator: Your Specialized Maintenance Tool
So, you’ve confirmed the problem. You’ve tipped your Navigator over, looked at the brush roll, and seen the solid mat of debris. Your first instinct might be to grab a pair of scissors or a butter knife. Stop. Using improper tools is how you accidentally slice through the bristles, crack the plastic end caps, or damage the delicate bearings. This is where the purpose-built Clean Beater Bar Shark Navigator tool shines.

Visual guide about Clean Beater Bar Shark Navigator
Image source: sharkvacuum.blog
Design Philosophy: Precision Over Force
This tool isn’t a generic “vacuum accessory.” It’s engineered for the specific geometry of Shark Navigator brush rolls. It typically features:
- A Curved, Forked Blade: This shape perfectly matches the curvature of the brush roll cavity. It slides in on either side of the bar, allowing you to slice through wrapped material without the blade ever touching the bristles themselves.
- Rounded, Non-Maring Tips: The edges are smooth to prevent scratching the plastic housing or the brush roll axle.
- Optimal Length: It’s long enough to reach the entire width of the brush roll but compact enough to maneuver in the tight space under the vacuum head.
- Durable Construction: Made from hardened plastic or metal to withstand the pressure needed to cut through compacted hair and fibers.
How It Works: A Surgical Clean
The process is beautifully simple and safe:
- Access: You lay the vacuum on its back, remove the bottom plate (usually 4 screws or clips), and expose the brush roll.
- Insert: You slide the forked end of the Clean Beater Bar tool into the gap between the brush roll and the plastic housing on one side.
- Slice & Clear: You gently push the tool along the length of the bar. The blade’s edge slices through the longitudinal wrap (the hair/string wound around the axle). You then pull the freed debris out with your fingers or the tool’s hook.
- Repeat: You do the same on the other side. You can also use the tool to clean debris from the end caps and the belt guardian.
It’s a process of cutting and removing, not prying and breaking. You restore the brush roll to a state where it can spin freely with minimal resistance, exactly as the engineers intended.
Step-by-Step: Mastering Your Clean Beater Bar Maintenance Routine
Knowing the tool is half the battle. The other half is incorporating a quick, effective cleaning into your routine. Here is a detailed, foolproof guide.
Visual guide about Clean Beater Bar Shark Navigator
Image source: i.ytimg.com
Preparation: Safety First
- Unplug the Vacuum: This is non-negotiable. You must ensure zero electrical power to the unit.
- Gather Your Tools: You’ll need the Clean Beater Bar Shark Navigator, a microfiber cloth, a trash can, and maybe a pair of needle-nose pliers for stubborn bits.
- Choose Your Location: Do this over a trash can or a large sheet of paper to catch the debris. It will be a mess.
The Disassembly Process (For Most Shark Navigator Models)
- Lay It Down: Place the vacuum on its back on a stable surface.
- Remove the Bottom Plate: Locate the 4 screws or release clips on the underside of the suction head. Use a Phillips screwdriver if needed. Gently lift the plastic housing off. You’ll now see the brush roll, belt, and suction channel.
- Inspect: Visually assess the damage. Is the hair wrapped tightly around the axle? Is it packed between the bristles? Is the belt covered in debris?
- Remove the Brush Roll (Optional but Recommended): For the deepest clean, slide the brush roll out of its housing. This gives you 360-degree access. Note which end goes in which side—usually there’s an arrow on the roll indicating rotation direction.
The Cleaning Execution
- Target the Axle Wrap: This is the dense, felt-like material wound around the metal rod in the center. Insert the forked blade of the Clean Beater Bar tool into the space between the brush roll and the housing. Gently saw back and forth to slice through the wrap. Once sliced, use your fingers to pull large chunks away.
- Clear Between Bristles: For debris packed in the bristles themselves, use the hooked end of the tool (or your fingers) to pick it out. Work your way along the entire length of the roll. Be gentle to avoid pulling out bristles.
- Clean End Caps and Bearings: Use the tool’s tip to scrape any debris from the plastic end caps and the small bearing housings. This is a common hiding spot.
- Check the Belt and Housing: With the brush roll out, wipe down the rubber belt with a dry cloth. Clean any debris from the plastic housing channel with the tool and a cloth. A clean housing ensures smooth re-assembly.
- Reassemble: Slide the clean brush roll back into the housing, ensuring it seats properly and the belt is looped around it correctly (if you removed it). Replace the bottom plate and secure the screws/clips. Don’t overtighten plastic screws.
Pro Tips for an Efficient Clean
- Frequency: For pet owners or homes with long hair, clean the beater bar every 1-2 uses. For typical use, aim for once a month. It takes 3-5 minutes.
- The “Flick Test”: After cleaning, spin the brush roll by hand. It should rotate freely for several seconds with a faint whirring sound. If it stops quickly or feels gritty, you missed debris.
- Belt Condition Check: While you’re in there, inspect the drive belt. Look for cracks, glazing (shiny surface), or stretching. Replace if needed—it’s cheap insurance.
- Bristle Wear: If the bristles are significantly frayed, splayed, or missing entire rows, it’s time for a new brush roll. A worn bar agitates poorly.
Troubleshooting: What to Do When Cleaning Isn’t Enough
You’ve followed the guide, used your Clean Beater Bar Shark Navigator tool religiously, but a problem persists. Here’s how to diagnose what’s next.
Symptom: Brush Roll Still Won’t Spin After Cleaning
Diagnosis: The bearings inside the end caps are likely seized or damaged from past abuse. Or, the brush roll axle is bent.
Solution: The fix is a new brush roll assembly. It’s a common wear part. Purchase a Shark Navigator replacement brush roll (ensure your exact model number). Replacing it is straightforward: remove the old roll, slide the new one in, re-route the belt.
Symptom: Loud Squealing or Grinding Noise
Diagnosis: This is the classic sound of a slipping, worn, or misaligned drive belt. It can also indicate the brush roll is still slightly jammed or the bearings are shot.
Solution: First, re-check the brush roll for any missed debris. Then, inspect the belt. If it’s loose, cracked, or shiny, replace it. Ensure the belt is properly seated on both the motor shaft and the brush roll gear. If the noise persists after a new belt and clean roll, the motor bearings may be failing—a more serious issue.
Symptom: No Suction on Carpets, But Strong on Hard Floors
Diagnosis: This is the telltale sign of a non-rotating beater bar. The suction path is clear (good for hard floors), but the agitation mechanism is dead on carpets.
Solution: Confirm the brush roll is actually spinning. Turn the vacuum on with the head off the floor. Can you see it rotate? If not, clean it again thoroughly. If it still doesn’t spin, check for a broken belt (it may have come off) or a faulty brush roll on/off switch. A multimeter can test the switch for continuity.
Symptom: Burning Smell
Diagnosis: STOP USING THE VACUUM IMMEDIATELY. This is the smell of an overheating motor, almost certainly caused by the extreme resistance of a seized brush roll or a broken belt rubbing on the motor shaft.
Solution: Let the motor cool completely. Then, perform the full cleaning and inspection procedure. Replace any broken belts and ensure the brush roll spins freely. If the smell returns immediately upon next use, the motor windings may be damaged and need professional repair or replacement.
Compatibility and Model-Specific Considerations for Shark Navigator
The “Clean Beater Bar Shark Navigator” tool is designed for a specific family of vacuums. Using it on an incompatible model can be frustrating or even damaging.
Target Models
This tool is primarily engineered for the popular Shark Navigator Lift-Away (NV350, NV356, NV360, NV362, etc.) and Shark Navigator Professional (NV350, NV352, NV356) series. It also fits many of the older Shark Rotator models (NV500, NV501, NV502). The key commonality is the removable bottom plate and the exposed, cartridge-style brush roll.
How to Verify Your Model
- Find the Label: Turn your vacuum over. On the back or bottom of the main body, there is a silver or white sticker with the model number. It starts with “NV” followed by numbers (e.g., NV352, NV356Q).
- Check the Brush Roll Style: The tool fits the long, narrow brush roll that is removable as a single unit. It does not fit the newer, smaller “anti-hair wrap” brush rolls found in some Shark Vertex or IZ series models, which have a completely different housing design.
- When in Doubt, Measure: Measure the width of your brush roll cavity. The Clean Beater Bar tool is typically about 10-11 inches long to match the Navigator’s roll.
What If My Model Isn’t Listed?
Shark frequently updates designs. If your model isn’t an obvious match, compare the photos of the tool’s forked end to the gap between your brush roll and the housing. The fit must be snug but not forced. A poor fit means it won’t work effectively and could slip, causing injury. Contact the tool manufacturer or Shark customer service for definitive compatibility before purchasing.
The Long-Term Payoff: More Than Just a Clean Vacuum
Let’s zoom out. Why is all this fuss about a $15-$25 tool worth your time? Because it’s an investment in the longevity and performance of your entire vacuum system.
Maximizing Your Initial Investment
A Shark Navigator is a mid-to-upper-tier vacuum. You likely spent $200-$400 on it. Neglecting the beater bar is like buying a high-performance car and never changing the oil. The Clean Beater Bar Shark Navigator tool is your “oil change.” It ensures you get 5, 7, or even 10 years of peak performance out of your initial purchase, dramatically improving your cost-per-year of ownership.
Saving on Consumables and Repairs
Consider the savings:
- Belt replacements: At $10-$20 each, a broken belt from a jammed bar is an avoidable expense. A clean bar means belts last for years.
- Brush roll replacements: A new brush roll assembly can cost $40-$70. Keeping it clean and free of debris prevents the bearing damage that necessitates a new roll.
- Motor repairs/replacement: This is the big one. A motor can cost $150-$250 to replace. Preventing motor burnout through simple beater bar maintenance is the ultimate saving.
Restoring and Maintaining Peak Suction and Agitation
Your Shark’s selling point is its “no loss of suction” claim. This is only true if the entire airflow path is clear, from the floor to the bin to the filter. A clogged beater bar is the first and most critical choke point. By keeping it clean, you ensure:
- Maximum carpet agitation and dirt removal.
- Consistent suction power across all surfaces.
- Efficient airflow, which helps filters last longer.
- Quieter operation (no straining motor noises).
A Healthier Home Environment
Think about what’s in that compacted hairball: dead skin cells, dust mite feces, pollen, and bacteria. When the brush roll is jammed, these allergens aren’t being effectively captured; they can be flung back into the air or settle in the vacuum’s housing. A clean beater bar is a more hygienic component. Combined with regular filter washing, it contributes to better indoor air quality, especially crucial for allergy and asthma sufferers.
Conclusion: Embrace Proactive Ownership
Your Shark Navigator is a workhorse, but it’s not indestructible. Its greatest vulnerability is also its greatest asset: the hard-working beater bar. Ignoring it is the single fastest way to degrade your vacuum’s performance and send it to an early grave. The Clean Beater Bar Shark Navigator tool demystifies this maintenance task. It transforms a potential $200 repair into a 5-minute, satisfying ritual.
This guide has been about empowerment. It’s about moving from being a frustrated user who wonders why the vacuum is weak, to becoming a knowledgeable owner who takes simple, proactive steps to keep their machine in pristine condition. Make a mental note: every time you finish vacuuming, or at least once a month, tip that Navigator over, grab your specialized tool, and give the heart of your machine a quick, surgical clean. You’ll feel the difference in suction power on your next pass, hear the quiet efficiency of a motor not straining, and gain the peace of mind that comes from truly caring for your valuable tools. That’s what smart homeownership looks like.
Frequently Asked Questions
How often should I clean my Shark Navigator’s beater bar?
For homes with pets or long hair, clean it every 1-2 uses. For typical households, a thorough clean once a month is sufficient. If you notice a drop in carpet cleaning performance, clean it immediately.
Can I use scissors or a knife instead of the Clean Beater Bar tool?
While you *can*, it’s highly discouraged. Scissors can easily slip and slice the bristles or crack the plastic end caps. A knife can damage the housing. The specialized tool is designed to fit perfectly and cut only the wrapped debris, protecting your expensive vacuum parts.
What are the signs that my beater bar needs cleaning?
The primary signs are: 1) Noticeable loss of suction on carpets, 2) A high-pitched motor whine instead of a deep sound, 3) The vacuum feels harder to push/pull on carpet, 4) You see a mat of debris wrapped around the brush roll when you look underneath.
Can a completely jammed beater bar cause permanent damage?
Yes. If run for an extended period while jammed, it can overheat and melt the plastic end caps, seize the bearings permanently, or cause the drive belt to snap and potentially whip into the motor. It can also overheat and damage the motor windings. That’s why immediate attention is crucial.
Does the Clean Beater Bar tool work on all Shark brush roll types?
No. It is specifically designed for the removable, cartridge-style brush rolls found in most Shark Navigator Lift-Away and Professional series. It will not fit the newer, self-cleaning “anti-hair wrap” brush rolls in some Shark Vertex or IZ models, which have a different, sealed housing design.
When should I replace the brush roll itself instead of just cleaning it?
Replace the entire brush roll assembly if: the bristles are significantly worn, splayed, or missing in patches; the metal axle is bent; the bearings are noisy or don’t spin freely even after cleaning; or the plastic end caps are cracked. A worn brush roll will never agitate effectively, even if clean.