A non-spinning Shark Mini motorized brush is almost always a fixable issue, not a failed vacuum. The problem typically stems from clogs, a worn drive belt, or a tripped safety mechanism. This guide provides a complete, step-by-step diagnostic and repair process for every model, empowering you to solve it yourself in minutes with basic tools. Avoid costly service calls and restore your vacuum’s deep-cleaning power.
You’re in the middle of cleaning, and you notice it. That familiar, satisfying whirring sound from your Shark vacuum’s mini motorized brush is gone. You look down, and the roller brush is just sitting there, stationary, while the suction seems weaker. Panic sets in for a second. Is it broken? Do I need a new vacuum? Take a deep breath. The phrase “Shark Mini motorized brush not spinning” is one of the most common internet searches for a reason—it’s a frequent issue, and in over 90% of cases, it’s something you can diagnose and fix yourself in under ten minutes with no special tools. This guide will walk you through every possible cause, from the simplest reset to a belt replacement, getting your Shark back to its powerful, agitating self.
First, let’s demystify what we’re dealing with. The “mini motorized brush” is the small, rotating roller bar with bristles (or sometimes a rubberized strip) at the front of your Shark vacuum head. Its job is to agitate carpet fibers, loosening embedded dirt and pet hair so the suction can pull it away. When it stops spinning, you lose that deep-cleaning agitation, making your vacuum feel weak and ineffective on carpets, even though the suction from the hose might seem fine. The system is beautifully simple: a small motor in the brush head spins a drive belt, which turns the roller brush. Three things can stop this: something physically jamming the brush, something breaking the power transfer (the belt), or something cutting the power supply (a switch or battery). We’ll tackle them in order of likelihood and ease.
Key Takeaways
- It’s rarely a motor failure: The motor is robust; the issue is usually a simple obstruction or a worn $5 drive belt.
- Safety switches are common culprits: Shark vacuums have a safety cut-off if the brush roll jams. Resetting it is often the first and easiest fix.
- Hair and fiber clogs are the #1 enemy: Regular cleaning of the brush roll housing and end caps prevents 80% of spinning issues.
- The drive belt is a known wear item: If the belt is broken, stretched, or missing, the brush won’t spin. Replacing it is a simple 5-minute task.
- Battery-powered models have extra checks: For cordless Shark IZs, ensure the battery is fully charged and the brush roll mode is selected.
- Always unplug before inspecting: This is a critical safety step to prevent accidental startup while your fingers are near moving parts.
- Preventative maintenance is key: A quick 60-second brush roll clean after every few uses prevents the vast majority of problems.
📑 Table of Contents
- Understanding Your Shark’s Brush System: The Core Components
- Diagnosis and Step-by-Step Repair: From Easiest to Hardest
- Preventative Maintenance: Keeping Your Brush Spinning Forever
- When to Consider a Replacement vs. Repair
- Advanced Troubleshooting: What If Nothing Works?
- Conclusion: Empowerment Through Understanding
Understanding Your Shark’s Brush System: The Core Components
Before we start taking things apart, knowing the parts helps you identify them. For most corded Shark stick vacuums (like the IZ, Vertex, or older DuoClean models), the mini motorized brush assembly consists of:
- The Brush Roll (Roller Bar): The long cylinder with bristles. It can get wrapped in hair, fibers, and string.
- The Drive Belt: A small, often black, rubber loop connecting the motor shaft to the brush roll. It’s a consumable part that stretches and wears out over time.
- The Motor Housing: The plastic shell containing the small electric motor and the belt pulley.
- The End Caps/Bearings: Plastic caps on each end of the brush roll that house the bearings allowing it to spin freely. These can crack or get clogged.
- The Safety Switch/Pawl: A small plastic lever or tab inside the brush head housing. If the brush roll jams hard, this lever can trip, disengaging the motor to prevent burnout. It must be manually reset.
Cordless models (Shark IZ series) add a brush roll motor separate from the main suction motor, a dedicated brush roll mode button on the vacuum body, and a battery that must have sufficient charge. The principles of clogs and belts remain the same.
The Critical First Step: The Reset Button
Seriously, do this first. It solves the problem instantly in many cases, especially after the brush has hit a hard object like a toy or a thick rug fringe. Shark vacuums are designed with a thermal overload protector and a mechanical safety pawl. If the brush roll encounters extreme resistance, a small plastic tab inside the brush head housing will physically move and disengage the motor. This is a feature, not a bug—it saves your motor from burning out.
How to Reset:
- UNPLUG THE VACUUM. If it’s cordless, remove the battery. Safety is non-negotiable.
- Lay the vacuum flat or turn the brush head over to access the bottom.
- Locate the reset button. It’s usually a small, circular, red or black button on the underside of the brush head housing, near where the brush roll sits. Sometimes it’s inside a small hole; you may need a pen tip to press it.
- Press the button firmly until you feel or hear a click.
- Reassemble, plug in (or reinsert battery), and test.
If the brush spins after this, you likely just jammed it hard. If it doesn’t, the reset may have already been tripped due to an underlying clog or belt issue, and we need to dig deeper.
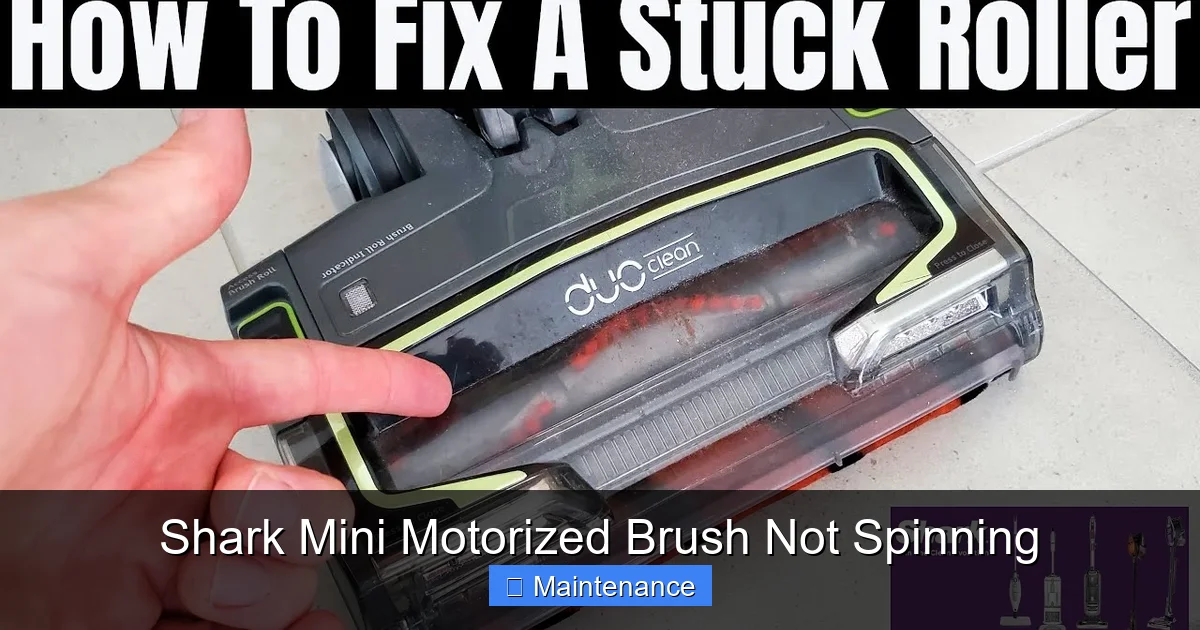
Diagnosis and Step-by-Step Repair: From Easiest to Hardest
We’ll proceed logically. Always unplug or remove the battery before performing any of these steps.
Visual guide about Shark Mini Motorized Brush Not Spinning
Image source: sharkvacuum.blog
Step 1: The Visual & Physical Inspection for Clogs
The #1 cause of a non-spinning brush is a physical obstruction. Hair, string, carpet fibers, and even small pieces of paper or plastic can wrap around the brush roll axle, get stuck in the end caps, or pack into the air intake channels.
What to do:
- Remove the Brush Roll: Most Shark mini motorized brushes have a release mechanism. Look for a latch, a sliding lock, or two screws on the top of the brush head housing. Release it and tilt the brush roll out. On some models, you may need to rotate it 90 degrees and pull.
- Examine the Brush Roll: Manually spin it. Does it move freely? If it’s stiff or doesn’t turn, it’s jammed at the bearings. Use scissors or a seam ripper to carefully cut away any hair or fibers wrapped around it, especially near the ends. Pull out any debris from the bristles.
- Check the End Caps: Look into the holes where the brush roll axles sit. Use a flashlight. Are they packed with lint and hair? Dig it out with a pointed tool (like a crochet hook or even a bent paperclip). The bearings inside should spin smoothly. If an end cap is cracked, it needs replacement.
- Clear the Housing: Look into the chamber where the brush roll sits. You’ll often see a large accumulation of hair and dirt packed around the belt pulley and in the suction ports. Pull this out with your fingers or needle-nose pliers. A clog here creates immense drag on the motor.
Pro Tip: A quick blast of compressed air from the outside into the intake ports can dislodge packed debris from the housing channels. Do this outside or over a trash can.
Step 2: The Drive Belt Inspection
If the brush roll spins freely by hand and the housing is clear, the belt is the prime suspect. The belt connects the motor’s small pulley to the larger pulley on the brush roll. If it’s broken, missing, or so stretched it slips, the brush won’t turn.
What to do:
- Locate the Belt: With the brush roll removed, look inside the motor housing. You should see a rubber loop sitting in a groove on the motor pulley and the brush roll pulley.
- Check Condition: Is it there? Is it intact? Is it loose and floppy when you push it? A good belt is taut and sits snugly in both pulley grooves. Signs of failure:
- Broken: One or more pieces of rubber. Obvious.
- Stretched/Slipping: The belt may have jumped off a pulley, or it’s so loose it can’t grip. Stretch it gently; if it feels limp and doesn’t spring back, replace it.
- Glazed/Burned: A shiny, hardened surface or a burnt smell indicates it’s been slipping and overheating due to a clog (which you already fixed in Step 1, so replace the belt now).
- Replacement: Drive belts are not universal. You must find the exact part number for your specific Shark model. This is usually on a sticker on the vacuum’s body or in the manual. Search “[Your Shark Model Number] drive belt” on Amazon or an appliance parts site. They typically cost between $5 and $15. Replacing it is simple: hook one end onto the motor pulley, stretch it over the brush roll pulley, and rotate the brush roll to seat it fully. No tools needed.
Step 3: Checking the Motor and Electrical Connection
If the brush roll is free and the new belt is on perfectly, but it still doesn’t spin, the issue could be with the small motor itself or its electrical connection. This is less common.
What to do:
- Listen & Feel: When you turn the vacuum on with the brush head attached, do you hear a faint high-pitched whine or feel a slight vibration in the brush head? That means the motor is trying to run but the brush roll is not turning (indicating a belt issue you missed) or the motor is seized. If you hear/feel nothing, the motor isn’t getting power.
- Check Connections: The brush head plugs into the wand/handle with a small, often rectangular, electrical connector. Unplug it and inspect the metal contacts on both the vacuum side and the brush head side. Are they clean? Not bent? Sometimes a poor connection is the culprit. Clean gently with a dry cotton swab.
- Test Without the Belt (Caution!): This is a diagnostic test. With the brush roll removed and the belt off, plug the vacuum in and turn it on. You should hear the motor in the brush head run. DO NOT let it run for more than 5-10 seconds like this, as it’s designed to have a load. If the motor does not run at all, the motor may be burned out or there’s a break in the wiring to the brush head. This usually requires professional repair or a brush head replacement assembly.
Step 4: Battery and Mode-Specific Checks (For Cordless Shark IZ Models)
Cordless Shark vacuums have a separate brush roll motor and a dedicated button to engage it. This adds a couple of specific failure points.
- Battery Charge & Health: A weak or old battery may not provide enough power to run both the main suction motor and the brush roll motor simultaneously. Ensure the battery is fully charged. If the vacuum runs for a short time then the brush stops, the battery is likely at the end of its life.
- Brush Roll Mode Button: On the main body of the IZ vacuum, there is a button with a brush icon. Make sure it is illuminated/activated. Sometimes it gets accidentally turned off.
- Brush Roll Motor Failure: The motor in the brush head itself can fail. If you’ve confirmed the battery is good, the mode is on, the brush roll spins freely, and the belt is new, but you hear no motor sound at all, the brush roll motor has likely burned out. You can purchase a replacement brush head assembly or, on some models, just the motor module.
Preventative Maintenance: Keeping Your Brush Spinning Forever
An ounce of prevention is worth a pound of cure. The best way to deal with a “Shark Mini motorized brush not spinning” problem is to never have it happen. Incorporate these 60-second habits into your cleaning routine.
Visual guide about Shark Mini Motorized Brush Not Spinning
Image source: i.ytimg.com
The After-Every-Few-Uses Quick Clean
Every two or three times you vacuum, especially if you have pets or long hair, do this:
- Unplug or remove the battery.
- Lay the vacuum flat and remove the brush roll as described earlier.
- Use your fingers or a cleaning tool to pull all hair and fibers from the bristles and the axle areas.
- Scrape out the packed debris from the housing with a plastic putty knife or the edge of the old brush roll.
- Wipe the belt with a dry cloth to remove dust and hair that can cause slippage.
- Reassemble.
This takes less time than emptying the dust cup and saves you from major clogs later.
Monthly Deep Dive
Once a month, or if performance seems to drop:
- Remove the brush roll and end caps. Clean the bearings thoroughly. If they feel gritty or don’t spin smoothly, the end cap assembly may need replacing (a cheap part).
- Inspect the drive belt for cracks, glazing, or stretching. Replace it preemptively if it shows any wear—it’s cheaper than a burned-out motor.
- Check the electrical connector pins for any corrosion or dirt. Clean them.
- Run the vacuum without the brush roll for a few seconds (with the brush head attached but belt off) to blow out any loose dust from the motor housing vents.
When to Consider a Replacement vs. Repair
Most fixes are under $20 in parts. But when does it make sense to repair, and when should you consider a new brush head or even a new vacuum?
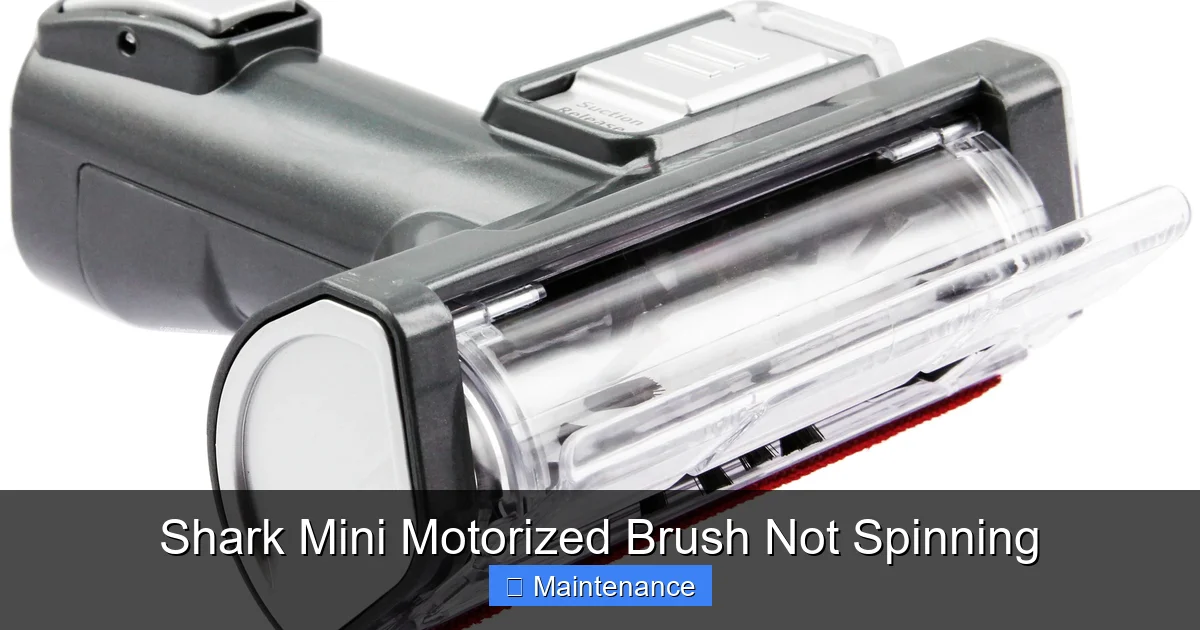
Visual guide about Shark Mini Motorized Brush Not Spinning
Image source: cdn11.bigcommerce.com
Cost-Benefit Analysis
- Replace Brush Roll ($15-$30): If the bristles are melted, missing, or the axle is bent from hitting a hard object, a new brush roll is a good investment. It’s a wear item.
- Replace Drive Belt ($5-$15): Always do this if it’s worn. It’s the cheapest fix with the biggest impact.
- Replace End Cap/Bearing Kit ($10-$20): If the plastic cap is cracked or the bearing inside is seized, this is an easy, inexpensive fix.
- Replace Brush Head Assembly ($50-$120): If the motor is dead, the wiring is fried, or the plastic housing is cracked, buying a complete new brush head is often the most economical path. It’s like getting a new engine for your car. Compare the cost to your vacuum’s original price. If your Shark is 5+ years old and the brush head costs 40% of a new vacuum, it might be time for an upgrade.
The “Aha!” Moment: A Real-World Example
Let’s say you have a Shark IZ682. The brush stopped spinning. You reset the button—nothing. You remove the brush roll: it’s wrapped in a thick mat of dog hair. You clean it, but it still doesn’t spin. You check the belt—it’s there, but it’s loose and glazed. You replace the $8 belt. It spins! But a week later, it stops again. You repeat the process and find the housing is already packed with hair again. The lesson? You didn’t fully clear the housing channels in the first repair. The clog was still there, causing drag that quickly wore out the new belt. The second time, you use a flexible brush wand to scrub deep into the suction ports, removing all packed debris. The fix lasts. This illustrates why thoroughness in Step 1 is so critical.
Advanced Troubleshooting: What If Nothing Works?
You’ve reset, cleaned, replaced the belt, checked the battery, and inspected connections. The brush roll spins perfectly by hand. The motor makes no sound whatsoever. Now we’re in rare territory.
Testing for Power at the Connector
This requires a multimeter and basic electrical knowledge. With the vacuum turned on (be extremely careful), you can carefully probe the electrical connector pins on the vacuum’s wand side to see if power is reaching the brush head. You should read the battery voltage (for cordless) or the wall voltage (for corded) at those pins when the vacuum is on and the brush mode is selected. If there is no power, the fault is in the main vacuum body—a switch, wiring, or main control board issue. If there IS power at the connector but the brush motor doesn’t run, the fault is inside the brush head assembly itself.
The Ultimate Decision: New Brush Head Assembly
For most users, this is the final step. If you’ve verified power is getting to the brush head connector but the internal motor is dead, the only practical solution is to replace the entire brush head module. They are designed as sealed units. You can find OEM or high-quality third-party assemblies online. Installation is usually just reversing the removal steps: unplug, release the old head, plug in the new one. This restores full function and often includes a new belt and brush roll.
Conclusion: Empowerment Through Understanding
That sinking feeling when your Shark’s brush stops spinning is now replaced with confidence. You know it’s almost certainly not a doomed vacuum. It’s a system with a few simple, identifiable parts. The sequence is your best friend: Reset → Inspect & Clear Clogs → Check/Replace Belt → Verify Power. By following this roadmap, you’ve saved yourself a $100+ service call and the hassle of being without your vacuum for weeks. You’ve also gained a deeper understanding of how your machine works, making you a more effective owner. Remember, the most powerful tool in your maintenance kit is a simple, regular habit of cleaning that brush roll. A few minutes of prevention ensures your Shark Mini motorized brush will be spinning vigorously, lifting dirt from your carpets, for years to come. Now go grab those scissors and get cleaning!
Frequently Asked Questions
Why does my Shark vacuum’s brush spin for a second then stop?
This almost always indicates a severe clog or jam that immediately triggers the safety cut-off switch. The motor tries to start, hits resistance, and the safety mechanism disengages power. You must unplug, remove the brush roll, and thoroughly clean all debris from the brush roll, end caps, and housing before the reset button will stay engaged.
Is it worth repairing a Shark brush head, or should I just buy a new vacuum?
Repairing is almost always worth it. A new brush head assembly costs a fraction of a new vacuum. Only consider replacing the entire vacuum if it’s very old, has multiple other issues, or if the cost of a new brush head is disproportionately high compared to a new entry-level Shark model. For a 3-5 year old vacuum, a $60-$100 brush head repair is excellent value.
Can I use my Shark vacuum without the motorized brush?
Yes, you can use it in a limited capacity. Without the brush roll, it functions as a suction-only tool, like a broom. It will pick up surface debris on hard floors and low-pile rugs but will be very ineffective at deep-cleaning carpets or agitating pet hair from fabric. It’s fine for a quick hard-floor cleanup in a pinch, but you’ll miss the core cleaning power of the brush agitation.
How often should I replace the drive belt on my Shark?
There’s no fixed schedule—it depends on use. As a preventative measure, inspect it every 6 months. Replace it immediately if you see any cracks, glazing, stretching, or if the brush roll slips. With regular cleaning and no major clogs, a belt can last 1-2 years. If you have pets that cause frequent hair jams, you may need to replace it annually.
My brush roll spins freely by hand, but the vacuum motor doesn’t sound right. What’s wrong?
If the brush roll spins freely but the vacuum sounds strained or the suction drops when the brush is engaged, you likely have a severely clogged brush head housing. The motor is working hard but can’t spin the brush because packed debris in the housing channels is creating immense drag. Remove the brush roll and meticulously clean out all packed lint and hair from the housing and belt pulley area.
The reset button won’t stay in / pops out immediately. What do I do?
This means the underlying problem that tripped the safety mechanism is still present. The reset button is designed to pop out if the brush roll encounters the same resistance again. You must unplug, remove the brush roll, and find and eliminate the physical jam or extreme drag (usually a massive hair clog around the bearings or in the housing). Only after the brush roll can spin completely freely by hand will the reset button stay engaged and the motor run.