Cleaning your Shark Rotator canister vacuum is a simple but crucial task that dramatically improves suction power, prevents odors, and extends the life of your machine. This comprehensive guide walks you through every step, from gathering tools to safely disassembling, deep cleaning each component (filters, canister, hose, brushes), and proper reassembly. By following these detailed, safety-focused instructions, you’ll restore your vacuum’s performance and avoid common pitfalls that can cause damage. Regular maintenance is the key to a happy, healthy Shark Rotator.
Key Takeaways
- Unplug Before You Start: Always disconnect the vacuum from the wall outlet before any disassembly to prevent accidental startup and ensure safety.
- Filters Are Priority #1: The pre-motor foam and felt filters require regular washing (monthly) and must be completely dry for 24+ hours before reuse to avoid motor damage.
- Use Only Gentle Cleaners: Stick to mild dish soap and warm water for the canister and hose. Avoid harsh chemicals, abrasives, or submerging electrical components.
- Check for Blockages: A major cause of suction loss is clogged hoses, wand connections, or the brush roll housing. Make inspecting and clearing these a core part of your cleaning routine.
- Dry Thoroughly: After washing, air-dry all washable parts (canister, filters, hose) completely in a well-ventilated area. Never use a hair dryer or reassemble with damp parts.
- Reassemble Correctly: Ensure all seals, gaskets, and latches are properly aligned and secured. A poor seal is a common reason for post-cleaning suction issues.
- Establish a Routine: Light cleaning after major jobs and a full deep clean every 1-2 months keeps your Shark Rotator operating at peak efficiency and prevents buildup.
[FEATURED_IMAGE_PLACEHOLDER]
📑 Table of Contents
- Why Cleaning Your Shark Rotator Canister Isn’t Optional—It’s Essential
- Gathering Your Tools: The Shark Rotator Cleaning Kit
- Step-by-Step: Safely Disassembling Your Shark Rotator
- The Deep Clean: Washing and Decontaminating Every Part
- Reassembly, Testing, and Troubleshooting
- Proactive Maintenance: Keeping Your Shark Rotator Clean Between Deep Cleans
- When Things Go Wrong: Diagnosing Persistent Problems
- The Final Word: Your Investment in Clean Air and Longevity
Why Cleaning Your Shark Rotator Canister Isn’t Optional—It’s Essential
Let’s be honest. When your Shark Rotator vacuum starts to feel a little weak, making strange noises, or worse, starts to smell like a forgotten science experiment, the culprit is almost always the same: a dirty canister system. The brilliant cyclonic action that makes Shark vacuums so effective relies on clean pathways and unobstructed airflow. Every pinch of pet hair, speck of dust, and smear of ground-in dirt that bypasses the brush roll ends up in that canister, on the filters, and tangled in the hose. Over time, this creates a thick, insulating layer of grime that chokes your vacuum’s power. Cleaning the Shark Rotator canister isn’t just about tidiness; it’s about restoring the machine’s fundamental ability to separate air from debris. Think of it like cleaning the lint trap in your dryer—skip it, and you risk poor performance, overheating, and a drastically shortened lifespan for your appliance. A clean canister means maximum suction, no funky odors, and a vacuum that will happily tackle your messes for years to come.
Gathering Your Tools: The Shark Rotator Cleaning Kit
Before you touch a single screw, gather everything you’ll need. Having tools at the ready makes the process smooth and prevents frustration. You likely have most of these items already in your kitchen or utility closet.
Visual guide about How to Clean Shark Rotator Canister
Image source: sharkvacuum.blog
Essential Cleaning Supplies
- Warm Water & Mild Dish Soap: Your primary cleaning agents. A few drops of soap in a sink or basin of warm water is perfect for the canister, hose, and non-filter parts.
- Soft Microfiber Cloths: Several clean, lint-free cloths for wiping, drying, and polishing. Avoid paper towels, which can leave behind fibers.
- Soft-Bristled Brushes: An old toothbrush is ideal for scrubbing crevices, filter frames, and the inside of hose crevices. A small, soft paintbrush can also help dislodge dust from tight spots.
- Cotton Swabs (Q-Tips): Perfect for cleaning around the small electrical contacts, sensor areas, and the intricate parts of the hose/wand connectors.
- Bucket or Large Sink: For soaking and washing the canister and hose.
- Rubber Gloves: To keep your hands clean and protected from any gritty debris.
Tools for Disassembly & Inspection
- Screwdriver: Most Shark Rotator models use a Phillips-head screwdriver (#2 is usually sufficient) to remove the brush roll housing and sometimes the canister latch cover.
- Needle-Nose Pliers: Incredibly useful for pulling out stubborn hair and fibers wrapped around the brush roll bristles and bearings.
- Flashlight or Headlamp: Shine light into the canister, hose, and wand connections to spot hidden blockages.
- Trash Bag: Have one nearby to immediately dispose of all the collected dirt, hair, and debris you unearth.
Important Note: Always consult your specific Shark Rotator model’s manual for any model-specific disassembly instructions or warnings. The general principles here apply to most models (NV350, NV352, NV356, etc.), but clip and latch locations can vary.
Step-by-Step: Safely Disassembling Your Shark Rotator
This is the most critical phase. Rushing or using excessive force here can break plastic clips or damage seals. Take your time. The goal is to isolate the four major components: the canister body, the filters, the hose/wand assembly, and the brush roll head.
Visual guide about How to Clean Shark Rotator Canister
Image source: everydaycheapskate.com
1. Initial Prep and Canister Emptying
First, take the vacuum to a trash can or outside. Press the release button to open the canister lid and dump all debris. Give it a firm tap against the side of the bin to dislodge any compacted dust. Use your hand or a tool to scrape away any large chunks stuck to the sides or the cyclonic funnel. This initial cleanup makes the washing step much easier.
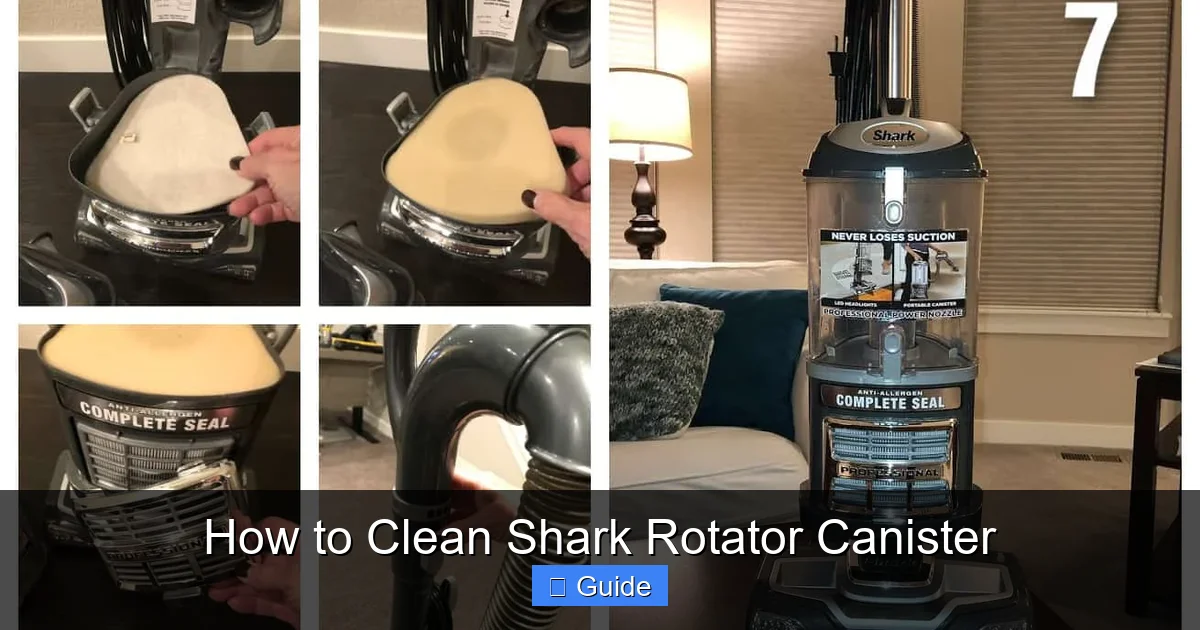
2. Removing the Filters
Locate the filter compartment, usually on the back or side of the canister. You’ll find two filters: the pre-motor foam filter (often rectangular, foam) and the pre-motor felt filter (often pleated, paper-like). Gently pull them out by their tabs. Do not force them. Some models have a foam filter that slides out from a plastic cage. Note their orientation for reassembly. Place them in a safe spot, ideally on a towel.
3. Detaching the Hose and Wands
At the back of the canister, you’ll find a large, usually red, release button or latch for the main hose. Press it and pull the hose straight off. Next, detach any extension wands from the hose and from the handle. Separate the hose from the crevice tool/other attachments. Lay all parts straight to avoid kinks.
4. Accessing the Brush Roll Housing
Flip the vacuum over to expose the brush roll. On most Shark Rotators, there’s a red release lever or a few Phillips screws holding the bottom plate (the brush roll housing) in place. If it’s a lever, pivot it and pull the plate off. If it’s screws, remove them and set them aside. Gently lift the plate to reveal the brush roll and the drive belt (if your model has one).
5. Removing the Brush Roll
With the plate off, the brush roll will be visible. It’s usually held in place by a clip on one side and a slot on the other, or by two small caps. Slide the brush roll out of its slots, being careful not to lose any small retaining washers or clips. If a drive belt is attached, slide it off the brush roll pulley. This gives you full access to clean the housing and the roll itself.
The Deep Clean: Washing and Decontaminating Every Part
Now for the satisfying part. We’ll go through each major component, ensuring no layer of grime is left behind. The golden rule: no electrical parts, no motors, and no “permanent” filters (like the HEPA filter on some models) should ever get wet.
Visual guide about How to Clean Shark Rotator Canister
Image source: livingpristine.com
Cleaning the Canister Body
Take your empty canister to the sink. Fill it with warm, soapy water. Use your soft cloth and toothbrush to scrub the interior, paying special attention to the cyclonic funnel—the cone-shaped spiral at the top. This is where fine dust packs in tight. Scrub in a circular motion. For the exterior, wipe it down with a damp cloth. Rinse thoroughly with clean water until no soap suds remain. Critical: Use a dry cloth to absorb all standing water from the inside, especially from the cyclonic funnel grooves and the lid seal channel. Then, place the canister upside down on a towel in a well-ventilated area. Let it air-dry completely for at least 24 hours. A fan can help speed this along.
Reviving Your Filters: The Soak and Squeeze Method
This is the most delicate part. The foam filter is washable. The felt filter is also washable but more fragile. Never wring or twist either filter. Fill your sink with warm, soapy water. Submerge the filters and gently agitate them. Let them soak for 10-15 minutes to loosen embedded dust. Gently press the soapy water through the foam and felt fibers with your palms. Rinse under a gentle stream of cool water until the water runs clear. For the felt filter, be extra gentle—it can tear if handled roughly. Once rinsed, do not wring. Instead, place the filters on a clean towel, roll the towel up, and press firmly to extract as much water as possible. Then, lay them flat on a dry towel in a warm, dry spot with good airflow. They must be 100% bone-dry, which takes a full 24-48 hours. Do not be tempted to use a hair dryer, as the heat can damage the filter media.
Unclogging the Hose and Wands
Stretch the hose out fully. Visually inspect it for kinks or collapses. Run a flexible brush (like a closet rod brush) or a long, flexible aquarium net cleaner through it to dislodge debris. For stubborn clogs, try this trick: disconnect both ends, aim the hose out a door or window, and use a strong blast of air from your mouth or a low-pressure air compressor to push the clog out. Never use a high-pressure air source or a metal rod, as you can puncture the hose. Wipe the outside of the hose with a damp cloth. For the wands and crevice tools, simply wipe them out with a damp cloth or use the flexible brush. Let all parts air-dry.
Cleaning the Brush Roll Housing and Roll
With the brush roll removed, you have full access to the housing. This is where hair and carpet fibers create a thick, felt-like mat. Use your needle-nose pliers to meticulously pull out every strand of hair, thread, and carpet fiber wrapped around the brush roll bristles, the end caps, and the bearings. This is the #1 cause of brush roll not spinning. Once all debris is removed, use a damp cloth with soapy water to wipe down the inside of the housing, the drive belt pulley (if present), and the rubber seals. Rinse with a damp cloth. Pay attention to the small air intake ports on the housing. Clear them with a cotton swab. Wipe the brush roll bristles with a soapy cloth, rinse, and let it air-dry completely before reassembly.
Reassembly, Testing, and Troubleshooting
Patience is key here. Reassemble in the reverse order of disassembly. Rushing can lead to missed steps and poor performance.
The Reassembly Sequence
1. Brush Roll: Slide the dry brush roll back into its housing slots. Reattach the drive belt if your model uses one, ensuring it’s seated properly on both the motor pulley and the brush roll pulley. Replace the retaining clips/caps. Snap the bottom housing plate back on, ensuring the seal is properly aligned and the clips/latches click into place. Give the brush roll a spin by hand—it should rotate freely.
2. Filters: Ensure your filters are completely dry. Slide the foam filter into its plastic cage (if applicable) and place it in the vacuum. Slide the felt filter in behind it, in the exact orientation it came out. Close the filter door securely.
3. Canister & Hose: With the canister dry, reattach the lid. Snap it shut until you hear a click. Reconnect the hose to the back of the canister until you hear a firm click. Reattach your extension wands and preferred cleaning head.
The All-Important Test Run
Before you return the vacuum to its storage spot, plug it in and perform a test. Turn it on in an open area. Listen for any unusual grinding or squealing sounds—this could indicate a misaligned brush roll or belt. Place your hand over the wand tip. You should feel strong, steady suction. If suction feels weak, immediately turn it off and check:
- Are all filters installed correctly and dry?
- Is the canister lid sealed completely?
- Is the hose fully attached at both ends?
- Is the brush roll housing plate securely latched?
Fix any issues before using it on your floors.
Common Reassembly Pitfalls and Fixes
Symptom: Weak Suction After Cleaning. Solution: The #1 cause is a wet filter. Double-check filter dryness. Next, check the canister lid seal—food debris or a misaligned lid can break the vacuum’s seal. Finally, ensure the hose is clicked firmly into the back of the canister.
Symptom: Brush Roll Not Spinning. Solution: Hair is likely still wrapped around the bearings or the belt is slipped. Re-open the housing, remove the brush roll, and clean the bearing ends thoroughly with a cotton swab. Check the belt for proper tension and seating.
Symptom: Loud Noise/Vibration. Solution: The brush roll may be unbalanced due to missing bristles or debris still caught. Ensure it’s reinstalled straight and spins freely. Also, check that the housing plate is not warped from impact and is sealed evenly.
Proactive Maintenance: Keeping Your Shark Rotator Clean Between Deep Cleans
You shouldn’t wait for a dramatic drop in performance to clean. A little light maintenance after each few uses makes the deep clean a breeze and maintains consistent power.
The Post-Cleanup Routine (2 Minutes)
After vacuuming a particularly dusty room or a pet hair nightmare, take 60 seconds to:
- Empty the Canister: Don’t wait until the “full” line. Dump it after every use or every other use. Tap it out and wipe the rim with a dry cloth to prevent dust from caking on the seal.
- Check the Brush Roll: Flip the vacuum over and use your fingers or pliers to quickly remove any hair or fibers visibly wrapped around the brush roll. This prevents matting and strain on the motor.
- Wipe the Exterior: A quick wipe-down of the body and handle with a dry microfiber cloth prevents dust accumulation and keeps it looking sharp.
Monthly Filter Check
Get in the habit of checking your pre-motor filters once a month. If they look visibly gray or dark, it’s time for their wash cycle. Remember, washing them is part of maintenance, not a fix for a clogged vacuum. They should be washed with water, no chemicals, and dried completely.
Seasonal Deep Hose Inspection
Every 3-4 months, disconnect the hose and visually inspect its entire length with a flashlight. Look for any nicks, tears, or areas where the internal plastic spiral might be broken, causing collapses. A damaged hose needs replacement to restore full airflow.
Storage Best Practices
Store your Shark Rotator in a cool, dry place. Avoid garages or basements with extreme temperature swings or high humidity, which can promote mold on damp filters. Store it upright with the wand and attachments secured. Never wrap the hose tightly around the canister for long-term storage; this can create kinks. Use the included hose hook or a separate hanger.
When Things Go Wrong: Diagnosing Persistent Problems
Even with perfect cleaning, occasionally issues arise. Here’s how to diagnose them.
“I Cleaned Everything, But Suction is Still Weak!”
If you’ve verified all parts are clean, dry, and reassembled correctly, the problem may lie elsewhere. Check the post-motor HEPA filter (if your model has one—it’s usually located near the exhaust). This filter is not washable and needs replacement every 6-12 months. A clogged HEPA filter will strangle exhaust airflow, making the vacuum feel weak. Also, inspect the internal exhaust hose (the small hose that runs from the motor to the canister) for blockages. Finally, a failing motor or a severely clogged cyclonic chamber (beyond what you can see) could be the issue, requiring professional service.
Stubborn Odors That Won’t Quit
If a musty smell persists after a full clean, the culprit is likely mold or mildew in a part that stayed damp. Re-isolate the culprit: Remove all filters and let them dry in direct sunlight for a day (UV light kills mold spores). Wash the canister again with a solution of 1 part white vinegar to 4 parts water. The vinegar will neutralize odors. Ensure every nook is bone-dry before reassembling. If the smell is from the brush roll (e.g., from wet pet hair), remove the brush roll and bake it in the sun for a few hours.
Brush Roll Still Not Spinning
Double-check the drive belt. On many Shark Rotators, it’s a stretch belt that can slip off or lose tension. With the vacuum upside down, try to turn the brush roll by hand. It should have slight resistance. If it spins freely, the belt is likely broken or not engaged. You may need to replace the belt (part number is in your manual). Also, check the motor pulley for any debris or a melted belt fragment stuck to it.
The Final Word: Your Investment in Clean Air and Longevity
Cleaning your Shark Rotator canister vacuum is one of the most impactful things you can do for your home’s hygiene and your appliance’s health. It’s not a glamorous chore, but the rewards are immediate: that powerful “whoosh” of suction returns, lingering odors vanish, and you’ll notice your carpets and floors look fresher because the vacuum is actually picking up the fine, embedded dust it was designed to capture. By following this structured guide—safety first, methodical disassembly, gentle but thorough cleaning, and meticulous drying—you transform a daunting task into a manageable, quarterly ritual. You protect the motor from dust overload, extend the life of expensive filters, and ensure your Shark Rotator remains the reliable workhorse you invested in. Remember, a clean vacuum doesn’t just clean your floors better; it contributes to cleaner air in your home, which is especially crucial for allergy sufferers. So, roll up your sleeves, put on some music, and give your Shark the spa day it deserves. Your floors—and your vacuum—will thank you.
Frequently Asked Questions
How often should I deep clean my Shark Rotator canister?
For optimal performance, perform a full deep clean as outlined in this guide every 1-2 months, depending on your usage. If you have pets, vacuum high-traffic areas daily, or deal with a lot of fine dust, aim for the monthly schedule. Light maintenance (emptying, quick brush roll check) should happen after every few uses.
Can I put the Shark Rotator canister or hose in the dishwasher?
No. The high heat and harsh detergents in dishwashers can warp the plastic canister, degrade the hose material, and damage seals. Always wash all plastic parts by hand with warm, soapy water and a soft cloth or brush, then air-dry completely.
My pre-motor filters are washable, but what about the HEPA filter? Can I clean that too?
No. The post-motor HEPA filter is a non-washable, disposable filter. Attempting to wash it will destroy its delicate media and render it useless. You should only tap out loose debris and replace it according to the manufacturer’s schedule, typically every 6-12 months, or when it becomes visibly dark and clogged.
How can I prevent bad odors from developing in my Shark Rotator?
Prevent odors by always ensuring the canister, filters, and hose are completely dry before reassembly. Empty the canister after every use. If you vacuum up damp or smelly debris (like pet accidents), immediately wash the canister and hose with a vinegar-water solution. Let all parts air-dry in sunlight, which helps kill odor-causing bacteria.
Is it safe to use compressed air to clean out the hose and ports?
Use extreme caution. A low-pressure blast from a can of compressed air (used in short bursts) can be okay for clearing a simple clog from a hose. However, never use a high-pressure air compressor, as it can damage the internal plastic spiral of the hose or blow debris deeper into the vacuum’s motor system. A flexible brush or carefully running water through the hose is safer and more effective.
I cleaned everything according to the guide, but my vacuum still has no suction. What now?
First, double-check that all filters are 100% dry and installed correctly. Next, ensure the canister lid is sealed tightly and the hose is clicked securely at both ends. If suction is still absent, inspect the exhaust port (where air blows out) for blockages. Finally, a failed motor or a severely clogged internal cyclonic chamber (beyond user-serviceable areas) may require contacting Shark Customer Support or a professional repair service.