Changing the belt on your Shark Navigator vacuum is a simple, do-it-yourself repair that restores powerful suction and prevents motor damage. This guide provides clear, model-specific instructions for the most common Navigator series. You’ll learn exactly how to access the brush roll, remove the old belt, install the new one correctly, and reassemble your machine safely. With the right replacement belt and about 15 minutes, you can have your vacuum working like new again.
Is your Shark Navigator vacuum suddenly quiet? Has its powerful agitation on carpets vanished, leaving dirt and pet hair behind? Before you panic and search for a replacement vacuum, take a deep breath. The most common culprit is a worn-out, stretched, or broken drive belt. This critical rubber band connects the vacuum’s motor to the brush roll, giving it the spinning power needed to deep-clean carpets. Replacing it is one of the most frequent and straightforward repairs for this iconic machine. This complete guide will walk you through every single step, from identifying the correct part to finishing the job with confidence. We’ll cover the nuances for different Navigator models, offer pro tips to avoid common pitfalls, and ensure your vacuum is back to its formidable self. Let’s get your Shark Navigator roaring again.
Key Takeaways
- Safety First: Always unplug your Shark Navigator and ensure the brush roll is completely stopped before beginning any repair to prevent injury.
- Model Matters: The exact belt part number (like 112F or 121F) depends on your specific Shark Navigator model (e.g., Lift-Away, Rotator, NV350, NV356, NV352). Always verify before purchasing.
- Access is Key: The primary access point for the belt and brush roll is almost always through the underside of the vacuum’s floor head. You must lay the machine on its back.
- Inspect & Clean: While the belt is off, this is the perfect time to thoroughly clean the brush roll bearings and remove any hair or debris wrapped around the bristles.
- Proper Alignment: The new belt must be seated correctly on both the motor pulley and the brush roll spindle. A misaligned belt will slip, break quickly, or not spin the brush roll at all.
- Test Before Full Reassembly: Briefly reattach the powerhead and run the vacuum (with the brush roll off the floor) to confirm the brush roll spins freely and the belt isn’t rubbing incorrectly.
- Regular Maintenance: Changing the belt every 6-12 months, or if you notice a loss of agitation/suction, is a critical part of Shark Navigator upkeep to ensure optimal performance.
📑 Table of Contents
- Understanding Your Shark Navigator’s Drive Belt
- Identifying Your Model and Sourcing the Correct Replacement Belt
- Tools and Preparation for the Repair
- Step-by-Step Guide: Removing the Old Belt and Brush Roll
- Step-by-Step Guide: Installing the New Belt and Reassembly
- Model-Specific Considerations and Troubleshooting
- Ongoing Maintenance and When to Replace Other Parts
- Conclusion: Enjoy the Renewed Power of Your Shark Navigator
Understanding Your Shark Navigator’s Drive Belt
Before we grab a screwdriver, it’s helpful to understand what we’re dealing with. The drive belt in your Shark Navigator is not just a simple loop of rubber. It’s a critical component designed to transfer rotational force from the vacuum’s motor shaft, through a pulley system, to the brush roll. When the vacuum is in carpet mode, this belt engages and spins the brush roll at high speed. The bristles then agitate the carpet fibers, lifting embedded dirt and hair so the suction can pull it away. Over time, this constant tension, heat, and friction cause the belt to stretch, develop cracks, or even snap. A failing belt will often make a high-pitched squealing noise, or more commonly, the brush roll will simply stop spinning while the suction remains, giving the illusion that the vacuum is still working but leaving your carpets noticeably dirtier.
The Role of the Belt in Your Vacuum’s Performance
The belt’s health directly dictates the cleaning efficacy on carpets and rugs. On hard floors, the brush roll is often disengaged, so a bad belt might go unnoticed. But on any fibrous surface, a non-spinning brush roll means you’re only getting surface-level suction, not a deep clean. Furthermore, a broken or severely stretched belt can slip off its pulleys and become tangled inside the brush roll housing, potentially causing jams or even damage to the motor if it’s forced to work against excessive resistance. Recognizing the signs of belt failure—loss of agitation, a burning rubber smell, or visible cracks—is the first step in this repair journey.
Identifying Your Model and Sourcing the Correct Replacement Belt
This is the most crucial step to ensure success. Shark has produced many iterations of the Navigator over the years, and they do not all use the same belt. Using an incorrect belt can lead to poor fitment, premature failure, or even damage. The belt’s part number is typically printed on the old belt itself. If it’s broken, you’ll need to identify your vacuum’s exact model number.

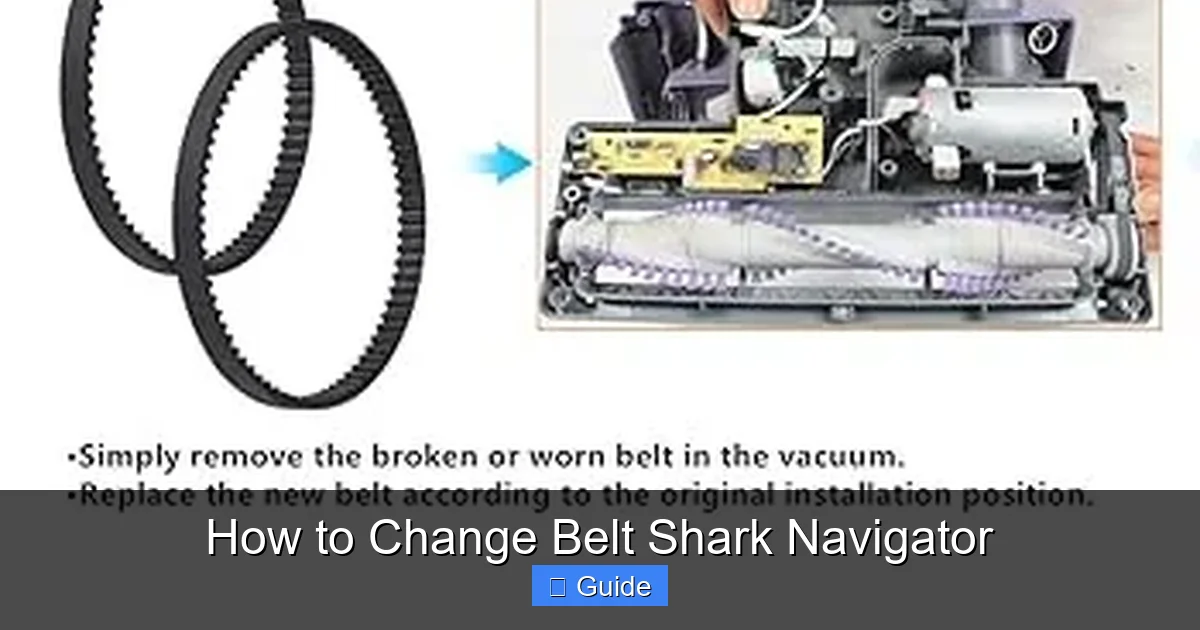
Visual guide about How to Change Belt Shark Navigator
Image source: sharkvacuum.blog
Where to Find Your Shark Navigator Model Number
Turn your vacuum over. The model number is usually located on a sticker on the back or bottom of the main canister body, or sometimes on the powerhead. It will start with letters like “NV,” “N,” “Z,” or “HV” followed by numbers (e.g., NV352, NV356, HV322, ZS351). Write this down exactly. You can also often find it on the original manual or box.
Common Shark Navigator Belt Part Numbers
While new models emerge, some of the most prevalent part numbers for older Navigator Lift-Away and Rotator models include:
- Shark Belt 112F: Fits many NV300 series models (NV350, NV352, NV355, NV356, NV357, NV360). It’s a flat, ribbed belt, approximately 11.5 inches long.
- Shark Belt 121F: Fits some earlier Navigator Lift-Away models and certain Rotator variants. It is also a flat, ribbed design but may have different dimensions.
- Shark Belt 116F: Used in some newer Navigator and Rotator models.
Pro Tip: The absolute best practice is to remove the old belt first and compare it physically to a new one at a store, or match its length and rib pattern online using your exact model number as the search term on Shark’s official website, Amazon, or a reputable appliance parts site like PartSelect or VacuumParts.com. Never guess.
Tools and Preparation for the Repair
With the correct new belt in hand, gather your tools. The good news is that for the vast majority of Shark Navigator models, you need nothing more than a Phillips-head screwdriver and possibly a flat-head screwdriver or putty knife for stubborn clips. No special tools, no torque wrenches. However, preparation is key to a smooth process.
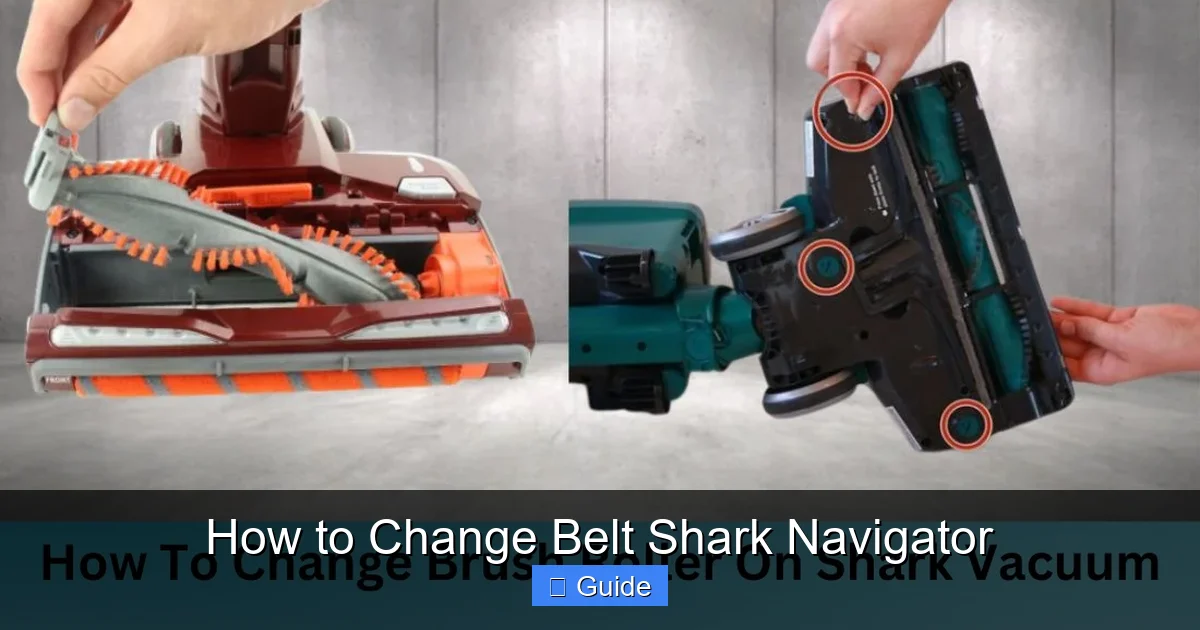
Visual guide about How to Change Belt Shark Navigator
Image source: m.media-amazon.com
Essential Tools
- Phillips-head screwdriver: The #2 size is most common for the screws securing the brush roll housing.
- Replacement Shark Navigator Belt: Verified for your model.
- Clean rag or cloth: For cleaning debris.
- Needle-nose pliers (optional): Helpful for removing hair from brush roll bearings.
- Small container (optional): To hold screws so they don’t get lost.
Workspace and Safety Setup
Find a clean, well-lit area with enough floor space to lay the vacuum on its back. A large towel or cardboard on the floor can protect your vacuum’s finish. Most importantly, unplug the vacuum from the wall outlet. This is non-negotiable. The brush roll can still be engaged if the vacuum is accidentally turned on during disassembly, which could cause serious injury. Once unplugged, move the suction/brush roll switch to the “Floor/Carpet” position. This ensures the belt is engaged on the motor pulley, which is how it will be accessed.
Step-by-Step Guide: Removing the Old Belt and Brush Roll
Now, the core of the operation. We’ll walk through the standard process for the classic Shark Navigator Lift-Away design. While clip locations may vary slightly, the fundamental sequence is nearly identical across the lineup.
Visual guide about How to Change Belt Shark Navigator
Image source: sharkvacuum.blog
Step 1: Access the Brush Roll Housing
Lay your Shark Navigator upright on its back, so the underside of the floor head (the part that touches your floor) is facing up. You’ll see the brush roll—a cylindrical roller with red or black bristles—running the width of the vacuum head. It is covered by a gray or black plastic housing. This housing is secured by either screws or plastic clips. Look for 4-6 Phillips-head screws around the perimeter of the housing. They are often hidden under small plastic caps or at the very front edge. Use your screwdriver to remove all of them. If you don’t see screws, look for plastic locking tabs along the sides or back. These typically require you to pry them open gently with a flat-head screwdriver or your fingernail. Set all screws aside in your container.
Step 2: Remove the Brush Roll Assembly
Once all screws are removed or clips are disengaged, carefully lift the plastic brush roll housing off. The brush roll itself will be sitting inside, held in place by two plastic end caps that fit into slots. You can now lift the entire brush roll assembly straight up and out of the housing. Be gentle; the plastic end caps can be brittle on older models. As you lift, you will see the old drive belt wrapped around the metal gear on one end of the brush roll and likely still attached to the motor pulley underneath.
Step 3: Detach the Old Belt
With the brush roll out, the belt is easy to remove. Simply stretch it and slide it off the brush roll’s metal gear spindle. Then, reach into the cavity where the brush roll was and slide the belt off the small rubber or plastic motor pulley. The old belt is now free. Inspect it: You’ll likely see cracks, glazing, or stretching. This confirms the diagnosis.
Step 4: Clean the Area Thoroughly
Before installing the new belt, this is a golden opportunity. Use your rag to wipe out any accumulated dust, hair, and debris from inside the brush roll housing, the motor pulley area, and the brush roll itself. Use needle-nose pliers to meticulously pull any hair or carpet fibers out of the brush roll bearings (the plastic caps on each end). A clean brush roll spins more freely, runs cooler, and puts less strain on the new belt and motor.
Step-by-Step Guide: Installing the New Belt and Reassembly
Installation is the reverse process, but alignment is critical. Rushing here is the main cause of a repair that doesn’t work.
Step 5: Connect the Belt to the Brush Roll
Take your new, correct Shark Navigator belt. It is a non-ribbed, smooth rubber loop. Stretch it slightly and hook it onto the metal gear spindle on the brush roll. It should fit snugly. Give it a gentle tug to ensure it’s seated properly and won’t slip off.
Step 6: Position the Brush Roll and Engage the Belt on the Motor Pulley
This is the trickiest part. You must now get the brush roll, with the belt already on its gear, back into the vacuum’s housing and simultaneously stretch the belt to slip it onto the motor pulley. Here’s the pro method:
- Look into the cavity where the brush roll sits. You’ll see the motor pulley—a small wheel, often black rubber or plastic, mounted on the motor shaft.
- Take the brush roll (with belt on) and angle it into the housing so one end cap slides into its slot first.
- As you lower the other end, use your other hand to gently stretch the belt and guide it onto the motor pulley. You may need to rotate the brush roll slightly to help the belt find its groove on the pulley.
- You should feel a slight resistance as the belt stretches over the pulley. Ensure it is fully seated and not twisted.
Critical Check: The belt should be perfectly straight, running parallel to the brush roll. It should not be twisted. Once both ends of the brush roll are seated in their slots, the belt should be taut and properly aligned on both pulleys.
Step 7: Reattach the Brush Roll Housing
Now, carefully lower the plastic brush roll housing cover back down over the brush roll assembly. It should fit perfectly. Reinsert all the screws you removed earlier and tighten them securely, but do not over-tighten and crack the plastic. If your model uses clips, press firmly around the edges until you hear/feel them click into place.
Step 8: The All-Important Test
Before you stand the vacuum up and put everything away, do a quick test. Plug the vacuum back in. Turn it on and immediately tilt it so the brush roll is off the floor. Look at the underside. You should see the brush roll spinning vigorously and smoothly. The belt should be moving without wobbling or slipping. Listen—there should be no squealing or grinding noises. If the brush roll doesn’t spin, the belt is likely not on the motor pulley correctly. Unplug, reassess, and try Step 6 again. If it spins but seems sluggish, check for obstructions or a misalignment.
Model-Specific Considerations and Troubleshooting
While the above guide covers ~80% of Shark Navigator models, some variations exist. Knowing these can save you frustration.
Shark Navigator Lift-Away (NV350, NV356, etc.)
This is the classic design we described. The brush roll housing is accessed from the bottom with 4-6 screws. The belt is a simple, flat 112F-style loop. The process is exactly as outlined.
Shark Navigator with “Self-Cleaning” Brush Roll
Some newer Navigators advertise a self-cleaning brush roll. The access procedure is often the same (screws on the underside), but the brush roll itself may have a different design—often a rubber-tipped or comb-like bristle pattern that claims to not wrap with hair. The belt replacement process remains identical. The cleaning step is even more important here, as debris can still jam the rubber blades.
Shark Navigator Professional / NV500 Series
These models sometimes have a more integrated powerhead. Access might still be from the bottom, but the screws can be in slightly different locations. The key is always to remove the entire brush roll housing assembly to free the brush roll. Consult your user manual if available, but the fundamental “remove housing, lift out brush roll, replace belt” logic applies.
Troubleshooting: Brush Roll Won’t Spin After Reassembly
If your test shows a stationary brush roll:
- Belt Not on Motor Pulley: This is #1 cause. Unplug, remove housing, and re-seat the belt on the small motor pulley.
- Belt is Twisted: A twisted belt will bind. Remove it and reinstall, ensuring it’s not rotated.
- Belt is Too Loose/Tight: If using a non-OEM belt, it might be the wrong size. It must be snug.
- Obstruction: A piece of carpet or plastic could be jamming the brush roll. Remove housing and check.
Ongoing Maintenance and When to Replace Other Parts
Changing the belt is the perfect time to perform other basic maintenance that will extend your Shark Navigator’s life and performance.
Brush Roll Care
As mentioned, clean the bristles and bearings every time you change the belt. If the bristles themselves are melted, scorched, or severely matted, consider replacing the entire brush roll assembly. A new brush roll with a new belt is a fantastic performance upgrade. Shark Navigator brush rolls are also widely available by model number.
Checking Filters
Your vacuum has multiple filters: a foam filter (washable) inside the dust cup, and one or two HEPA filters (often not washable). While you have the vacuum apart, check these. A clogged filter reduces suction dramatically and puts extra strain on the motor. Wash the foam filter with cold water, let it dry completely for 24 hours before reinserting. Tap out debris from the HEPA filters and replace them according to the manual’s schedule (usually every 3-6 months).
Dust Cup and Hoses
Empty the dust cup completely. Wipe it out. Check the hose that connects the powerhead to the canister for any blockages. A clear air path is essential for suction. Use a long, flexible brush to clean the hose if needed.
How Often Should You Change the Belt?
There’s no universal mileage, but as a rule of thumb, change your Shark Navigator belt:
- Every 6-12 months with regular use (several times a week).
- Immediately if you notice the brush roll has stopped spinning.
- If you see visible cracks, glazing, or stretching on the belt.
- After a major ingestion incident (e.g., a sock, large hairball) that could have stressed the belt.
Preventive replacement is cheaper and easier than dealing with a broken belt that wraps itself inside the machine.
Conclusion: Enjoy the Renewed Power of Your Shark Navigator
Congratulations! You have successfully navigated the repair of your Shark Navigator’s drive belt. By following this structured approach—identifying the correct part, preparing your workspace, methodically removing the old components, and meticulously installing the new belt—you’ve not only saved a significant amount of money but also gained a deeper understanding of your vacuum cleaner. This simple maintenance task is the single most effective way to restore its original cleaning power on carpets. Remember, a vacuum with a healthy belt and a clean brush roll is a vacuum that works efficiently, protects its motor from unnecessary strain, and keeps your home truly clean. Bookmark this guide for future reference. Now, plug it in, run it over your living room rug, and bask in the satisfying sound of a brush roll spinning at full speed. You’ve earned it. Your Shark Navigator is back in the fight.
Frequently Asked Questions
What happens if I use the wrong size Shark Navigator belt?
Using an incorrect belt will cause problems. A belt that’s too loose will slip and not spin the brush roll. A belt that’s too tight will put excessive strain on the motor bearings and the brush roll bearings, causing premature wear and potential failure. Always use the exact part number for your model.
How can I tell if my Shark Navigator belt is broken without taking it apart?
The most common sign is that the vacuum seems to have good suction but does not agitate or pick up debris from carpets. You can also lay the vacuum on its back, turn it on, and watch the brush roll. If it’s not spinning while the vacuum is on and the floor/brush roll switch is set to “Carpet,” the belt is likely broken, stretched, or has slipped off.
My brush roll spins, but the vacuum still isn’t cleaning well on carpet. Is it the belt?
Possibly, but it could also be a severely worn or clogged brush roll. If the bristles are short, melted, or packed with hair, they won’t agitate effectively even if spinning. After changing the belt, thoroughly clean or replace the brush roll if it’s in poor condition. Also, check your filters—clogged filters drastically reduce suction.
Can I change the belt on a Shark Navigator without any tools?
For most models, no. The brush roll housing is secured with screws that require a Phillips-head screwdriver. Some newer models use more clips, but you’ll still likely need a flat-head screwdriver or your fingernails to release them. Having the proper screwdriver is essential.
Where is the best place to buy a genuine Shark Navigator belt?
The most reliable sources are the official Shark website (using your model number), major retailers like Amazon or Walmart (ensure the seller is Shark or a reputable parts dealer), or dedicated appliance parts websites like PartSelect or VacuumParts.com. Be wary of generic “fits all” belts on marketplaces; they are often the wrong size or made of inferior rubber that fails quickly.
My new belt keeps slipping off the motor pulley. What am I doing wrong?
This is almost always an alignment issue. Ensure the brush roll is seated fully and evenly in its slots on both ends. The belt must be straight, not twisted. When installing, make sure the belt is fully seated on the motor pulley’s groove. Sometimes, a piece of debris or a worn plastic motor pulley can cause slippage. Clean the pulley thoroughly and inspect it for smoothness.